1.2 Interface introduction
1.2.1 Interface introduction
The WCC system root interface window is mainly composed of three areas: ① the left menu bar, ② the upper status bar, and ③ the middle work area.
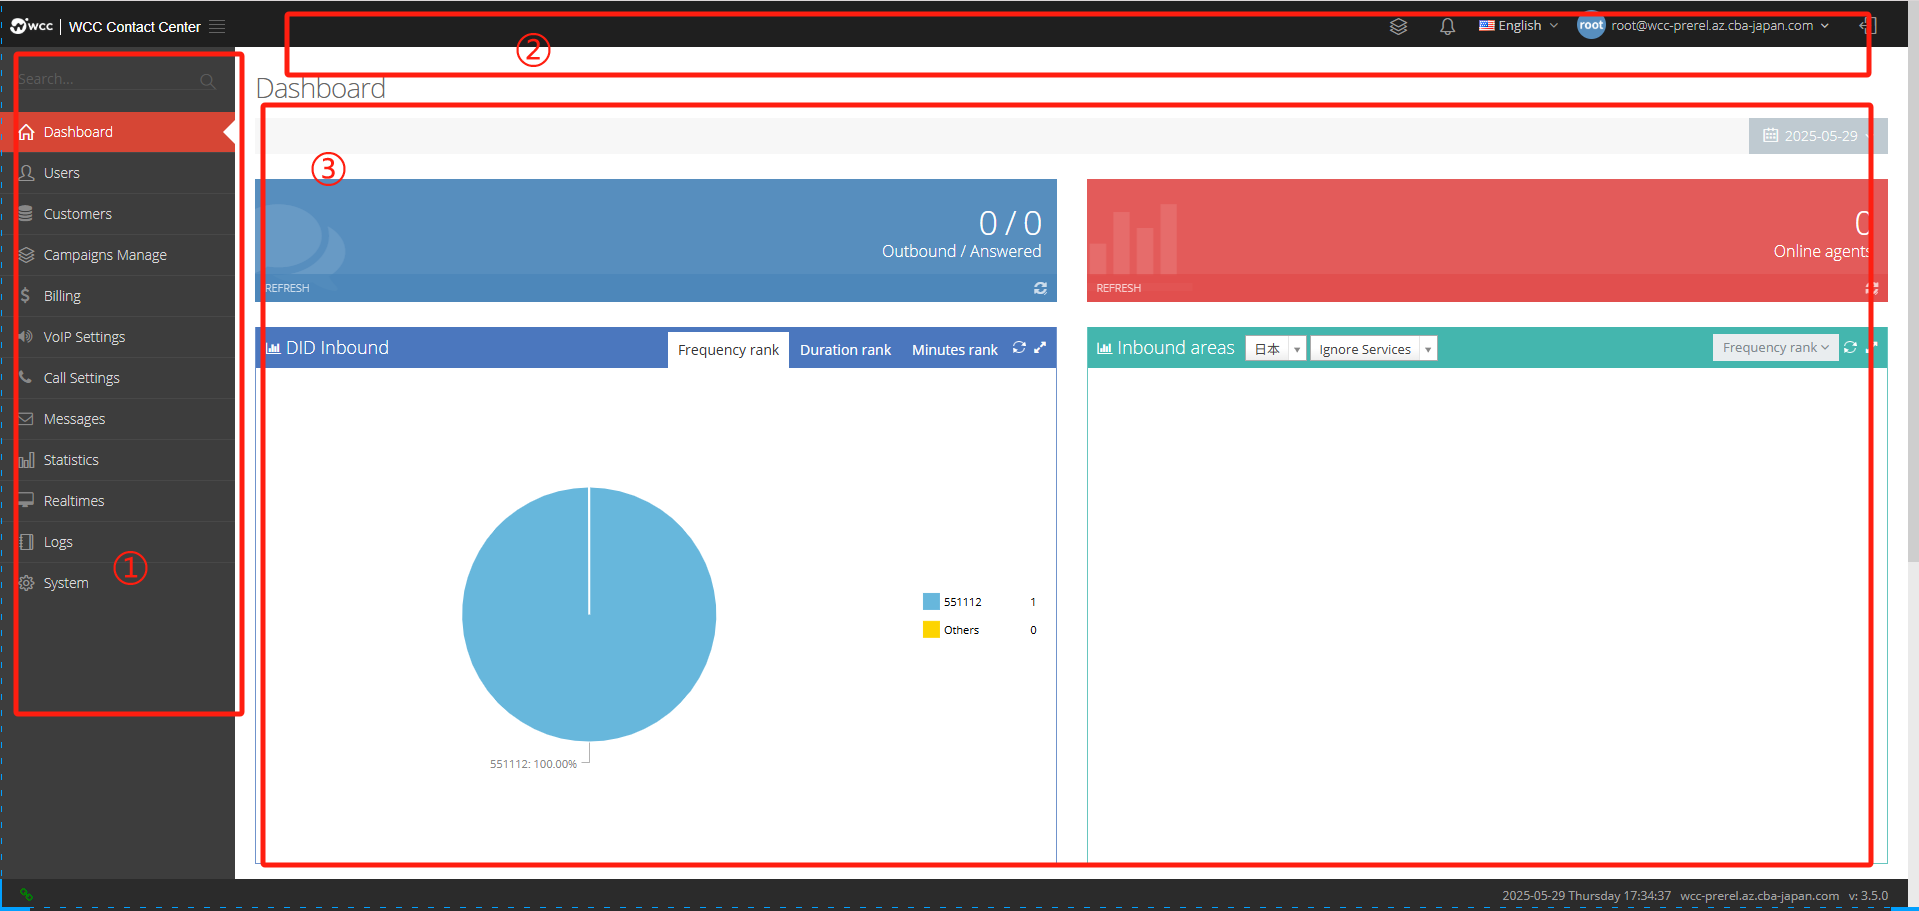
Menu Bar
a. Dashboard:
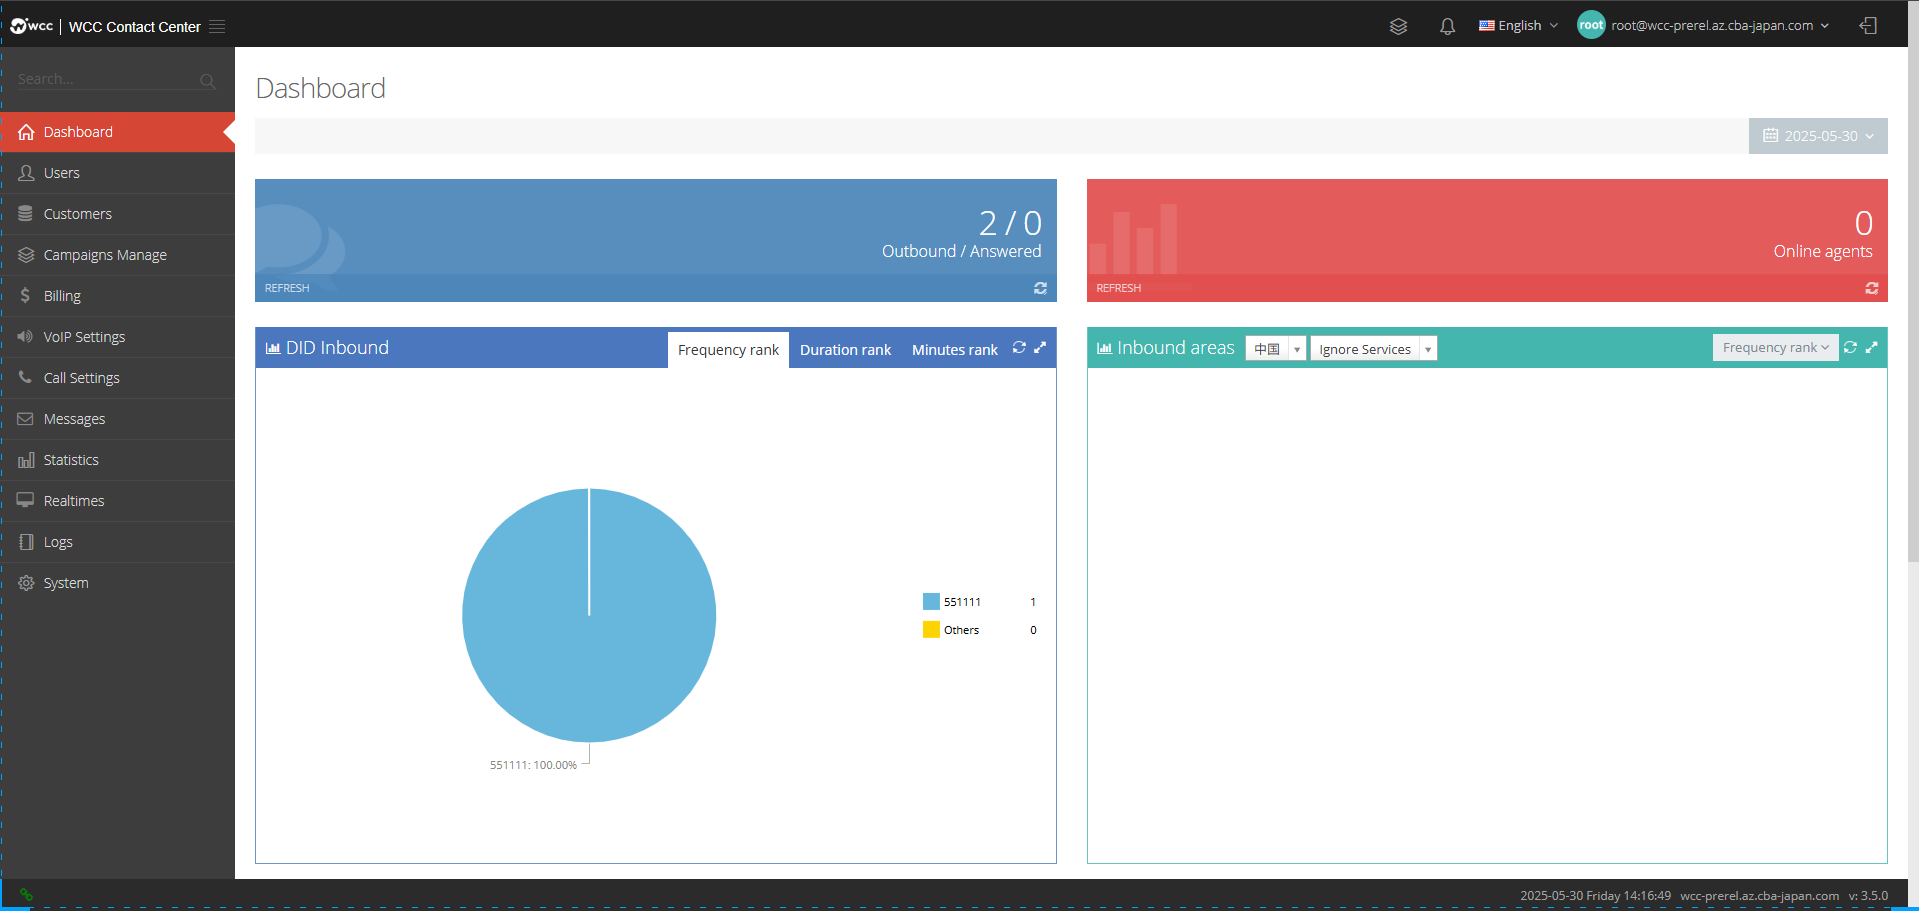
System users can view statistics on the dashboard: System users can view statistics on the dashboard: outbound/responsed, online proxy, DID inbound, inbound area and outbound area.
b. User:
Resellers:
Created by system users
Select [Add] to enter [General] to add proxy settings: (as shown below)
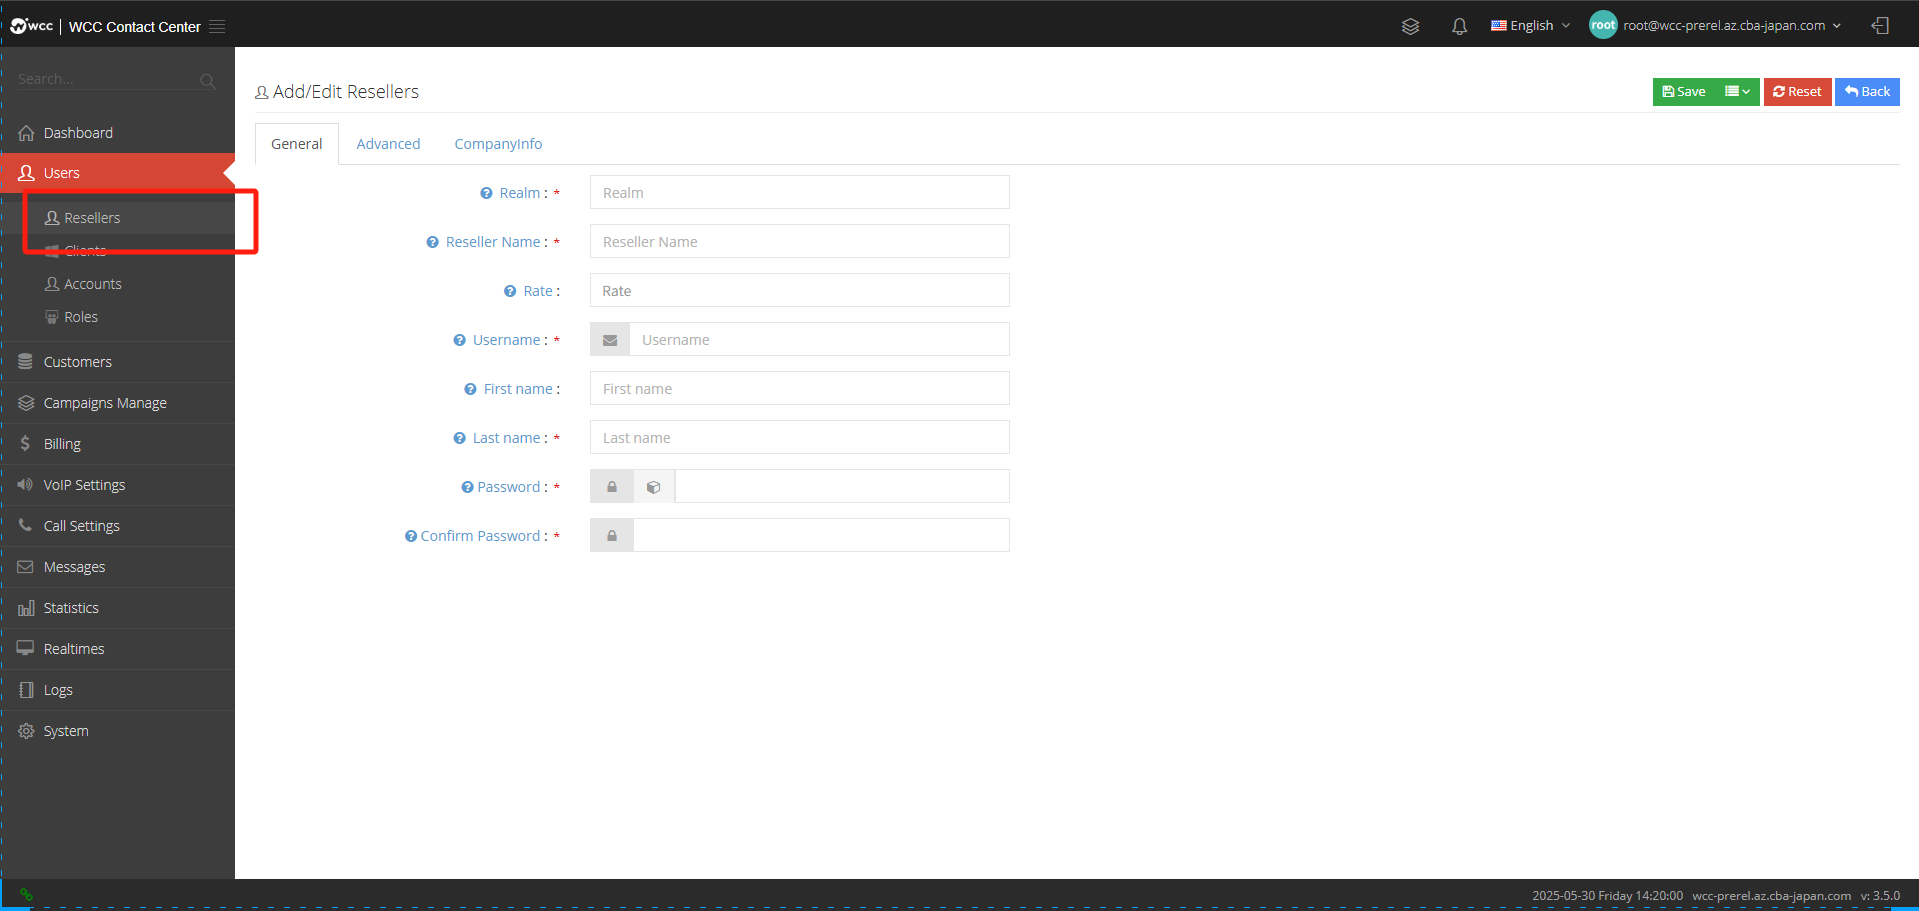
Realm: Each proxy user should have a unique domain name, and the domain name cannot be modified once it is set.
Reseller name: Please specify the name of the agent, and the name can be changed at any time.
Rate: Set the applicable rate range for the agent.
Username: The user will use this username to log in to the system.
First Name: Please fill in the name of the agent user.
Last Name: Please fill in the last name of the agent user.
Password: Fill in the user’s login password, and the user will use this password to log in to the system.
Confirm password: Confirm password again to ensure that the passwords are the same twice.
【Advanced】Settings:
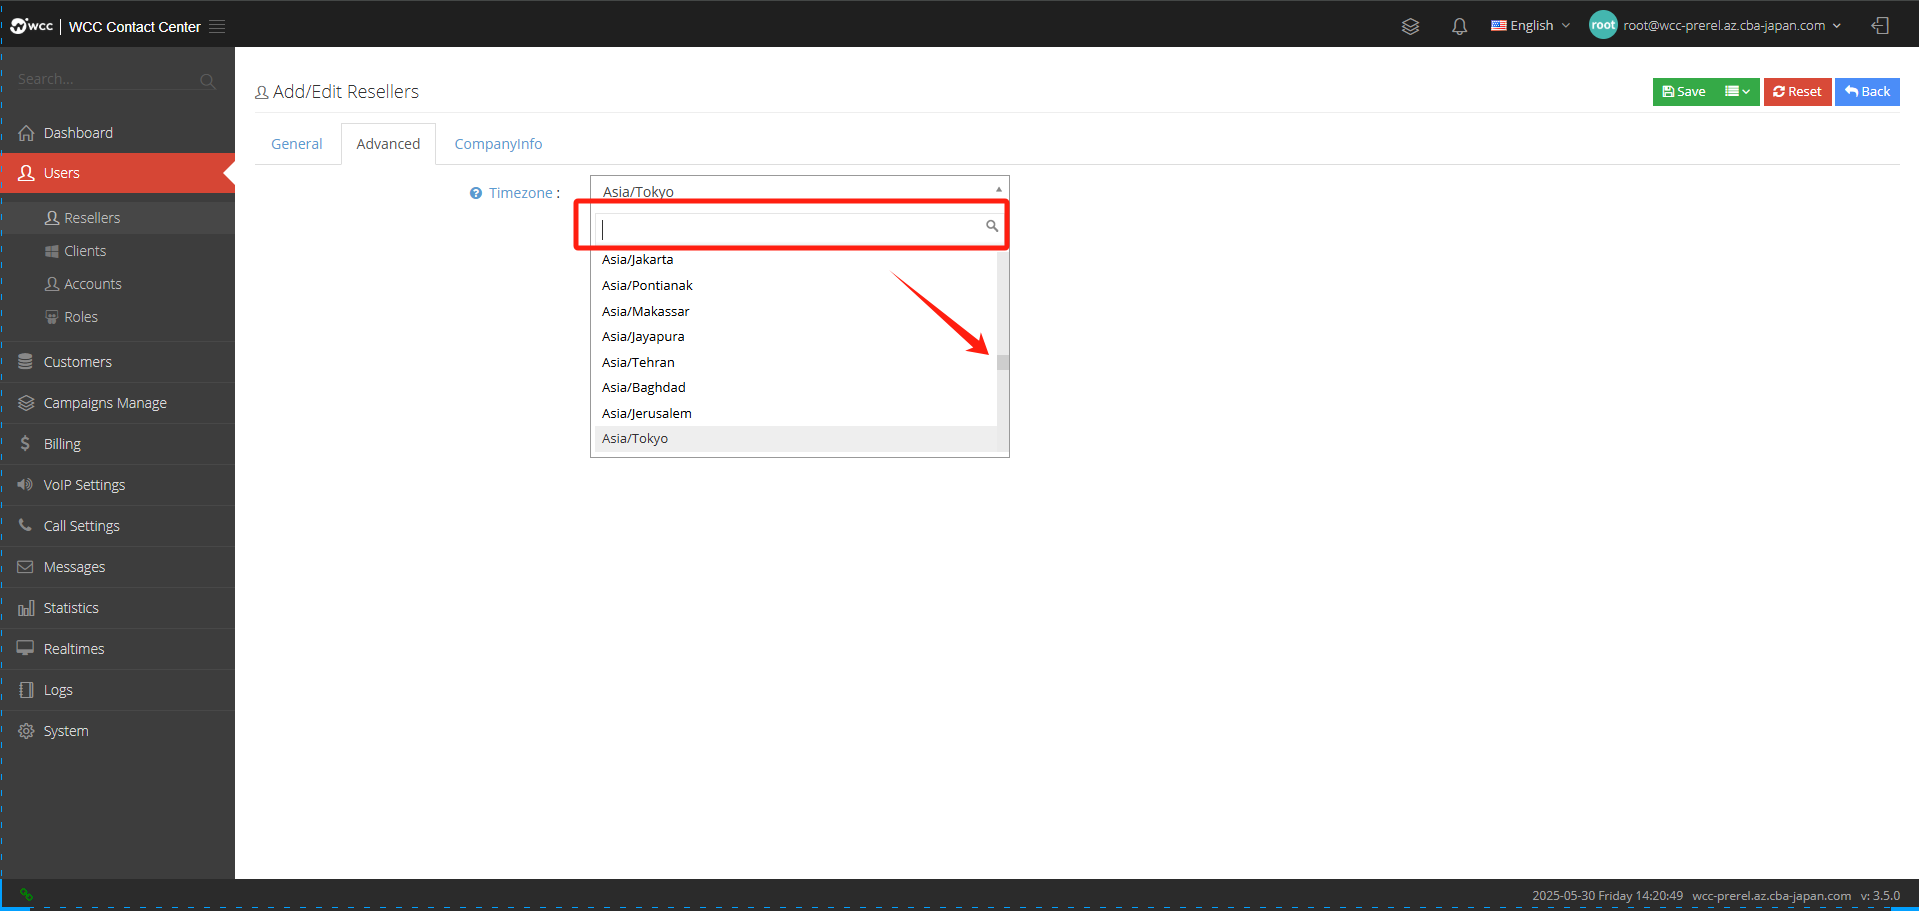
Time Zone: Please set the time zone for this proxy user.
[Companyinfo]: Basic edit of company information (as shown below)
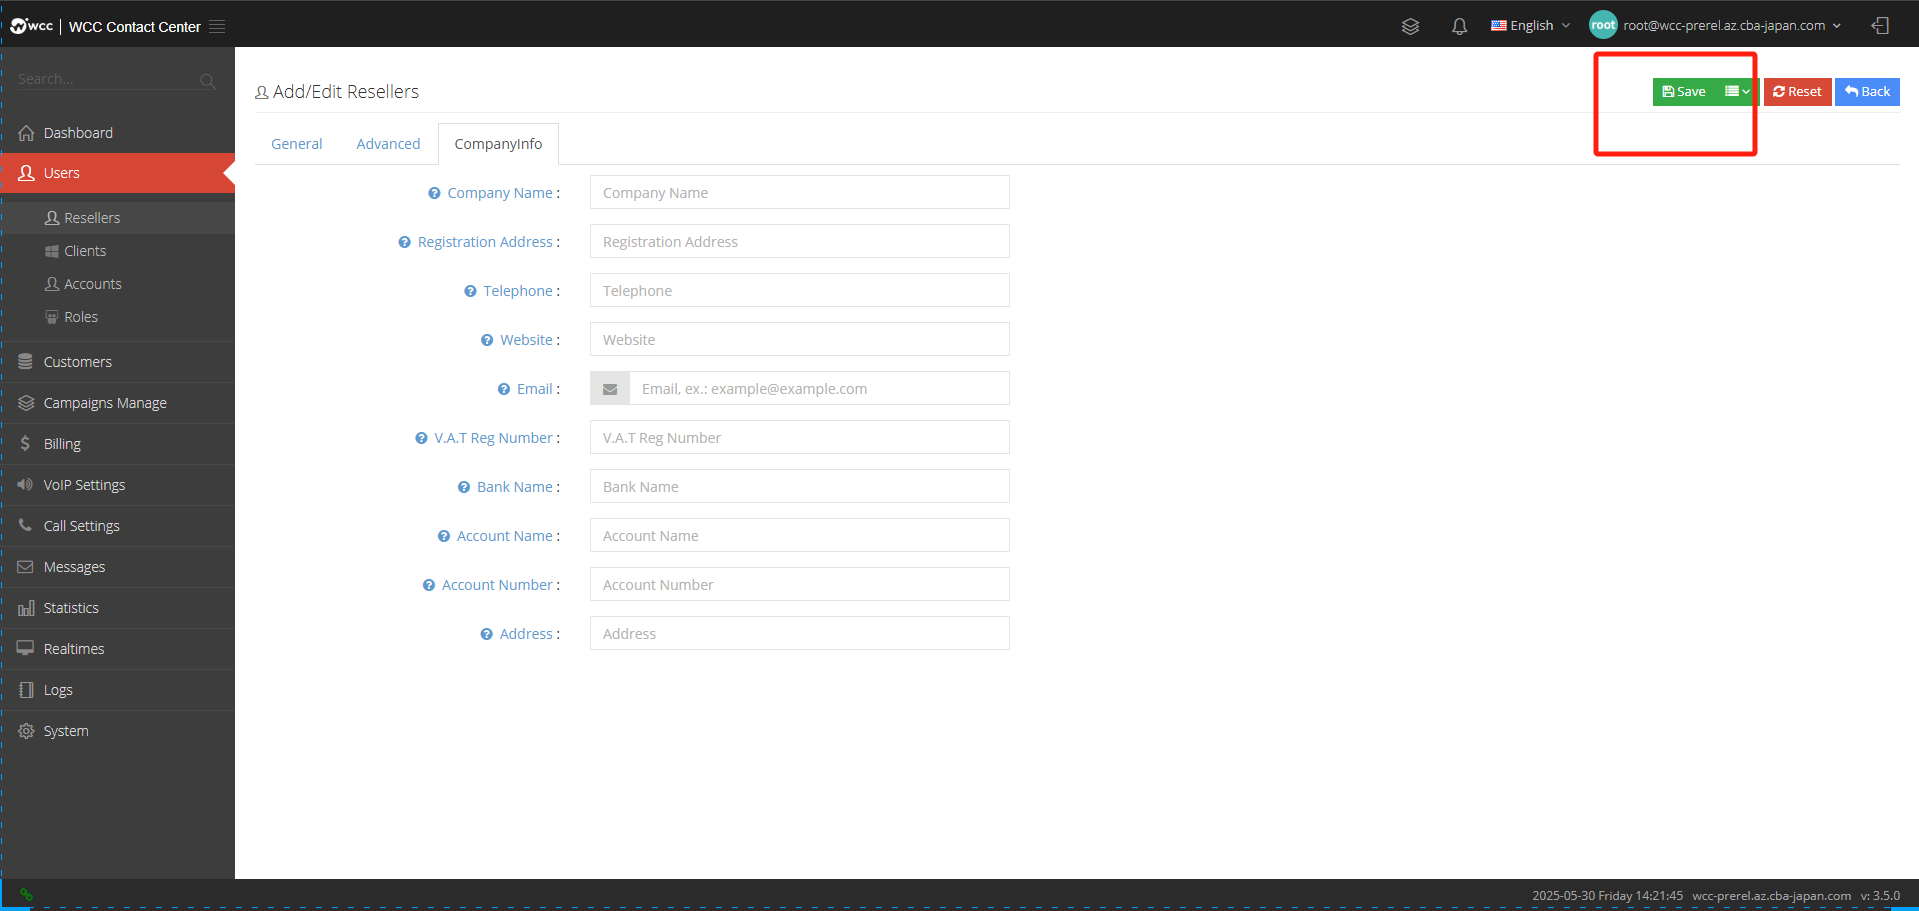
Company Name: Please fill in the name of this company.
Registered address: Please fill in the company’s registered address.
Contact number: Please fill in the contact number of this company.
Website: Please fill in the website of this company.
Email: Please fill in the company’s email address.
V.A.T Reg Name: Please fill in the company’s tax number.
Bank Name: Please fill in the account opening bank of this company.
Account Name: Please fill in the name of this account.
Account Number: Please fill in your account.
Address: Please fill in the office address.
Clients:
clients 用户是有代理商用户创建。代理商用户和系统用户在client页面可以删除/编辑/查看clients用户,也可以以某-client用户登陆。代理商用户在clients页面,页面列表显示的是当前代理商和当前代理商的账户已新建的Clients用户。系统用户在Cients用户页面,页面列表显示的是系统用户下所有的代理商用户和代理商账户已新建的Clients用户。

Account:
Accounts are used to manage users of the system, such as adding agents, querying reports, updating configurations, etc. By configuring different permission roles for the account, different accounts can have different functional permissions:
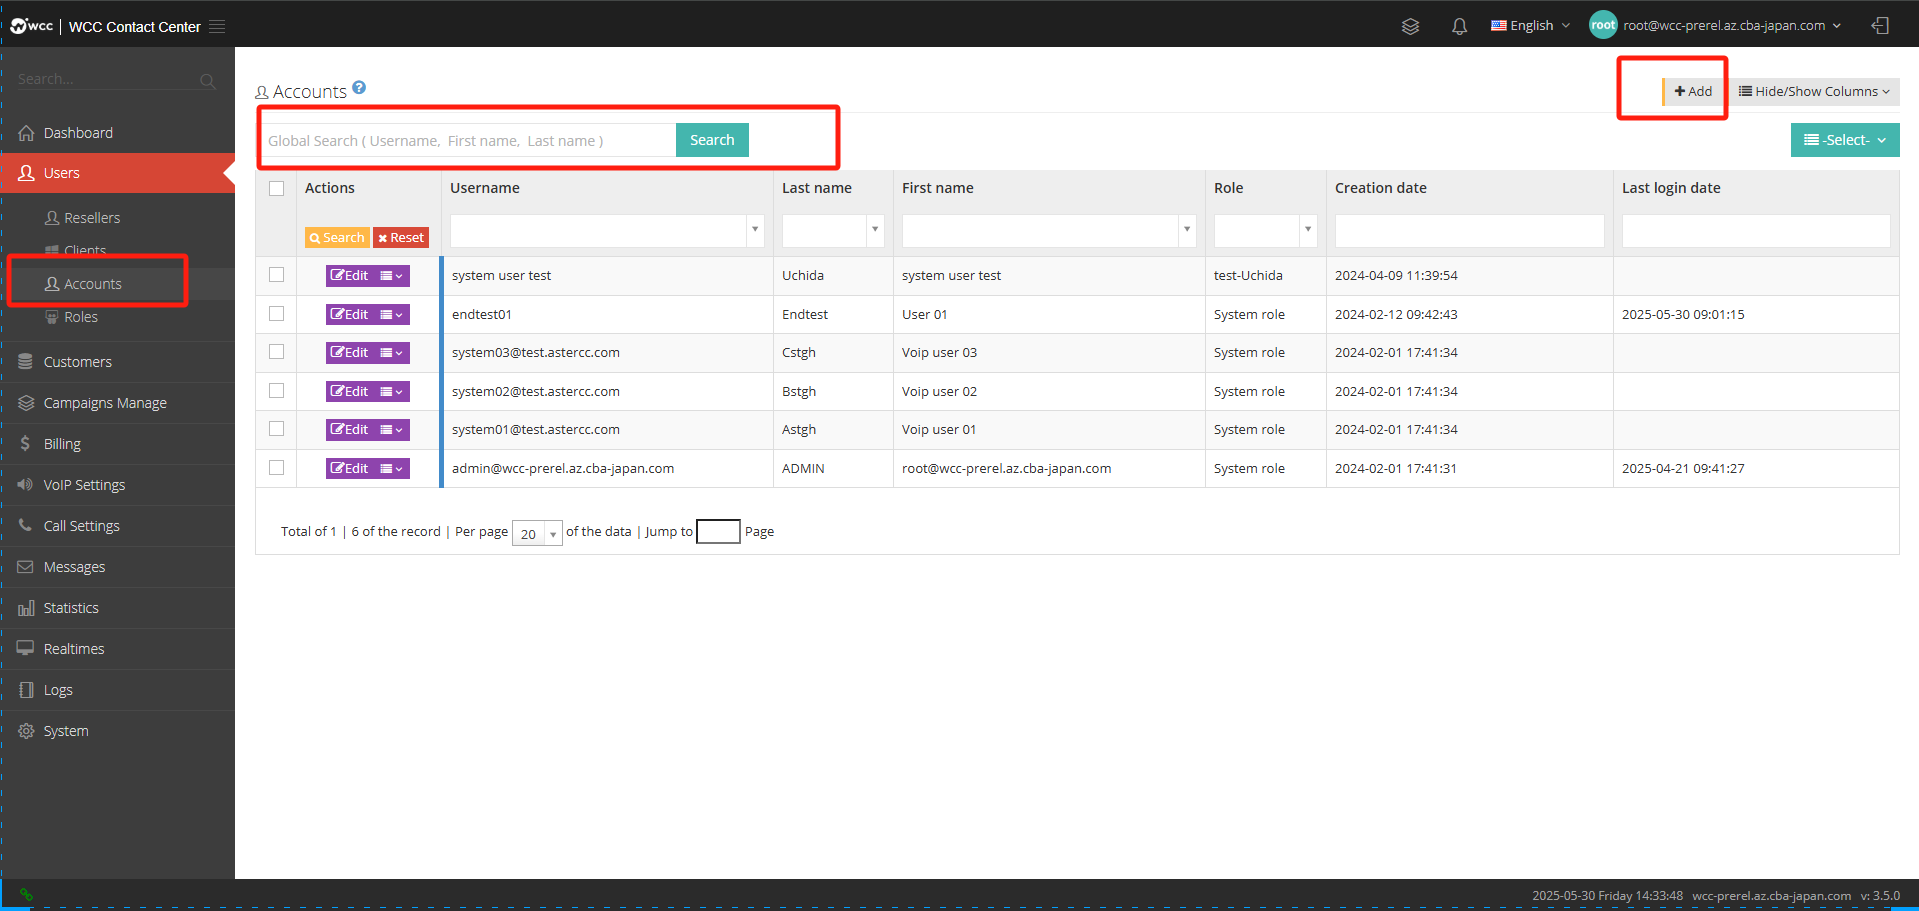
Select [Add] and enter [General] settings: (as shown in the figure below)
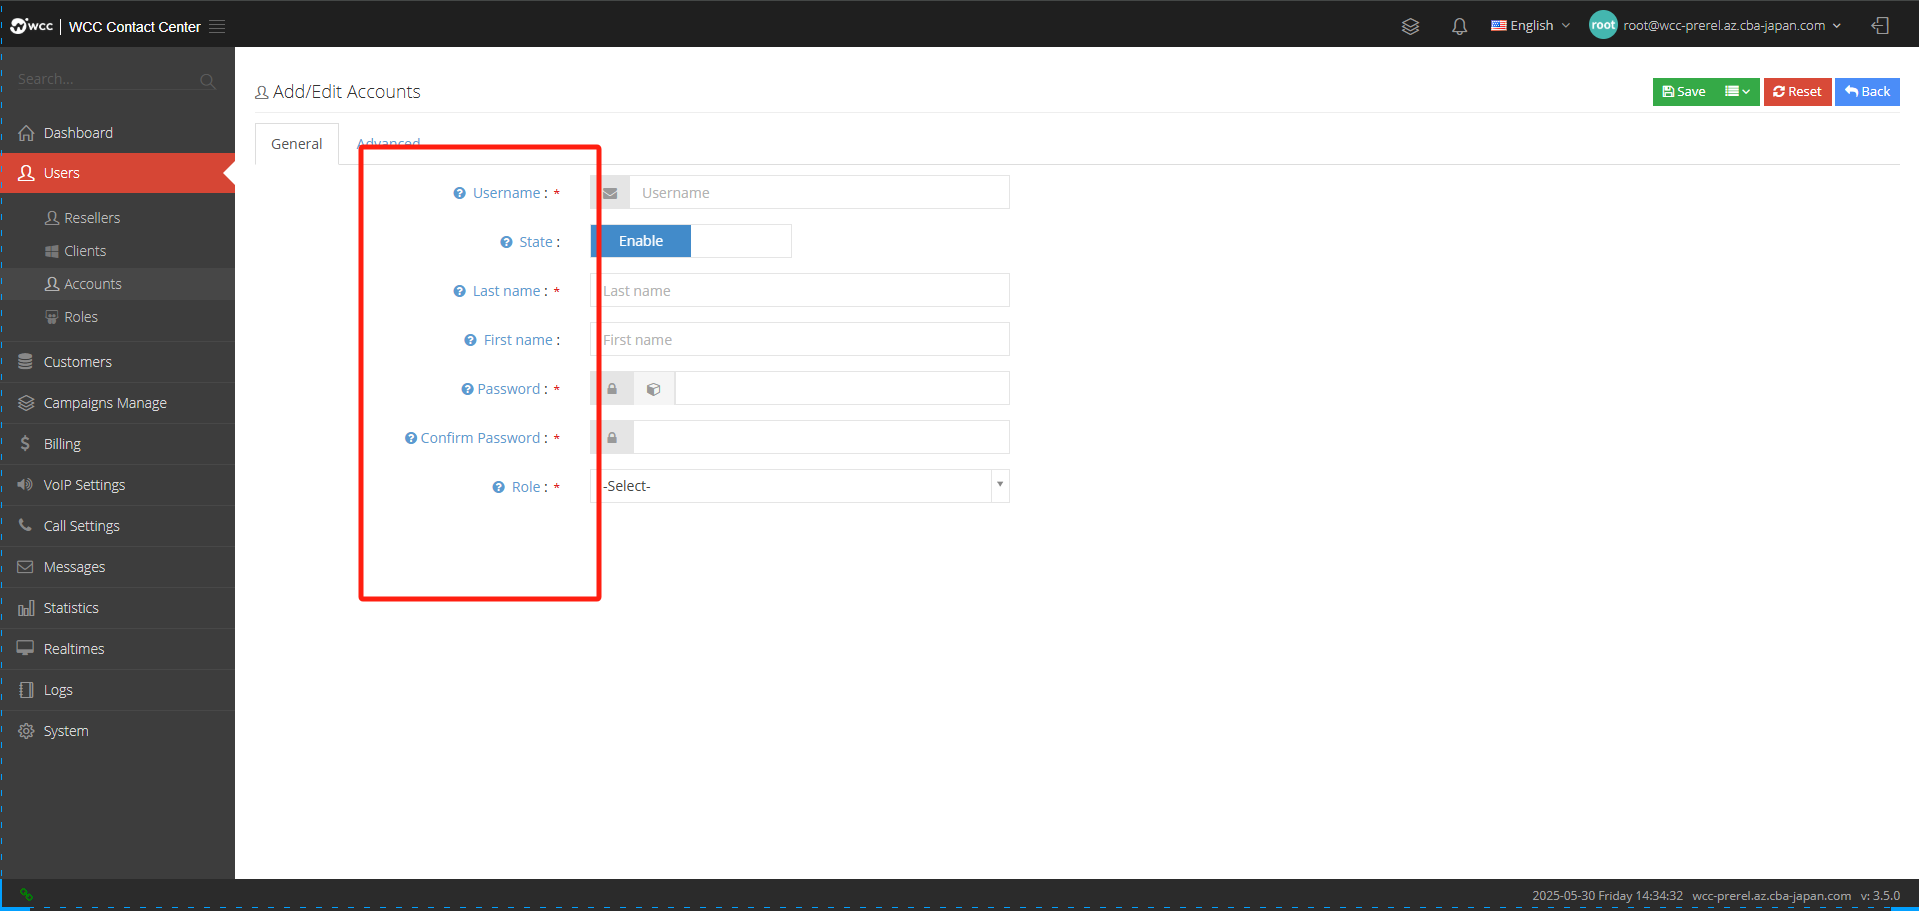
Username: The user will use this username to log in to the system.
State: You can choose to enable/disable the account.
Last Name: Please enter the user’s name.
First Name: Please enter the user’s last name.
Password: The user will use this password to log in to the system.
Confirm password: Please enter your password again to ensure that your passwords are the same twice.
Role: The role is used to set the pages this account can access and the permissions it has on that page.
In the Advanced settings, you can set the notes for this account
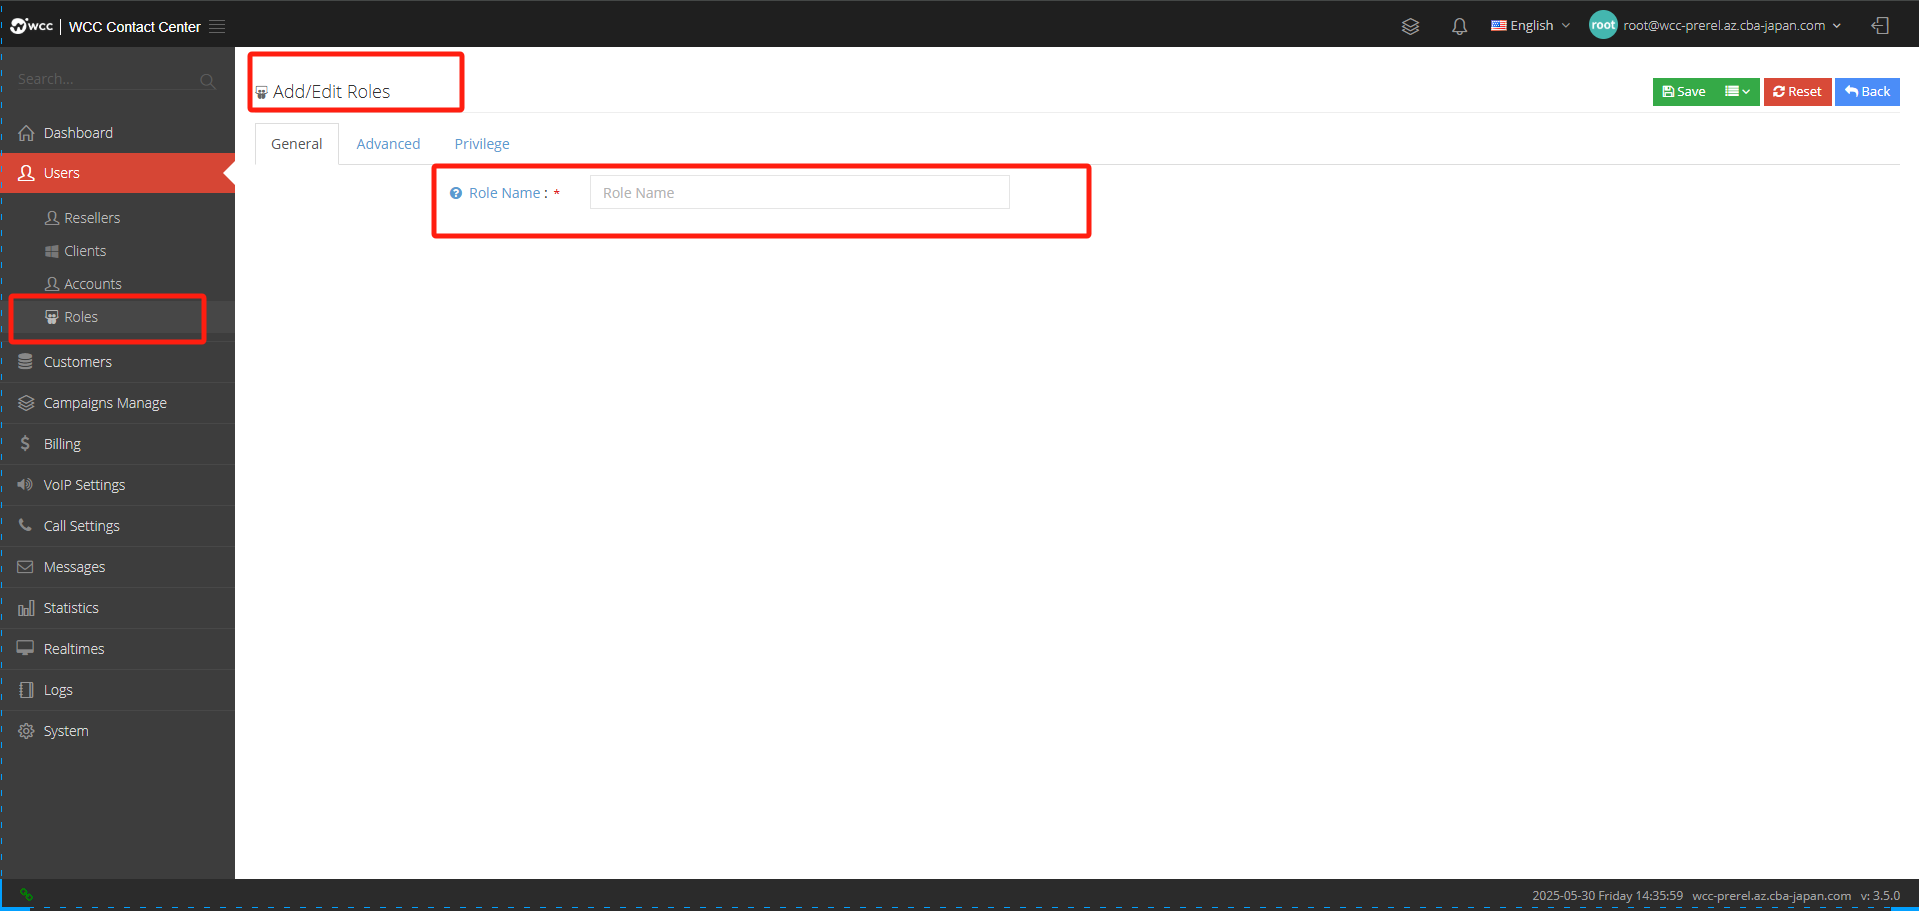
Roles:
Roles are used to control the permissions that users have. For example, if you set an account to have the permission to view tasks, you can first add a role to view task permissions,and then assign this permission role to an account, so that the account can view tasks and view tasks.The list on the Roles & Permissions page displays the newly created permission roles for the current user and account.
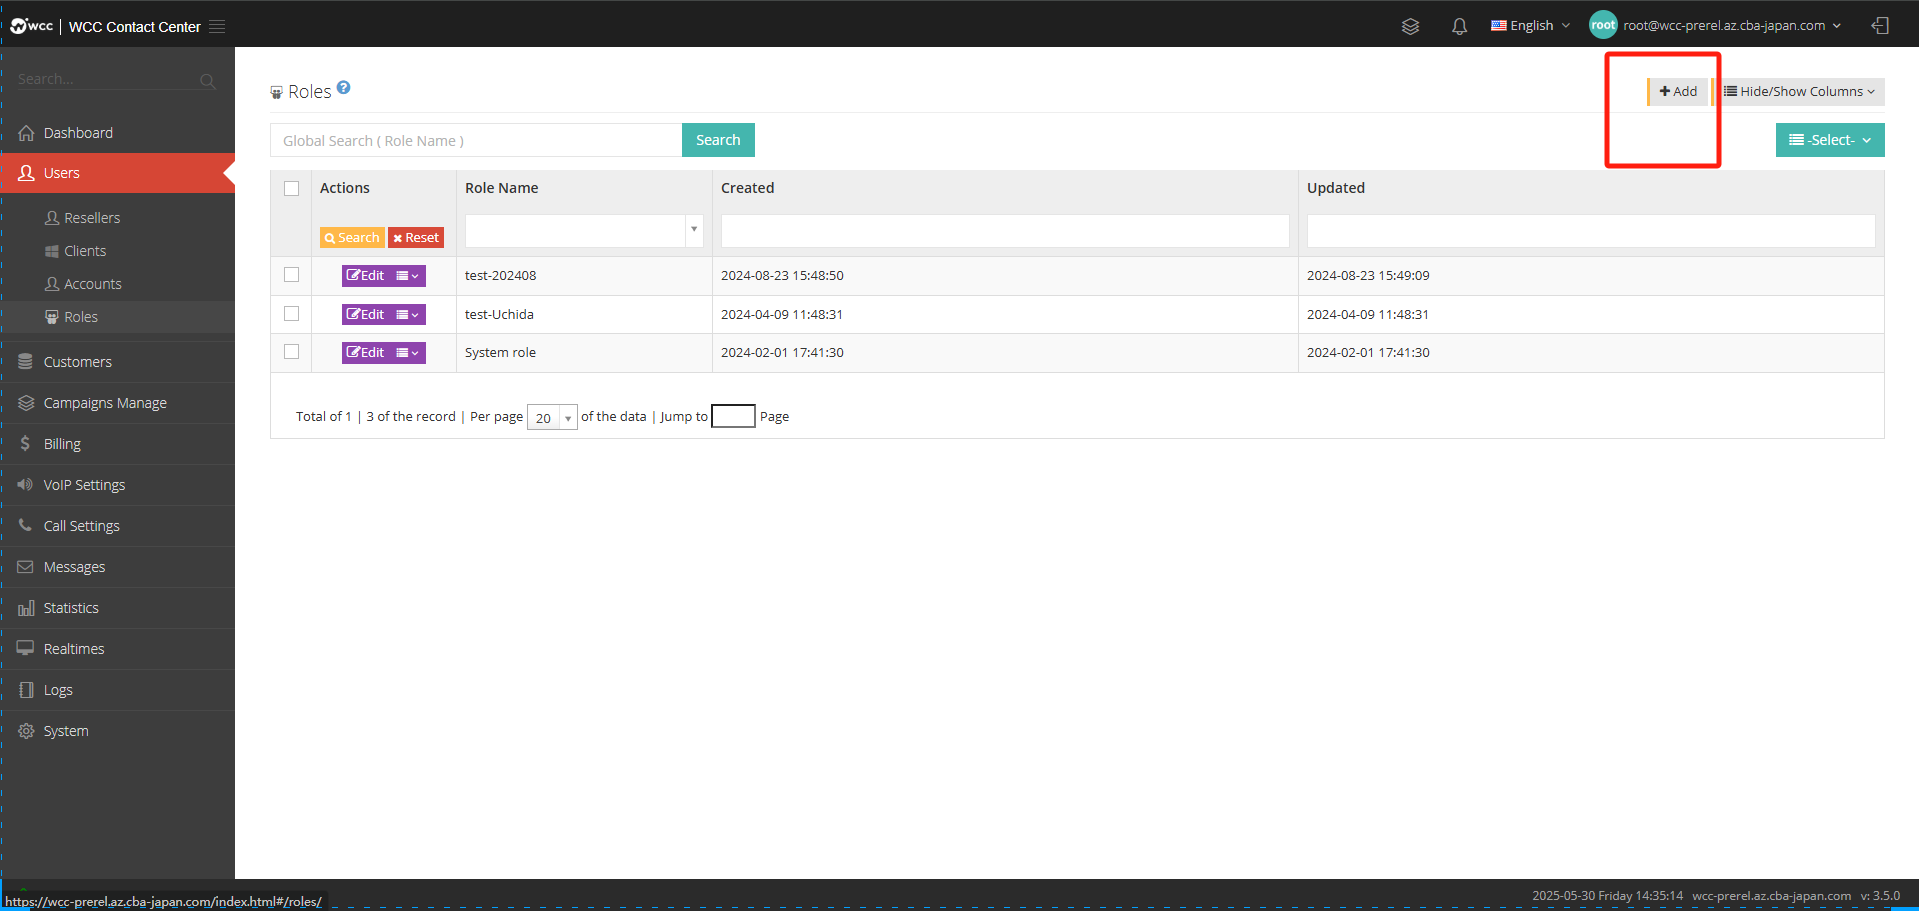
Click [Edit]/[Add], and then enter [General] to name the role: (as shown in the figure below)
【Advanced】Settings:
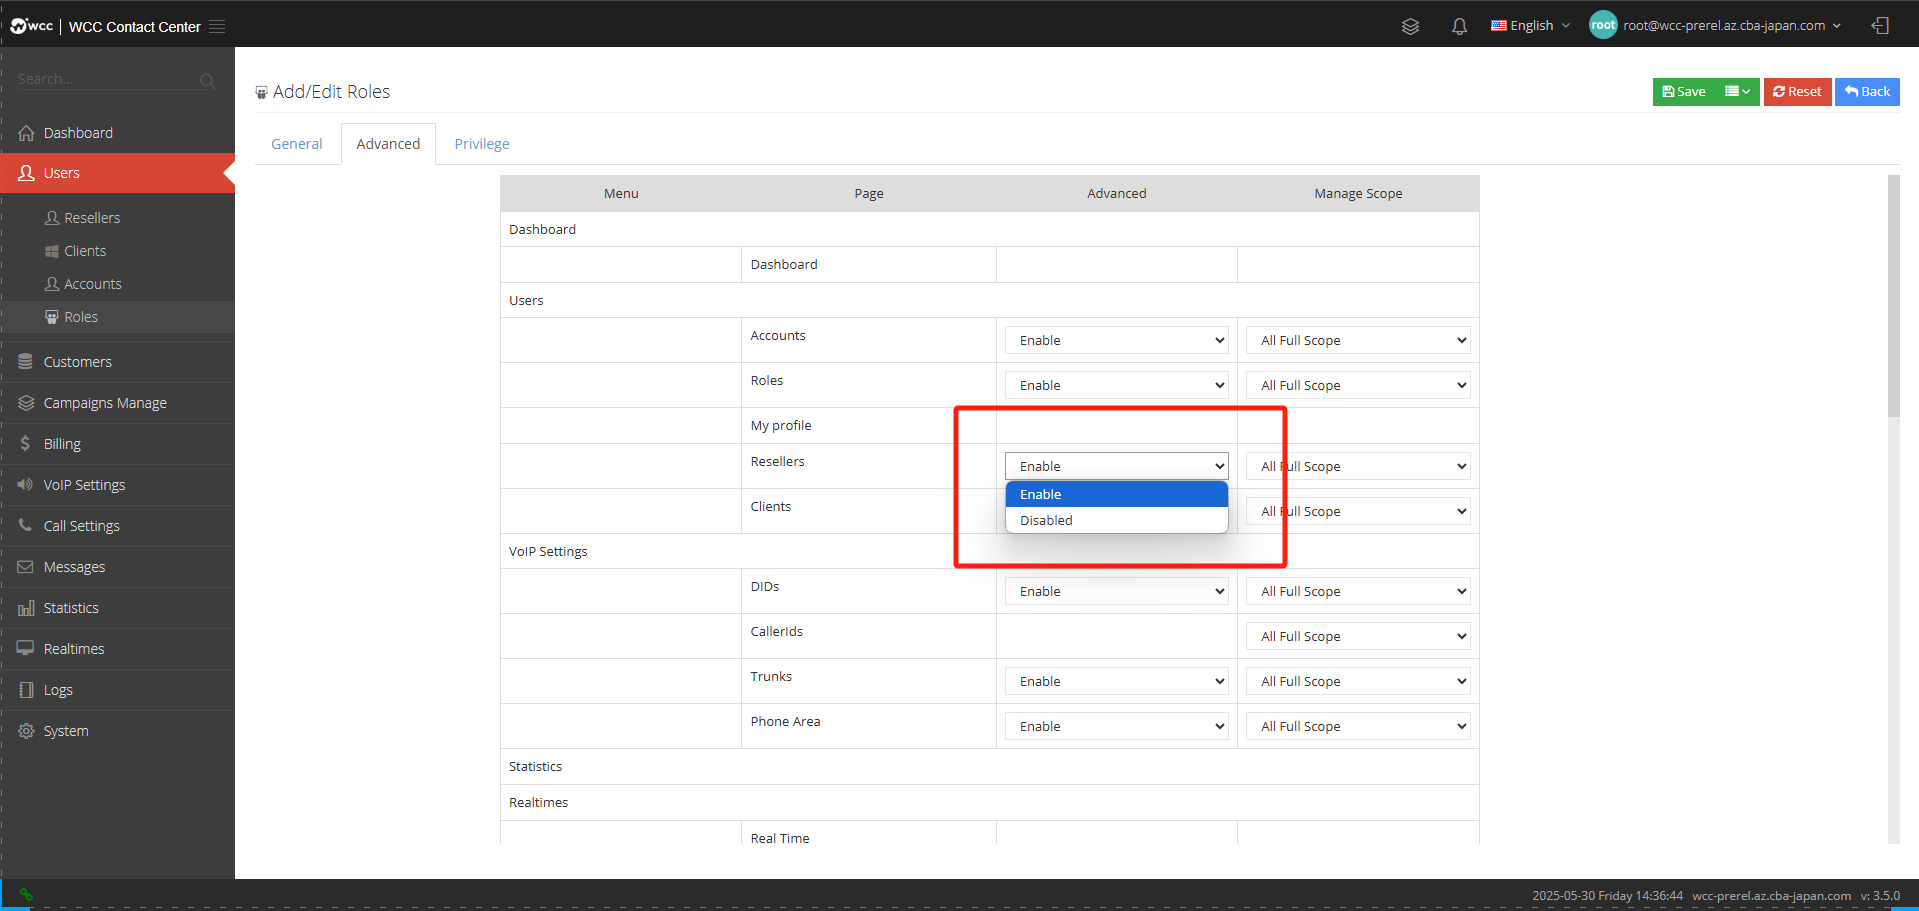
【Privilege】:

c. Customer data:
Tags:
Customer Tag Management Page, Customer Tags are used to select different customer tags for customers, making it easier to find customers through customer tags.
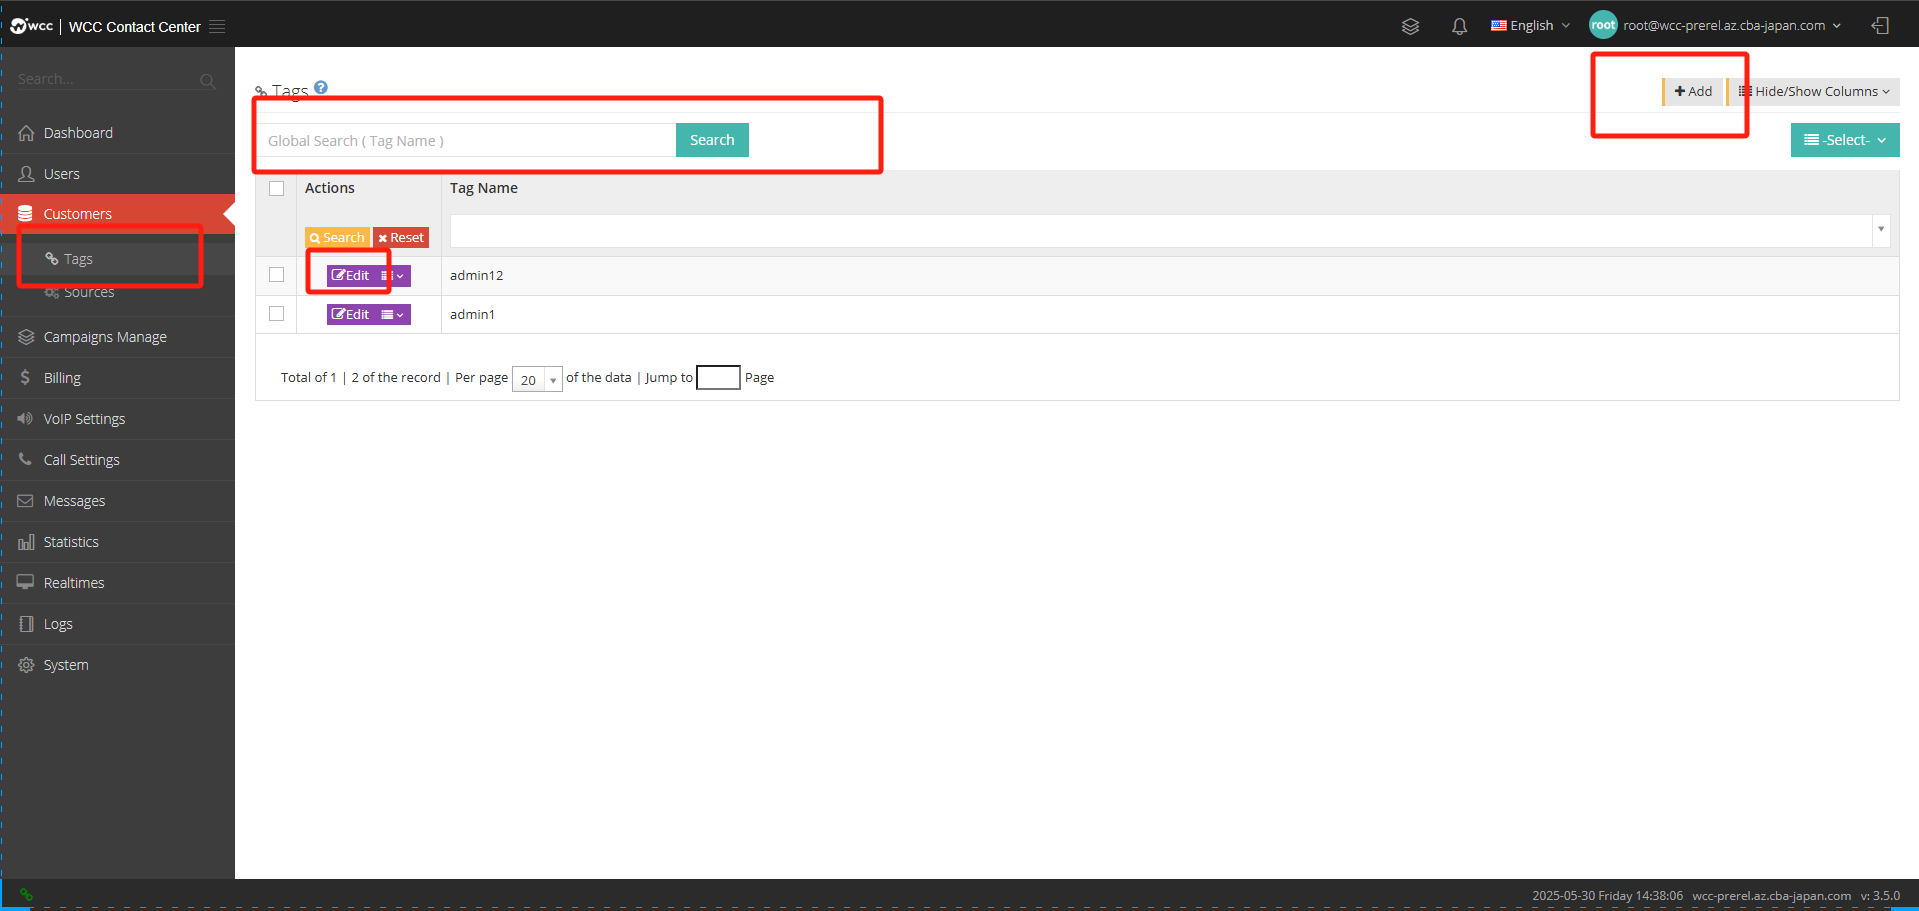
Click [Add] to enter [General] settings: (as shown in the figure below)

Tag name: Please enter the name of the customer tag.

Sources
Data source refers to the data source of customer data. Once the customer data is imported, the data source will be added, marked with time and color.

Click [Add] to enter [General] settings: (as shown in the figure below)

Source Name: Please enter the name of the data source.
Color: Please select the color of the source of the customer data.
In the [Advanced] settings, you can set the notes information (as shown below)>

d. Campaigns Manage:
Call results
The call result is the call result recorded after the agent calls the client, and is used to classify the call result.
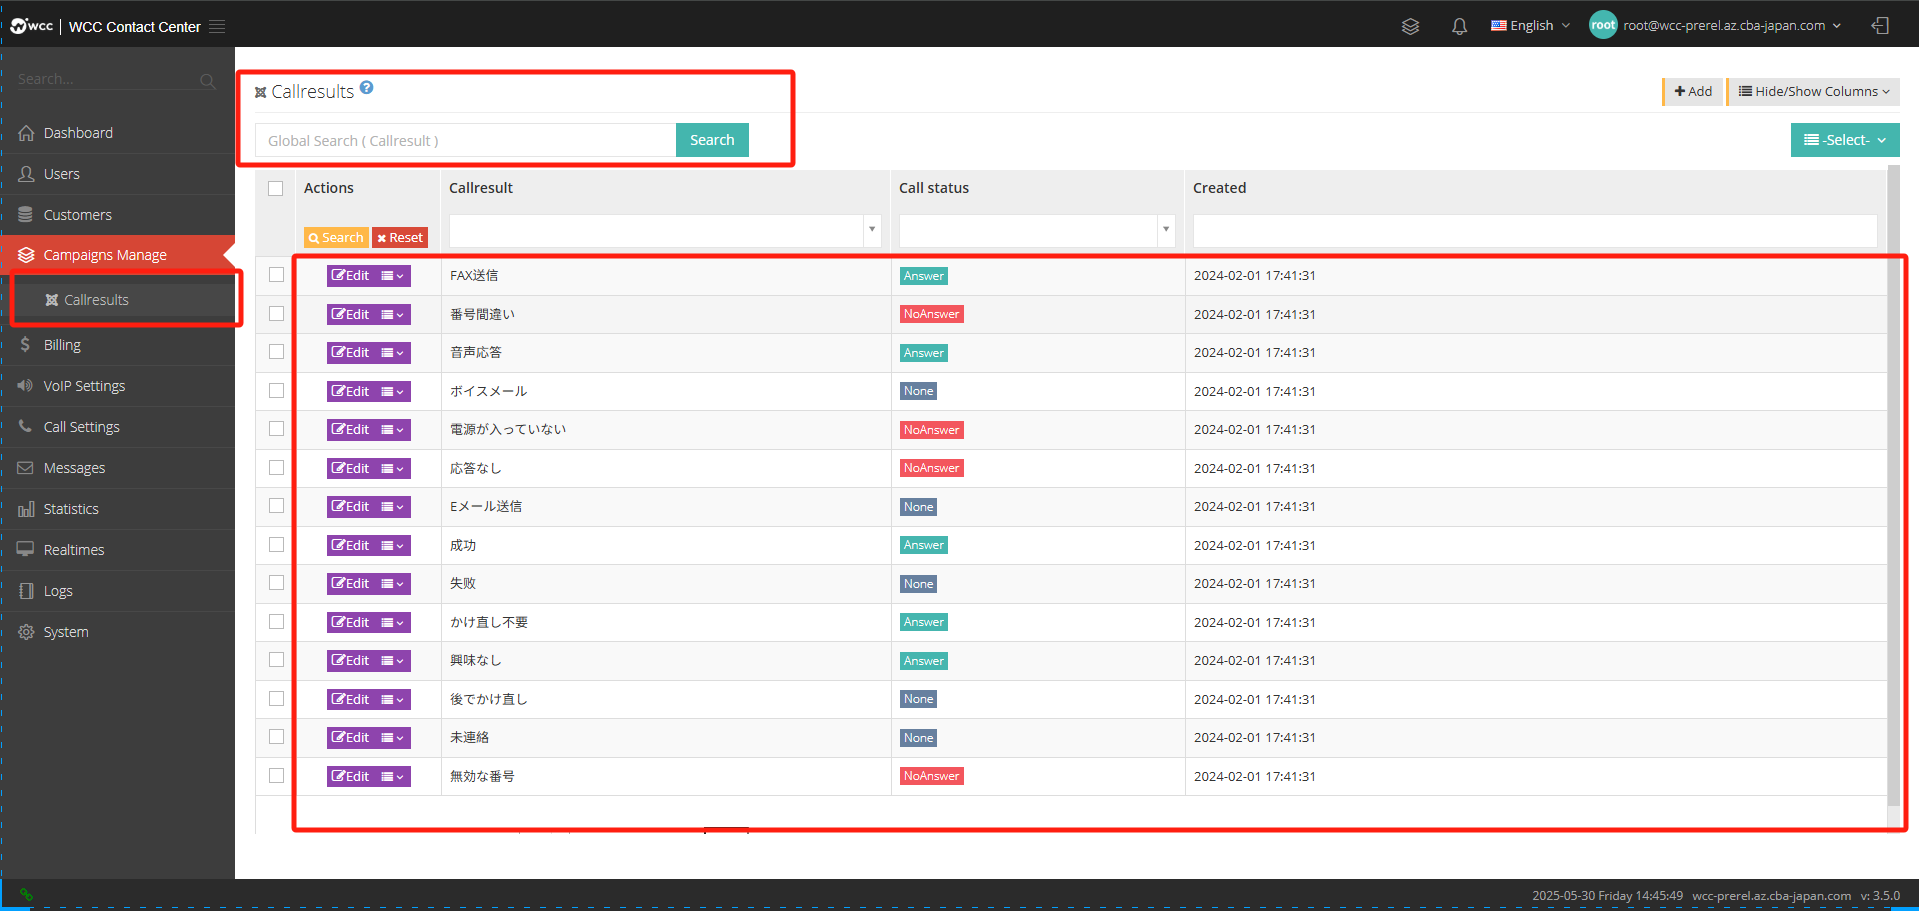
Select [Add] and enter [General] settings: (as shown below)
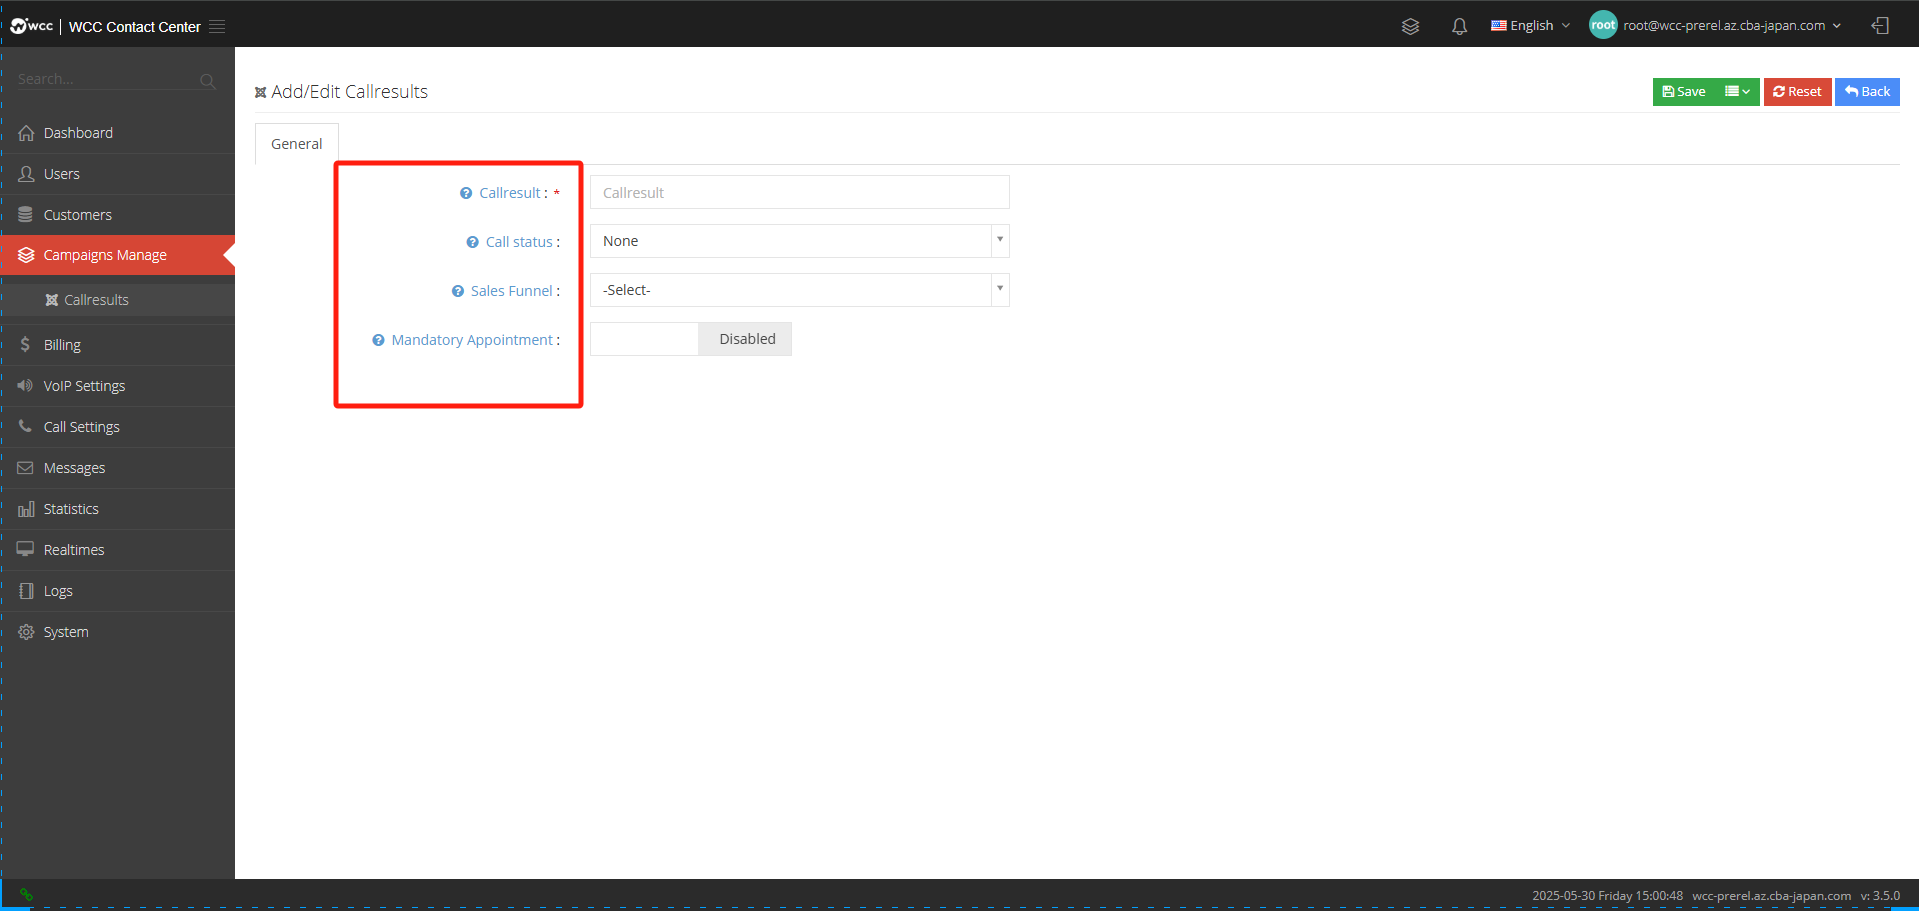
Callresult: You can customize the call results. After the agent completes the call, you can choose to record the call results.
Call Status: The call result can only be set when answering the call.
Sales funnel: Sets the call results that are displayed only under the specified sales funnel.
Mandatory appointment: The appointment must be established, otherwise the customer cannot be saved and the contact history cannot be submitted.
e. Billing:
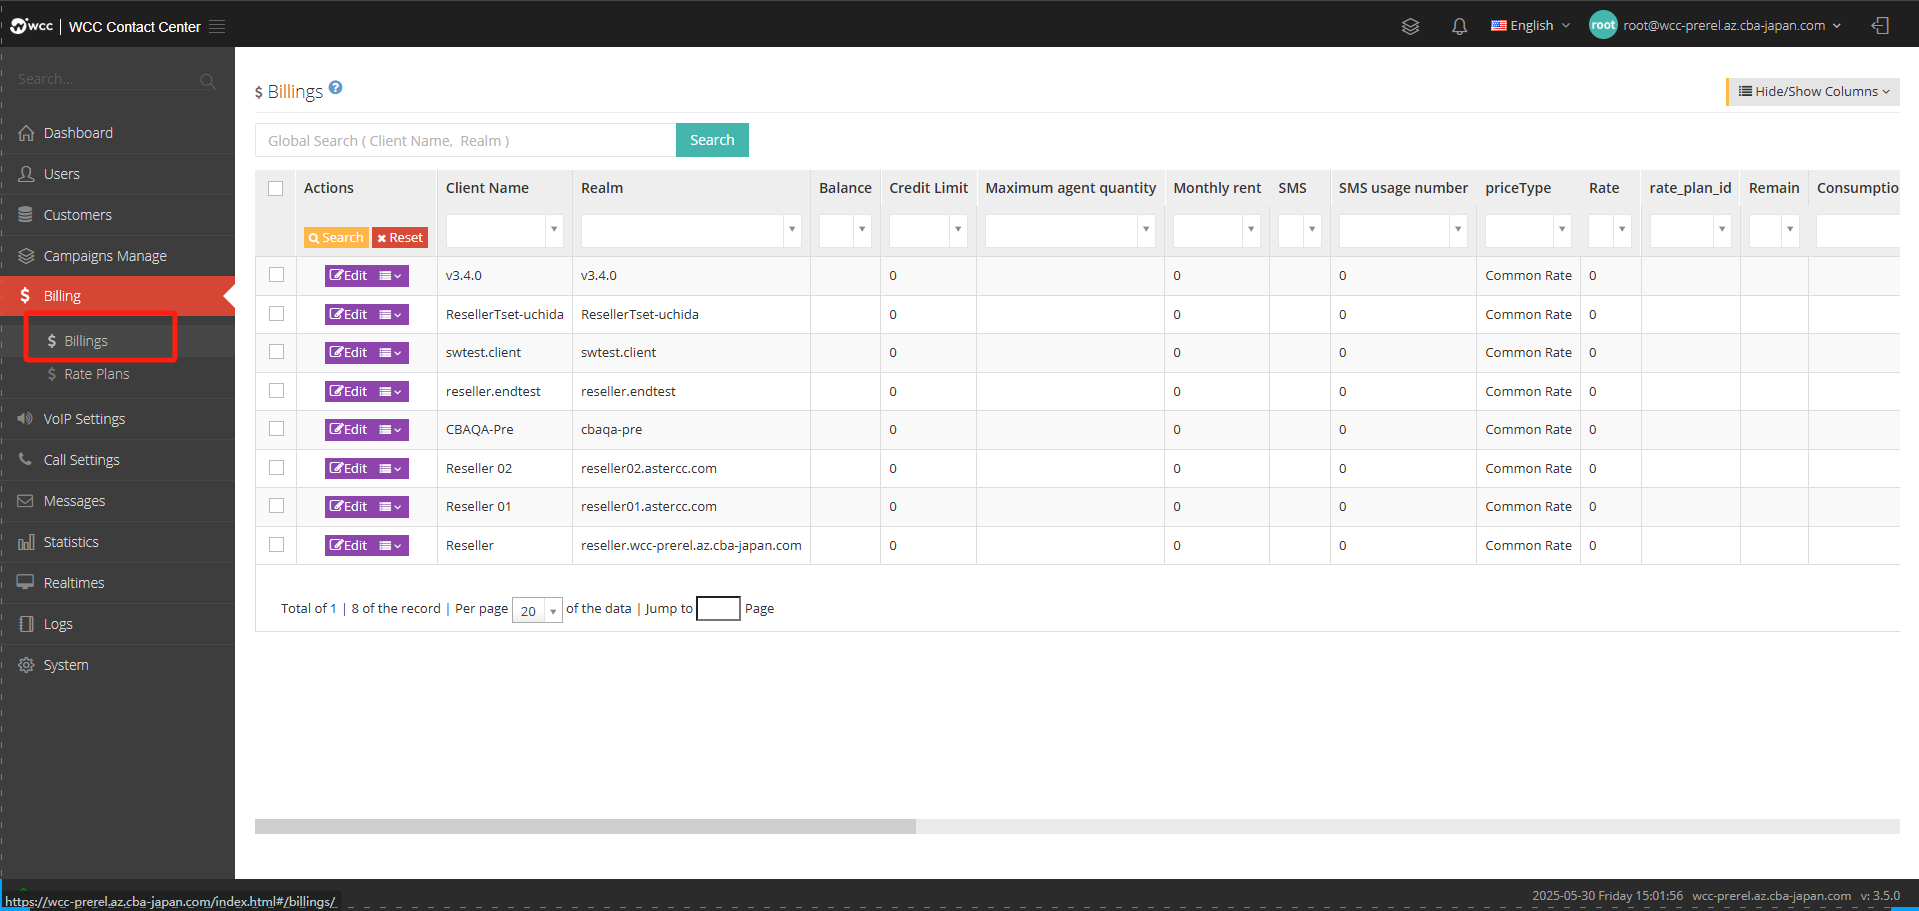
Billing
Customer billing is billing to the agent.
Click [Edit] to enter [General] settings: (as shown in the figure below)
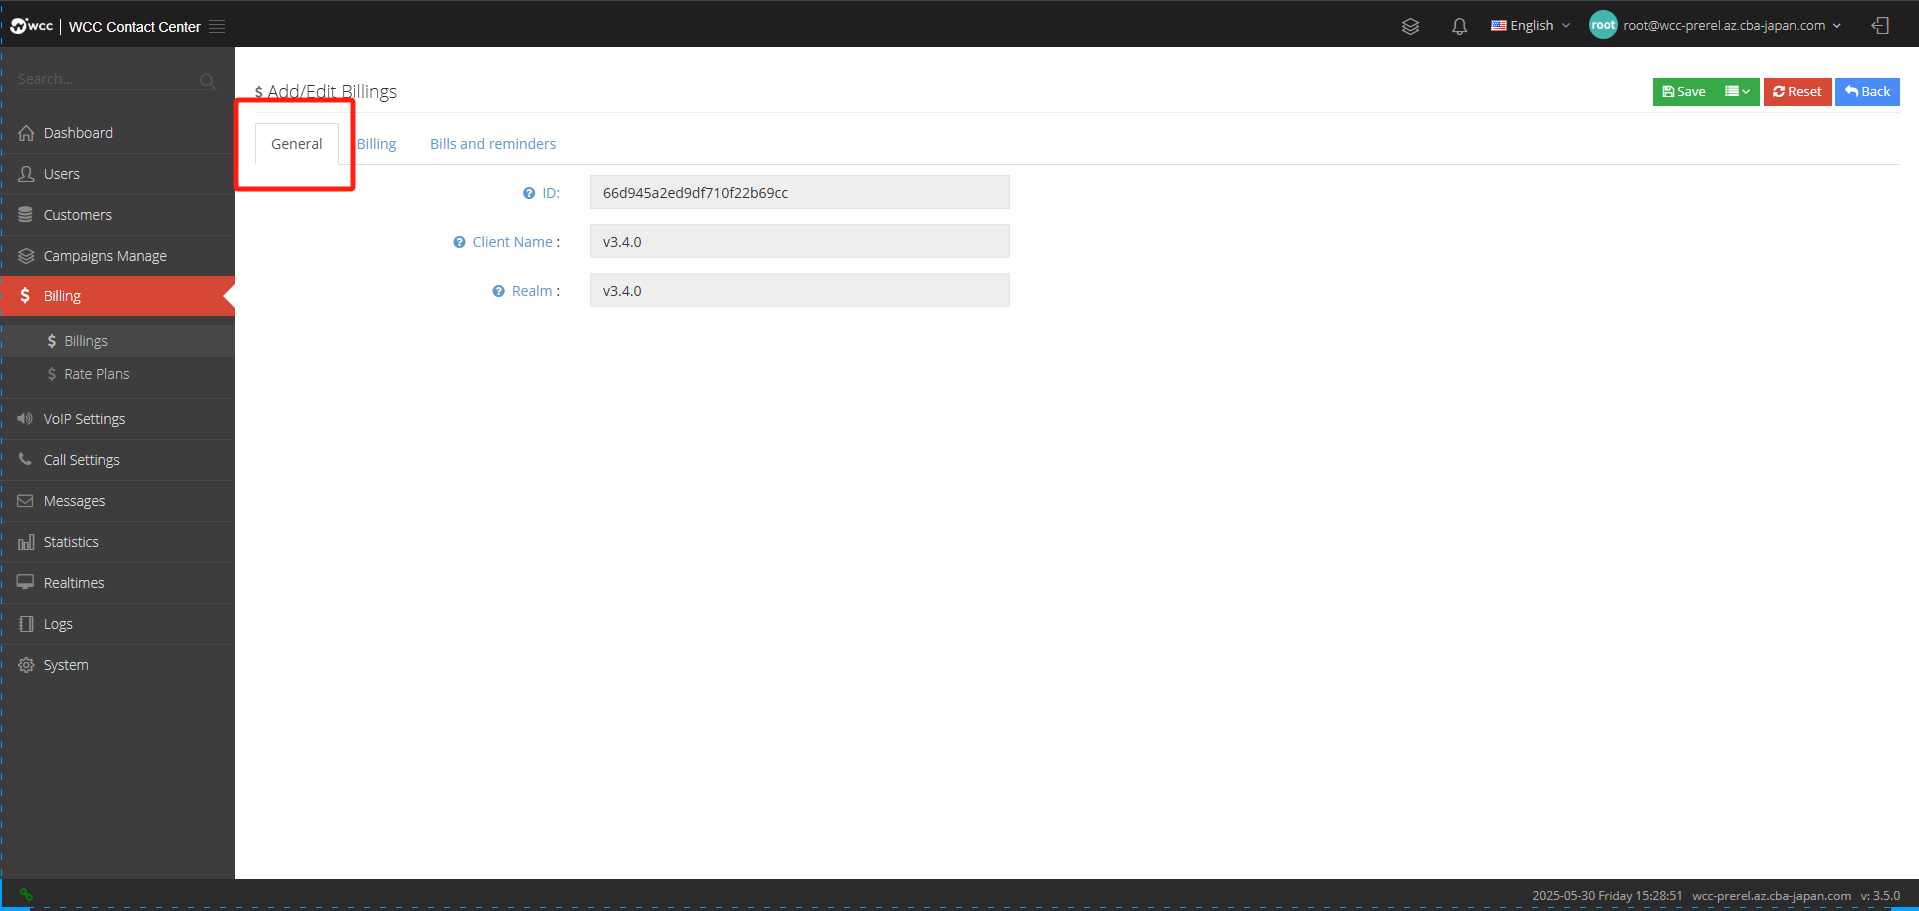
ID: Unique id.
Client Name: Add a customer name, it cannot be changed after adding.
Realm: Add a domain name, the domain name cannot be changed after saving.
[Billing] Settings: (as shown below)
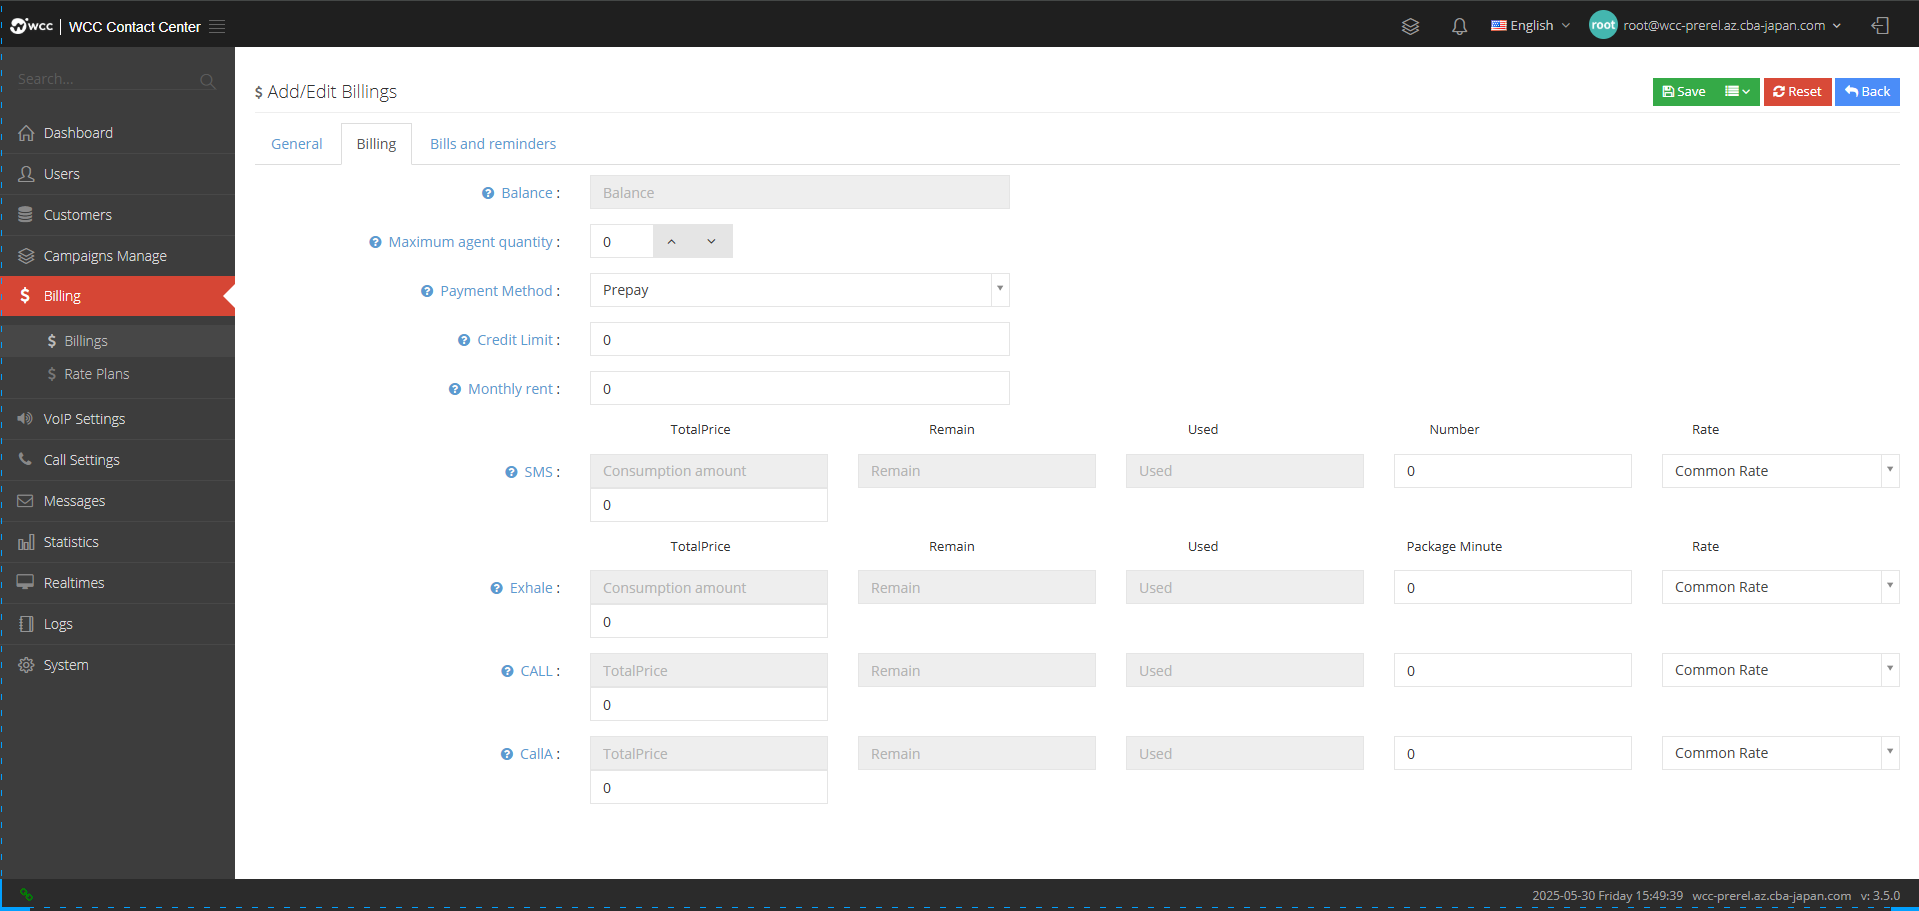
Blance: The fees to be paid for this period.
Maximum agent quantity: The maximum number of seats allowed.
Payment Method: Select payment method to advance or postpay.
Credit Limit: Set the available credit Limit.
Monthly Rent: Set the monthly rent amount.
SMS: You can learn more about the consumption of SMS this month, the remaining time of the month, the number of SMSs manually added, and select the SMS rate.
Exhale: Can learn more about the consumption of money exhaled this month and the rest of the month.
Call: When the system calls the agent, the agent calls back to the customer, and the customer will incur the charge when answering the call.
CallA: Settings for the call process billing status of the system to the agent-bound phone.
【Bills and Reminders】Settings:
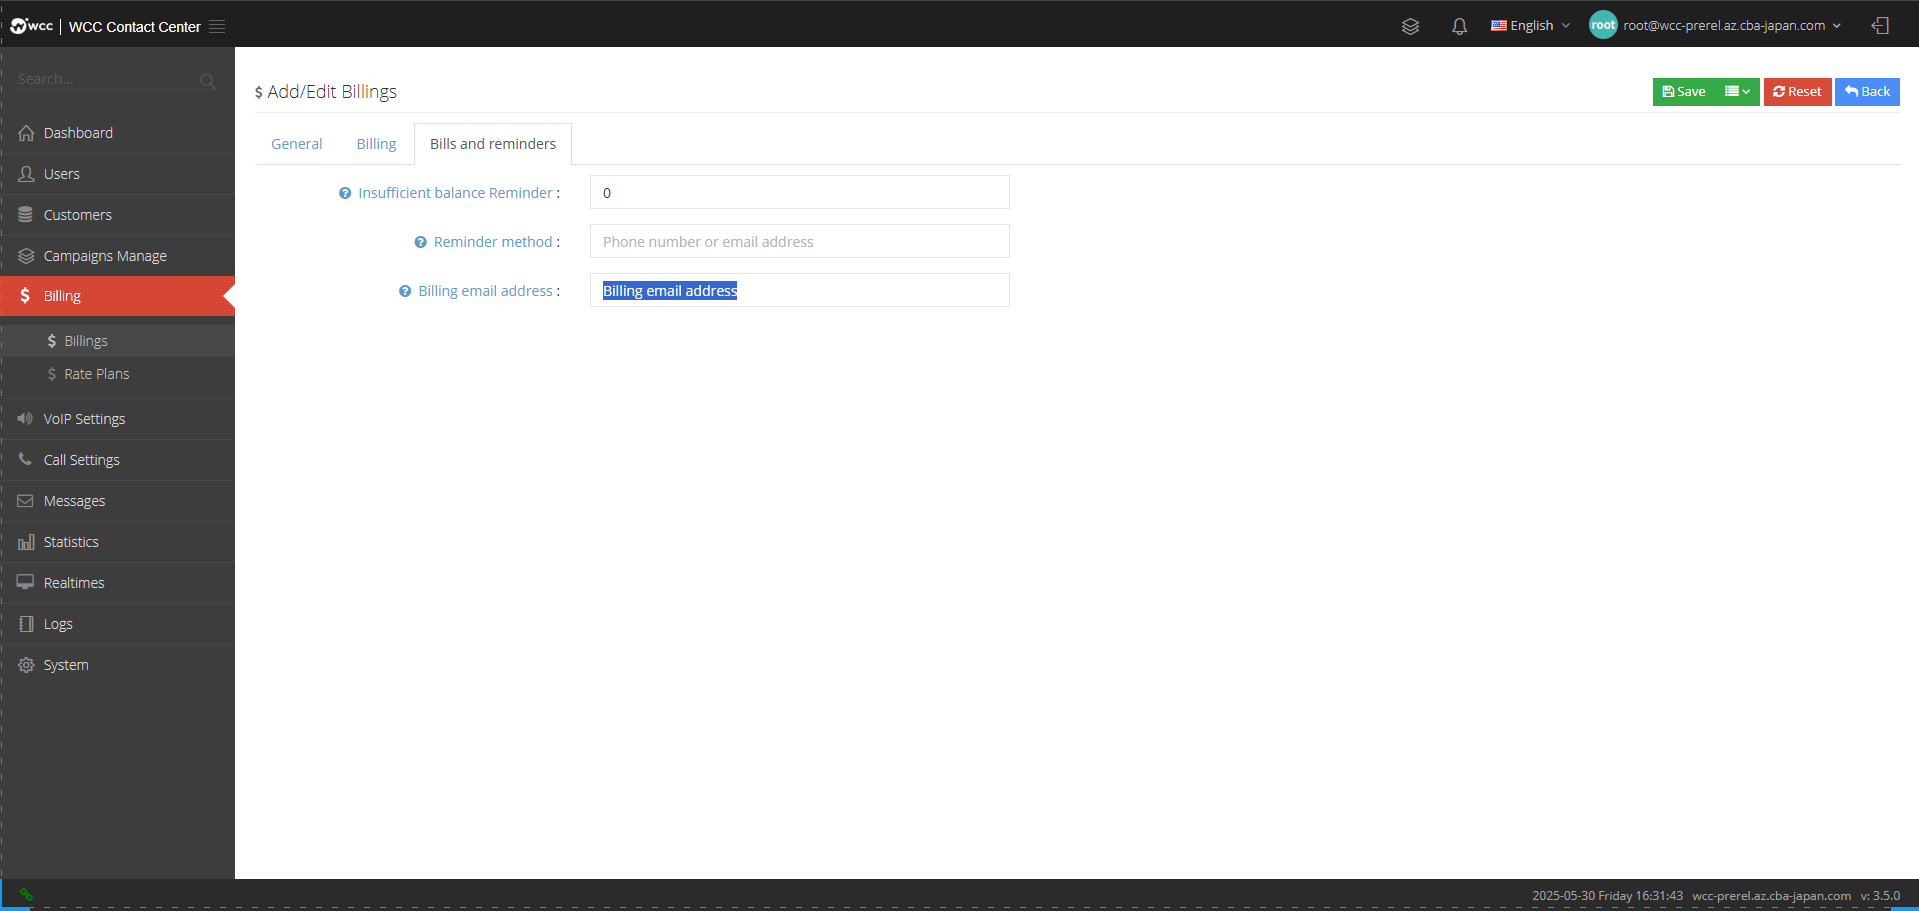
Insufficient balance Reminder: Set the number of reminders after insufficient balance.
Reminder method: Select the reminder method of your mobile phone number or email address.
Billing Email Address: Fill in the email address where the bill was received.
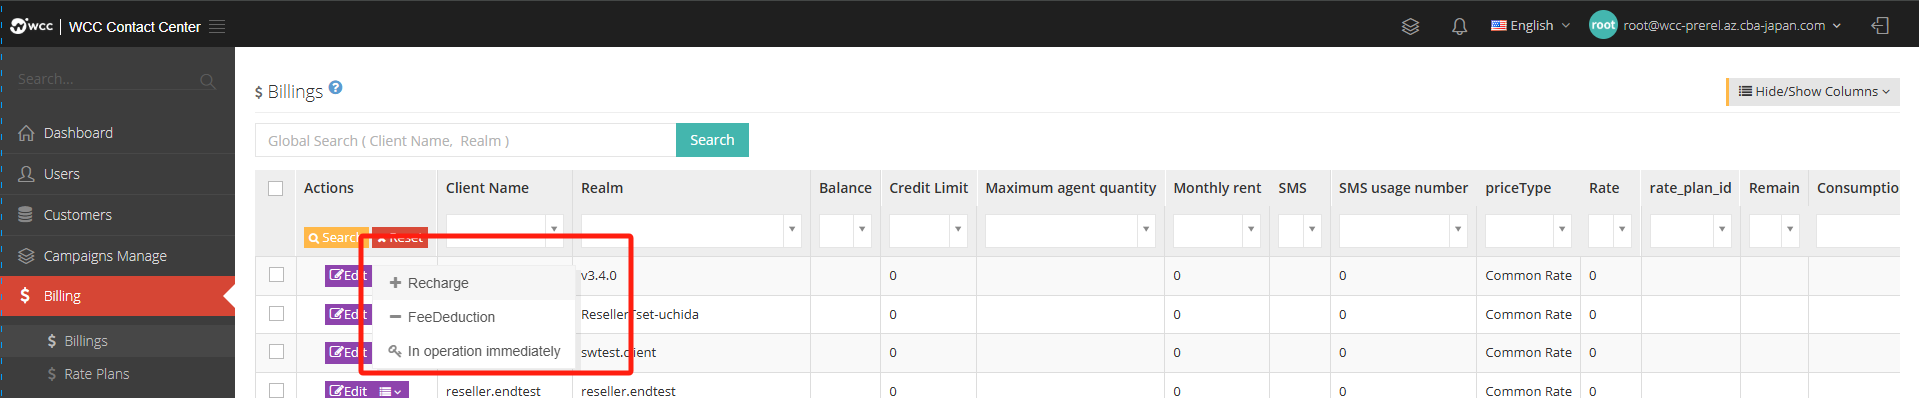
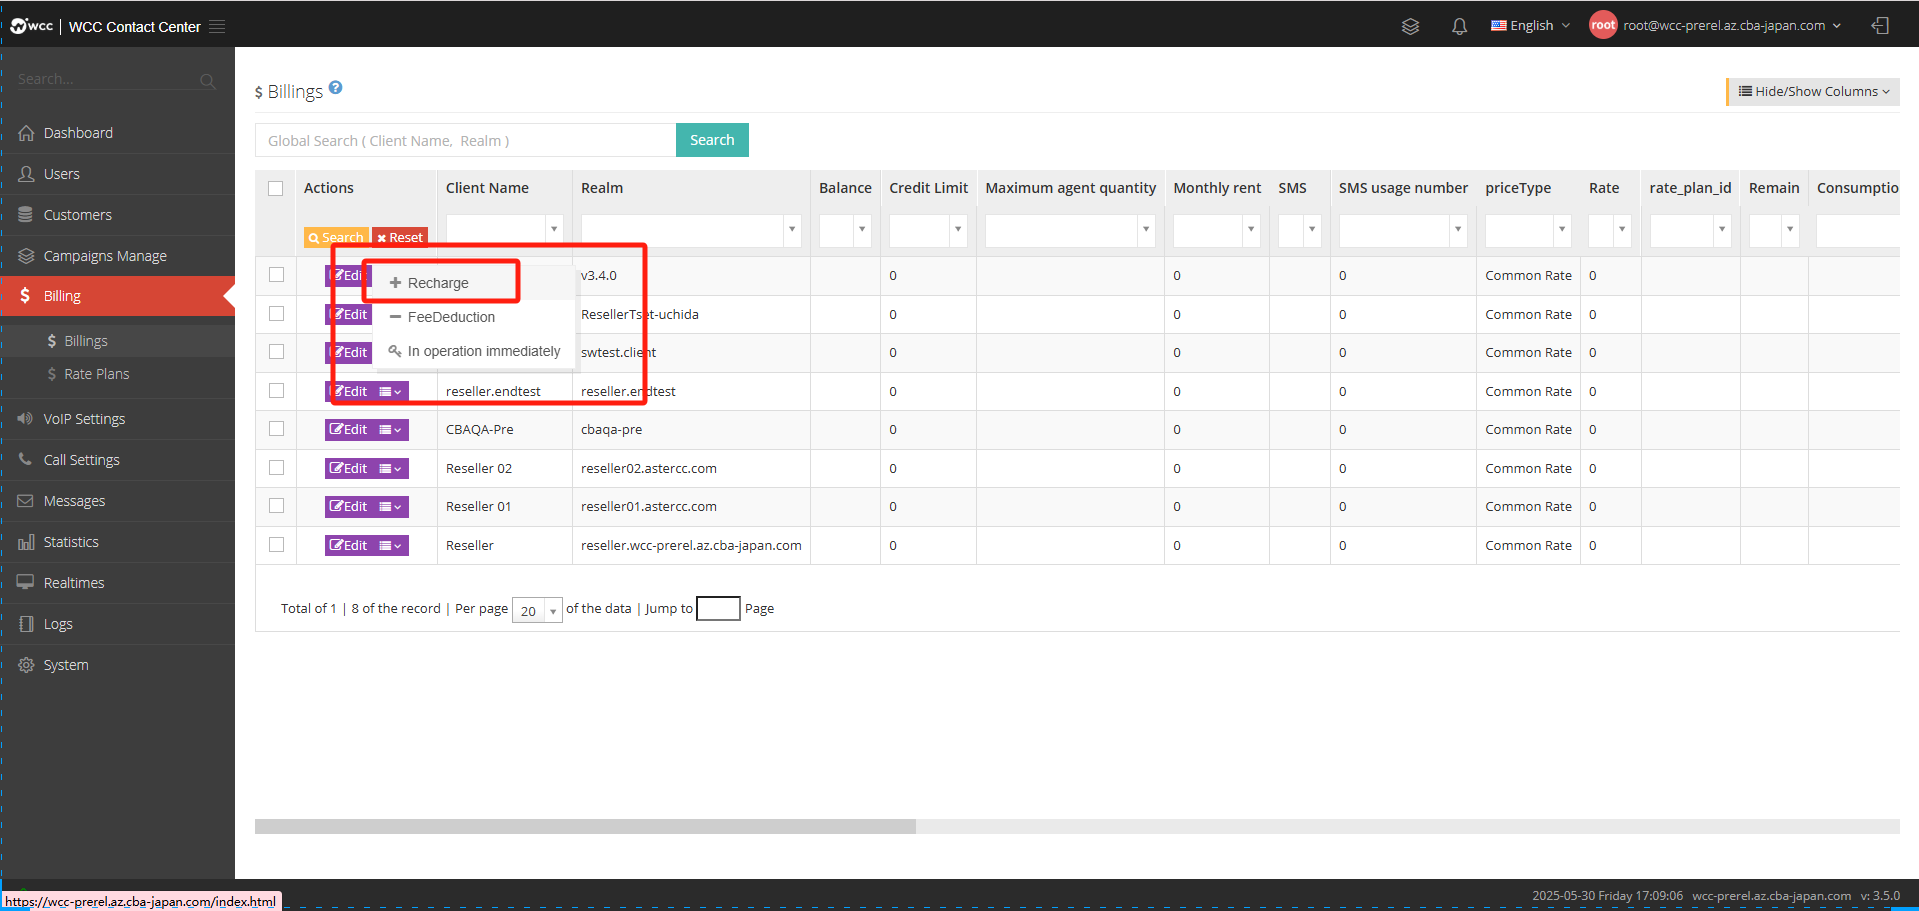
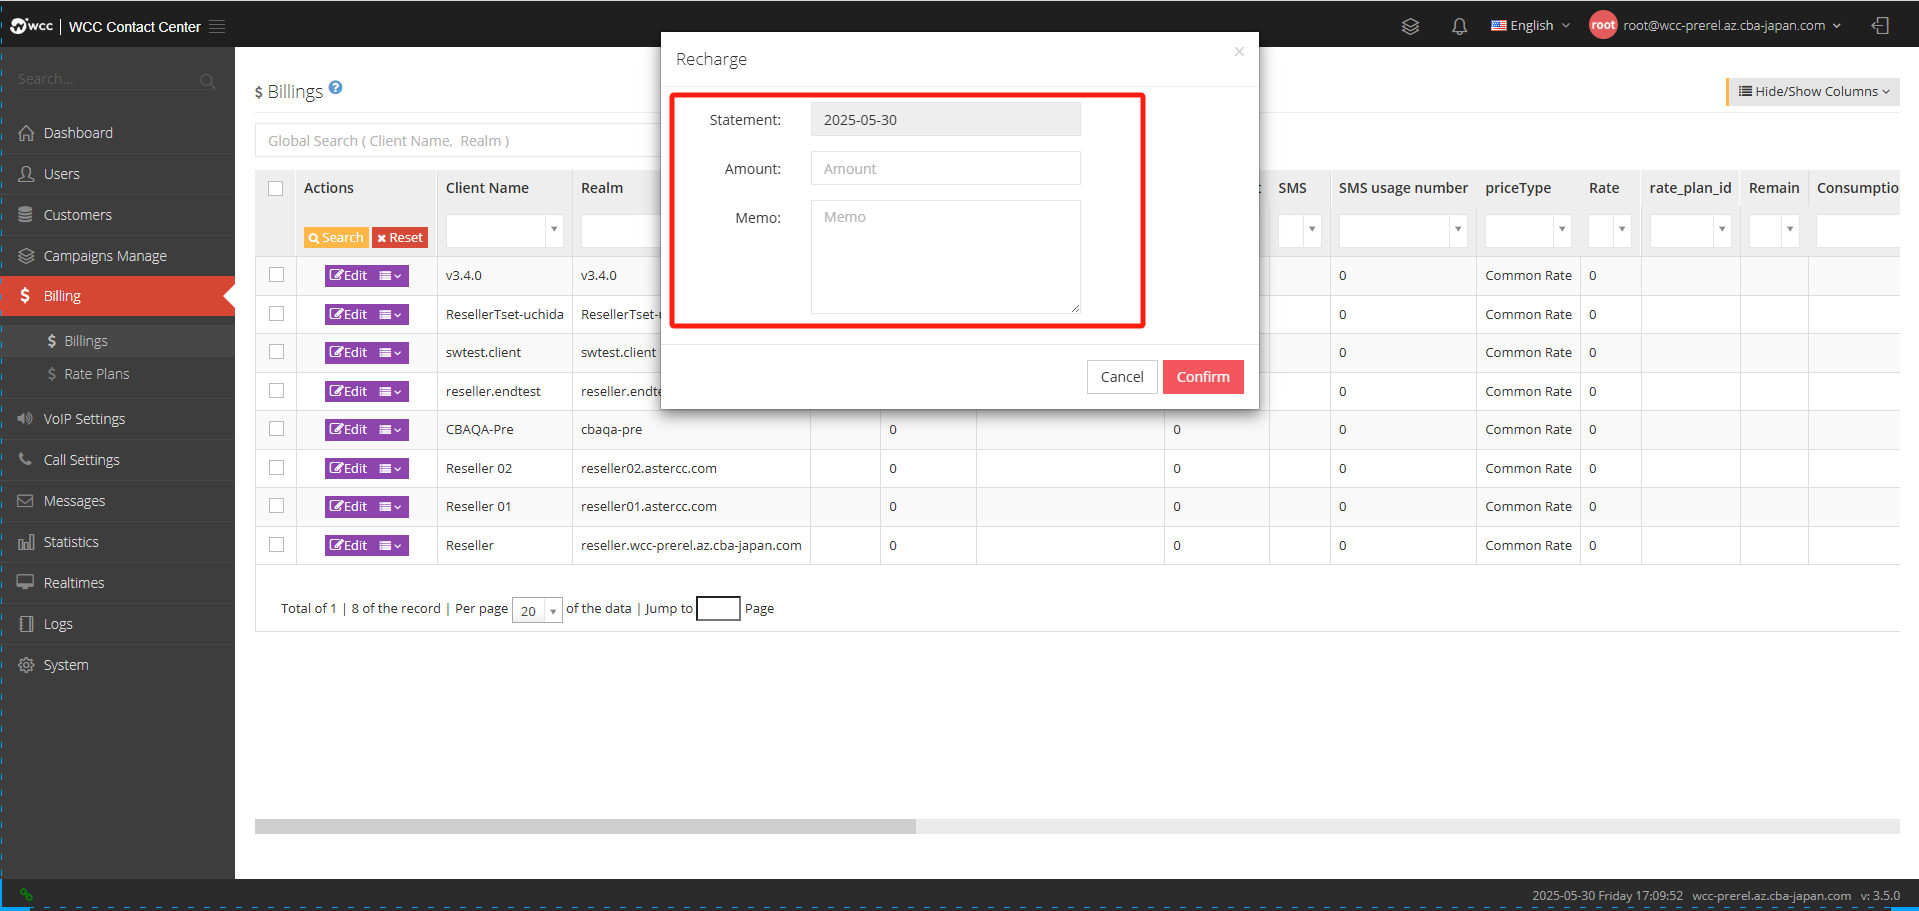
Click the drop-down menu on the set customer page to select [Recharge] to record the customer’s recharge amount and transaction time. If necessary, you can also fill in the notes information; click [Fee Deduction] similar; click [Effective Now] to take effect on the customer’s bill information (as shown below)
Rate plan:
Rate plan refers to the specific preparation of a rate plan that is realized within a certain period (plan period) according to the cost decision-making requirements, including: sales rate and cost rate.
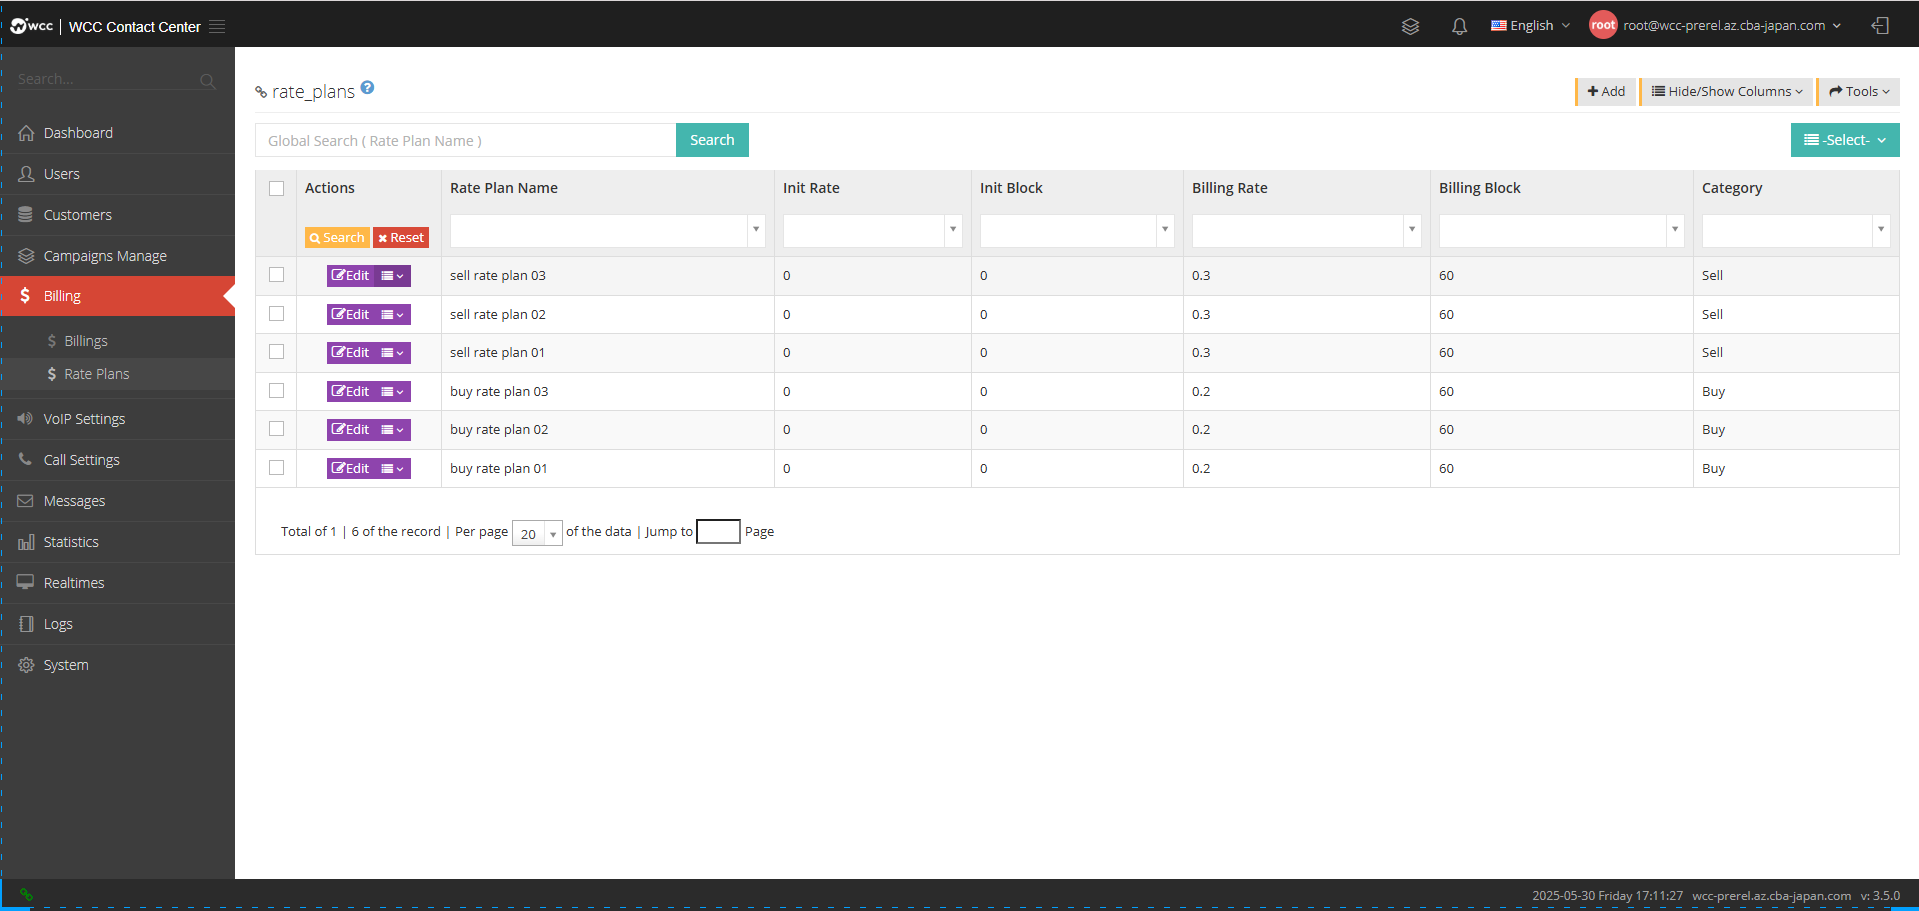
Select [Add] and enter [General] settings: (as shown below)
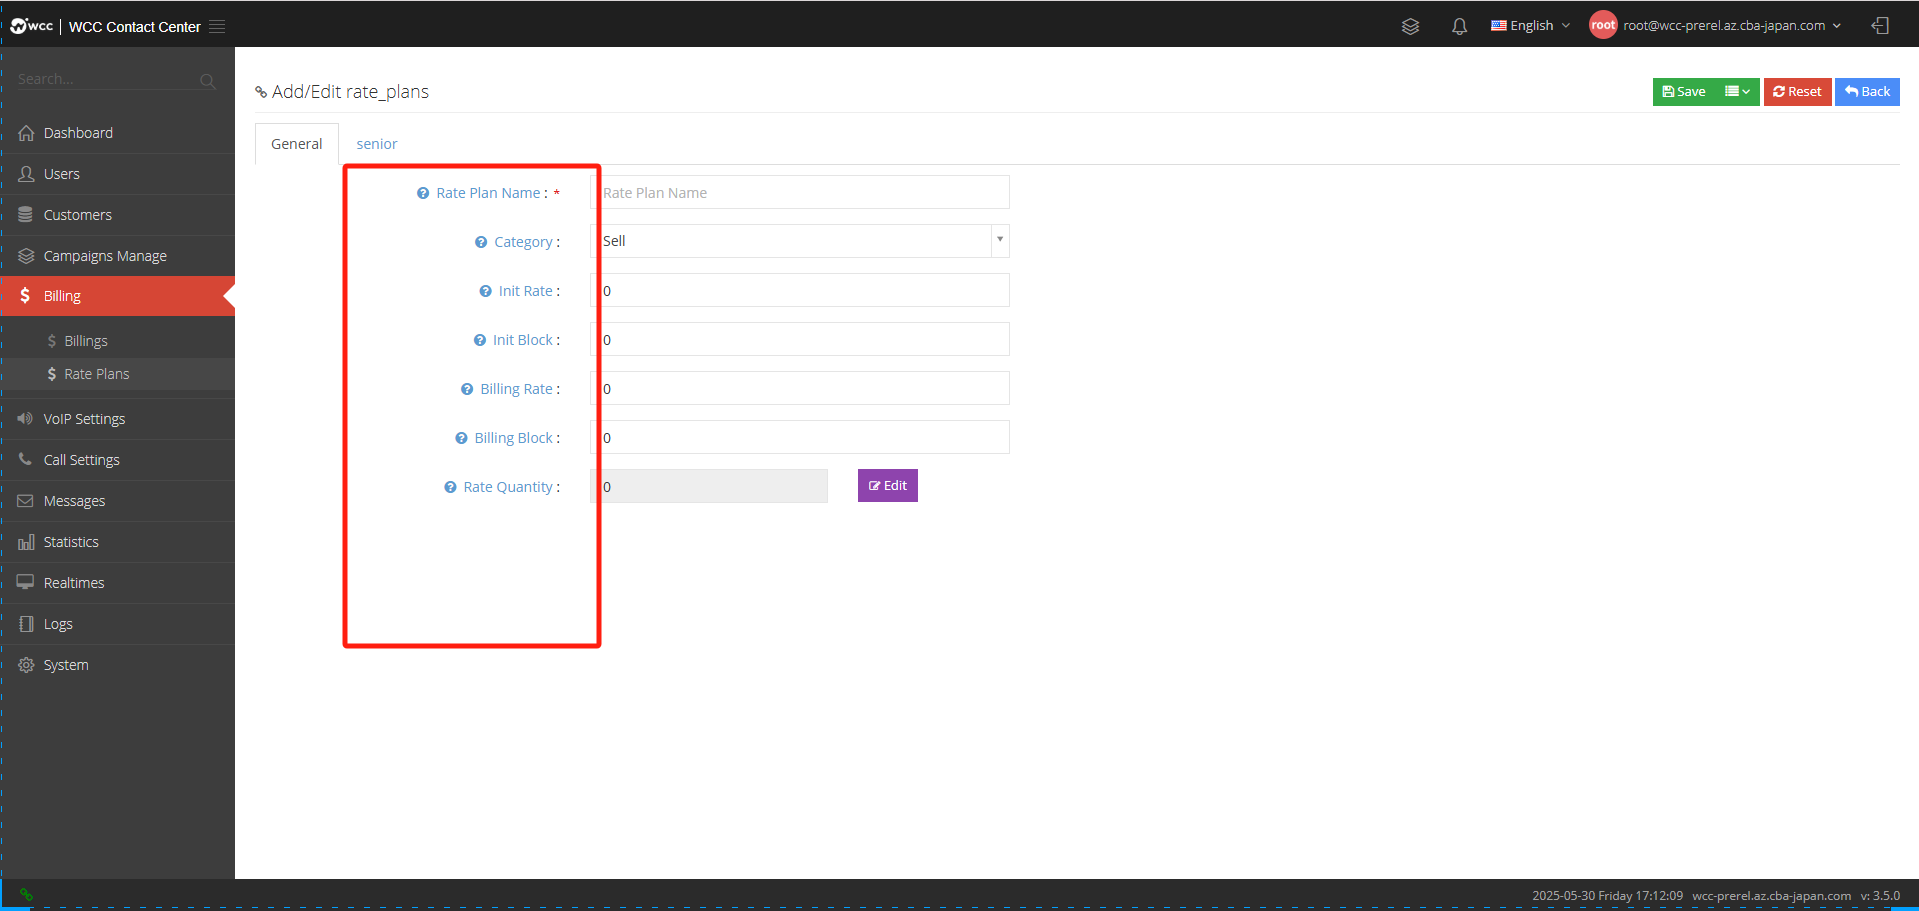
Rate Plan Name: Please name this rate.
RCategory: Please select a rate category.
Init rate: The initial billing is within the initial time period, the rate per minute is equivalent to the starting price, and the unit is RMB/min.
Initial block: The initial billing time is the time billed for the initial call, which is equivalent to the mileage corresponding to the starting price, and is in seconds.
Billing Rate: The rate per minute after initial billing, unit is RMB/min.
Billing Block: The billing cycle refers to how long it takes to bill once after the initial time period is over, and the unit is seconds.
Rate Quantity: The number of rates to be selected by editing.
【Advanced】Settings:
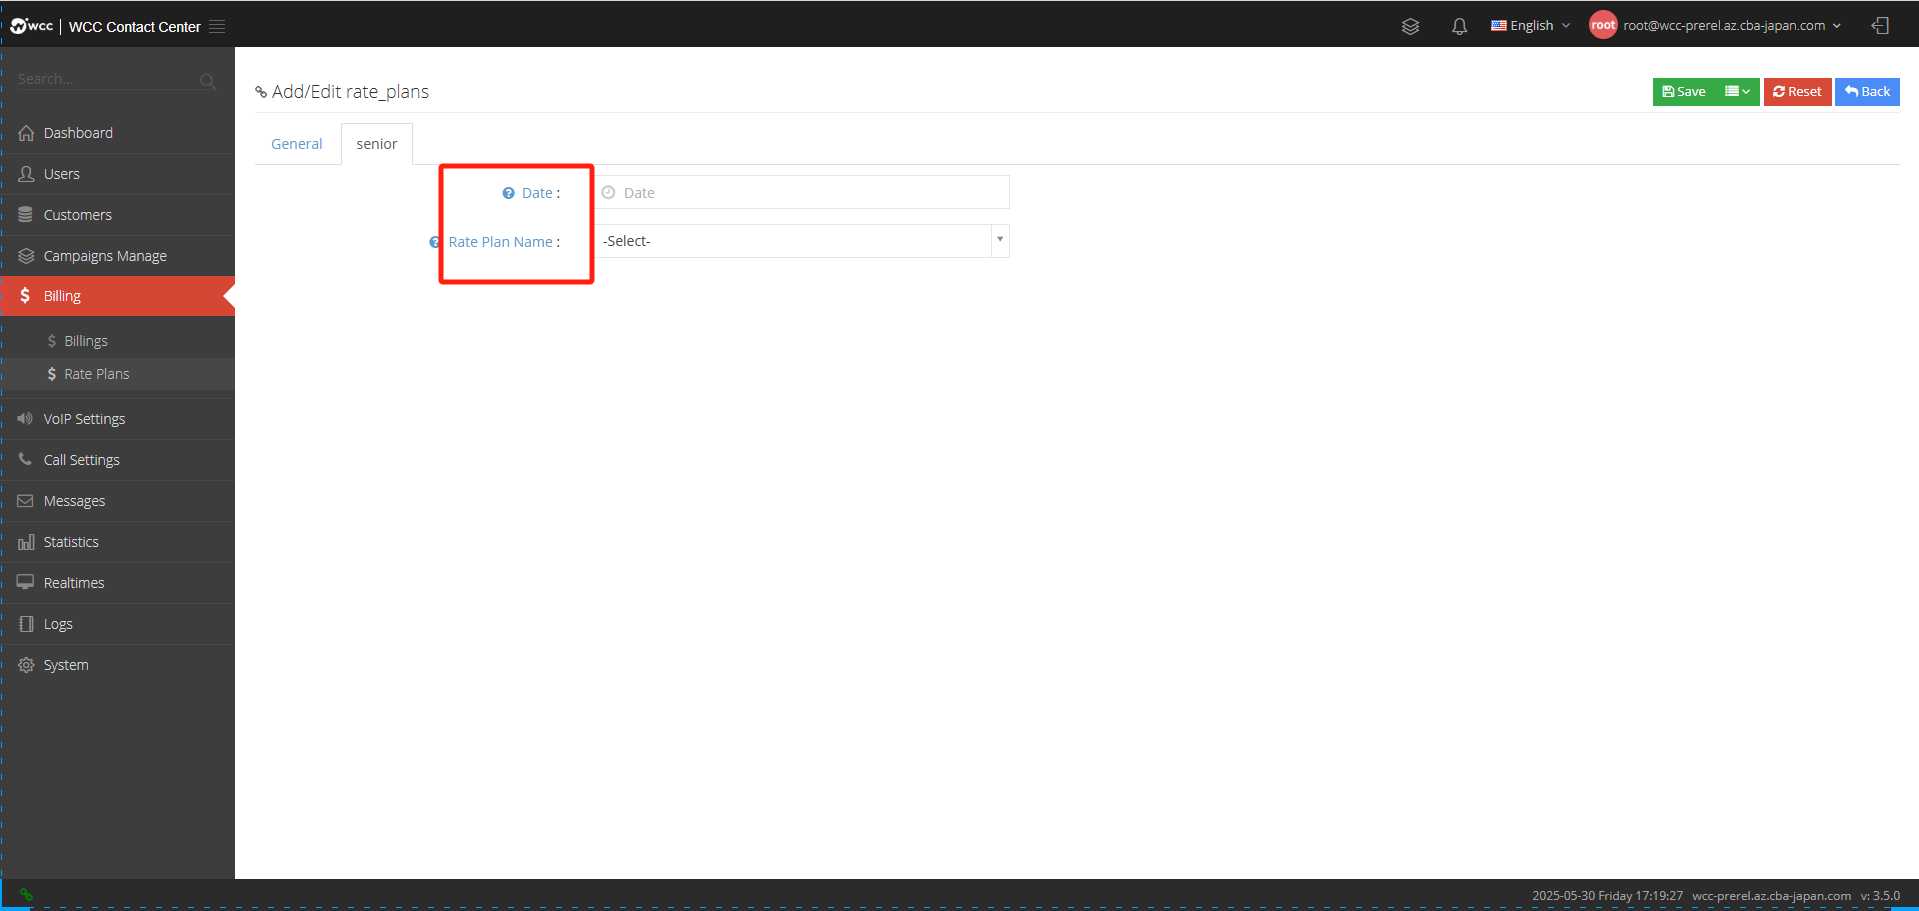
Date: Please select the time when this rate plan begins to be executed.
Rate Plan Name: Please select an added rate plan.
f. VoIP settings:
Trunks:
Relay is a line management used to connect the telephone network of the local machine with the telephone network of other systems.
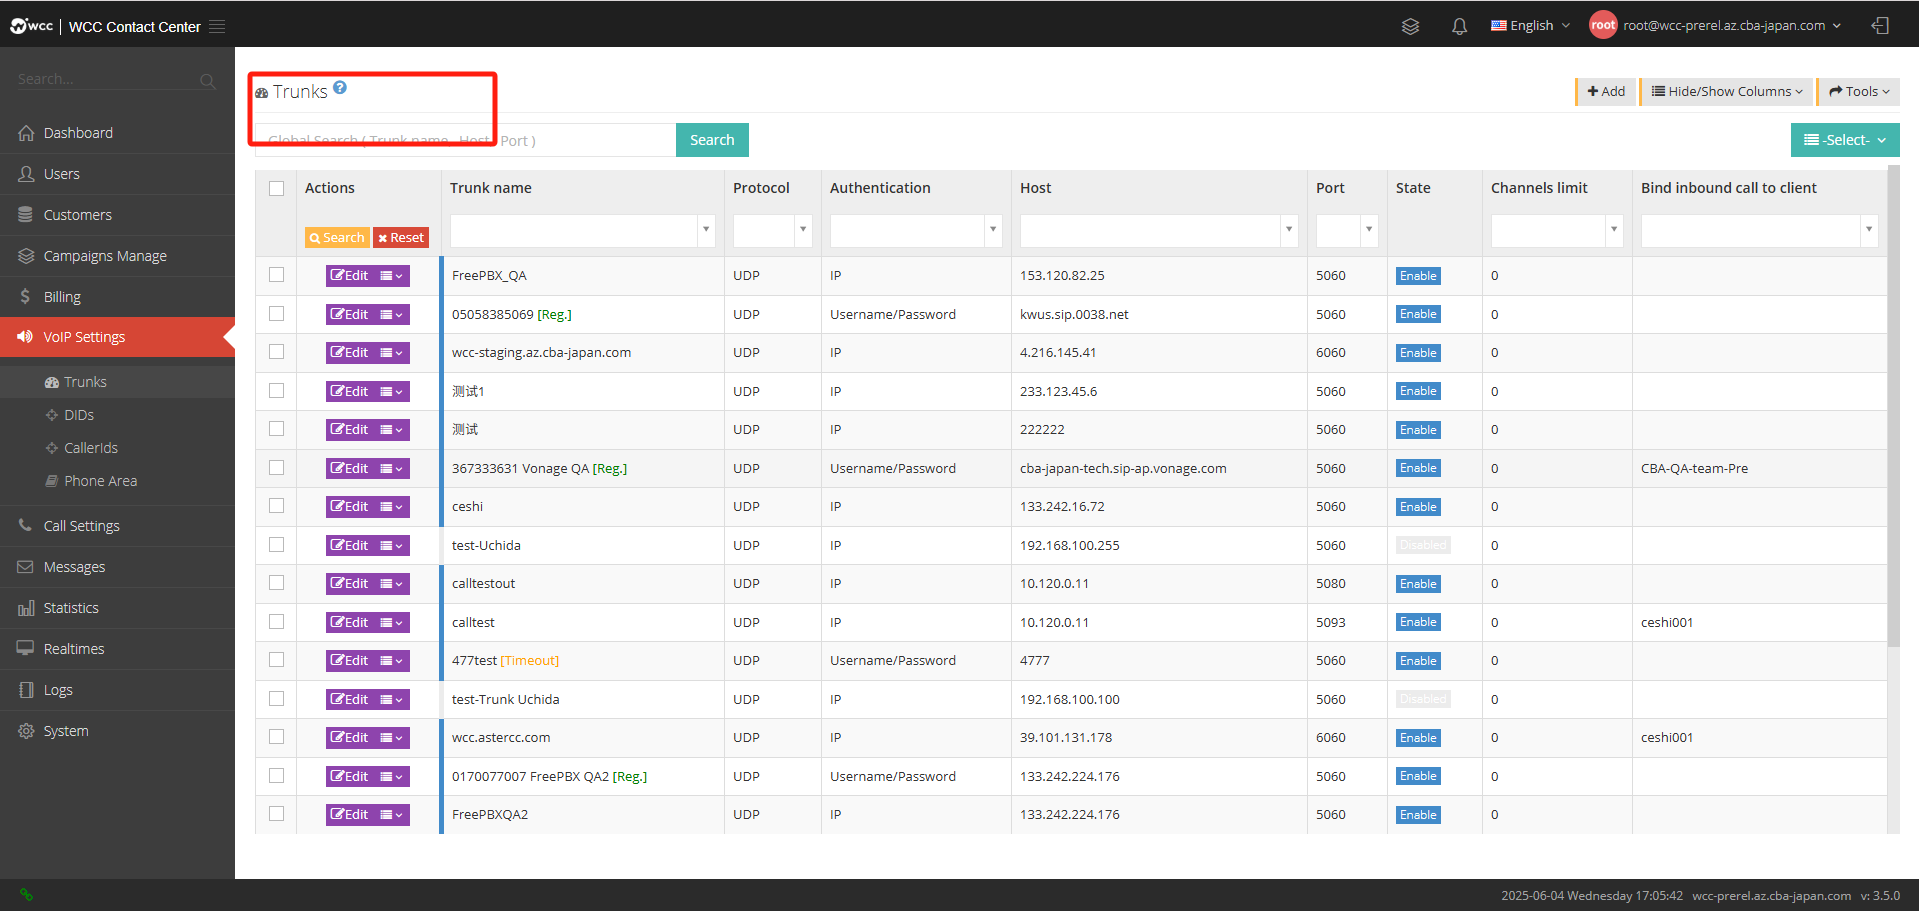
Select [Add] and enter [General] settings:
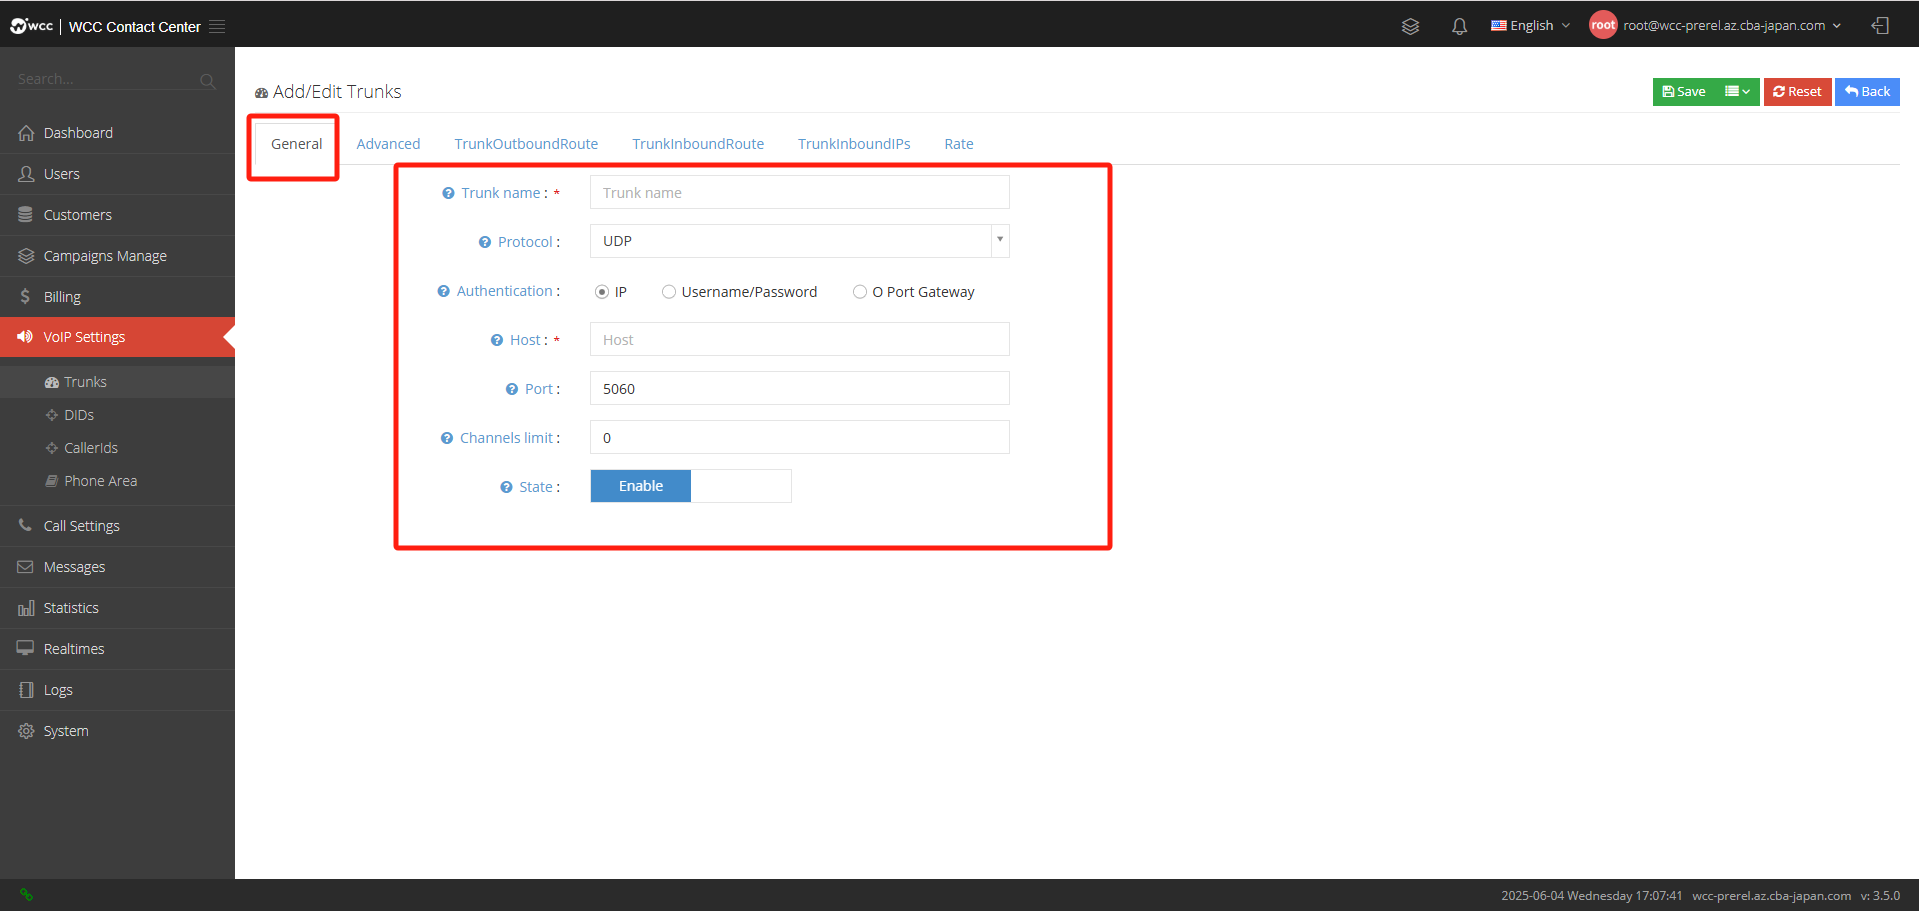
Trunk Name: Give the relay a name and you can change it at any time.
Protocol: Please select the protocol type of this relay.
Authentication: Please select the verification method of this relay. The following steps vary according to the verification method. Add the management relay management interface [Verification Method]. The system defaults to [IP] (as shown below)

Host: Please enter the address of this server, it may be a domain or IP.
Port: Please enter the port number of this relay, the default is 5060.
Channels Limit: The number of channel limits indicates the maximum number of outbound calls, and 0 indicates no limit.
State: You can disable this relay according to your needs.
Add the edit relay management interface [Verification], and then select [Username/Password] (as shown in the figure below)
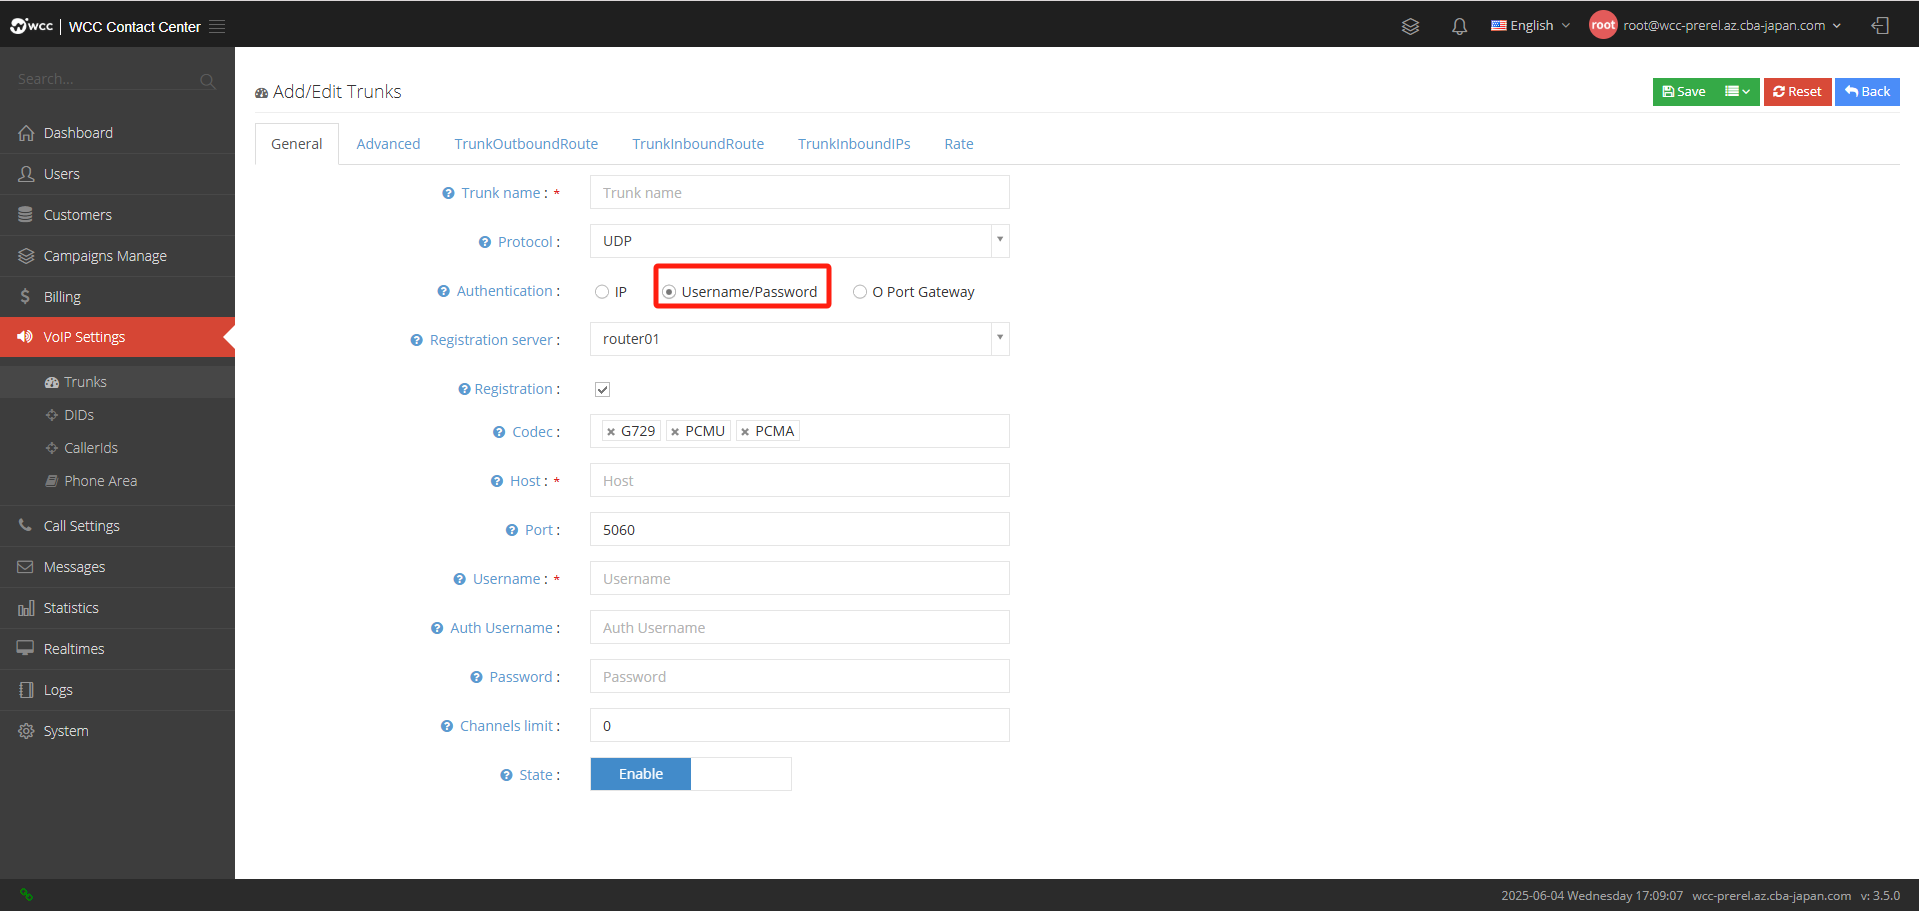
Register server: Please select a registration server.
Registration: When the verification method is username/password, you can choose whether to enable registration. If you enable registration, you need to continue filling in the registration information.
Codec: When the verification method is username/password verification, please select the voice encoding of this relay.
Host: Please enter the address of this server, it may be a domain or IP.
Port: Please enter the port number of this relay.
Username: When the verification method is username/password verification, please enter the username.
Auth username: Authenticate this username.
Password: When the verification method is username/password verification, please enter your password.
Channels Limit: The number of channel limits indicates the maximum number of outbound calls, and 0 indicates no limit.
State: You can disable this domain according to your needs.
Add the management relay management interface [Authentication], and then select [O Port Gateway] (as shown in the figure below).

Verification: The domain that needs to be verified.
State: You can disable this domain according to your needs.
In relay management, selecting [Edit] will display dial-out, failed, and unreceived messages (as shown in the figure below)
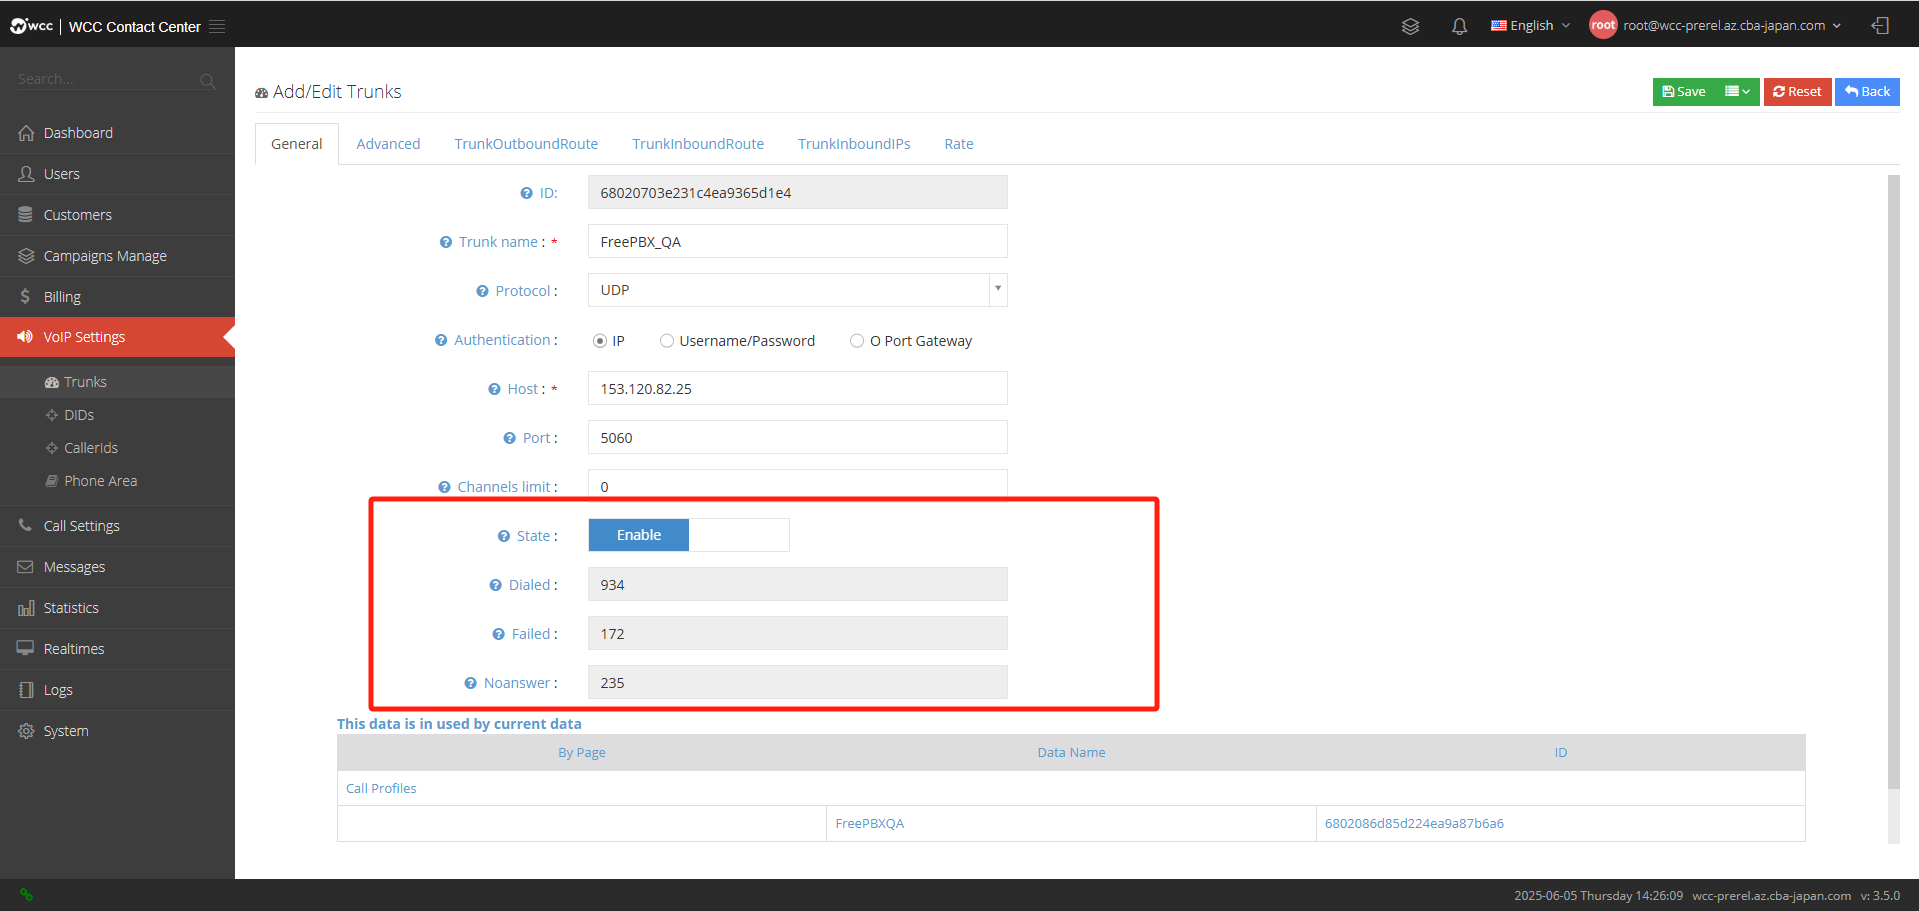
Dialed: Total number of calls have been made.
Failed: Number of failed calls.
Noanswer: Number of calls not answered.
【Advanced】Settings: (as shown in the figure below)
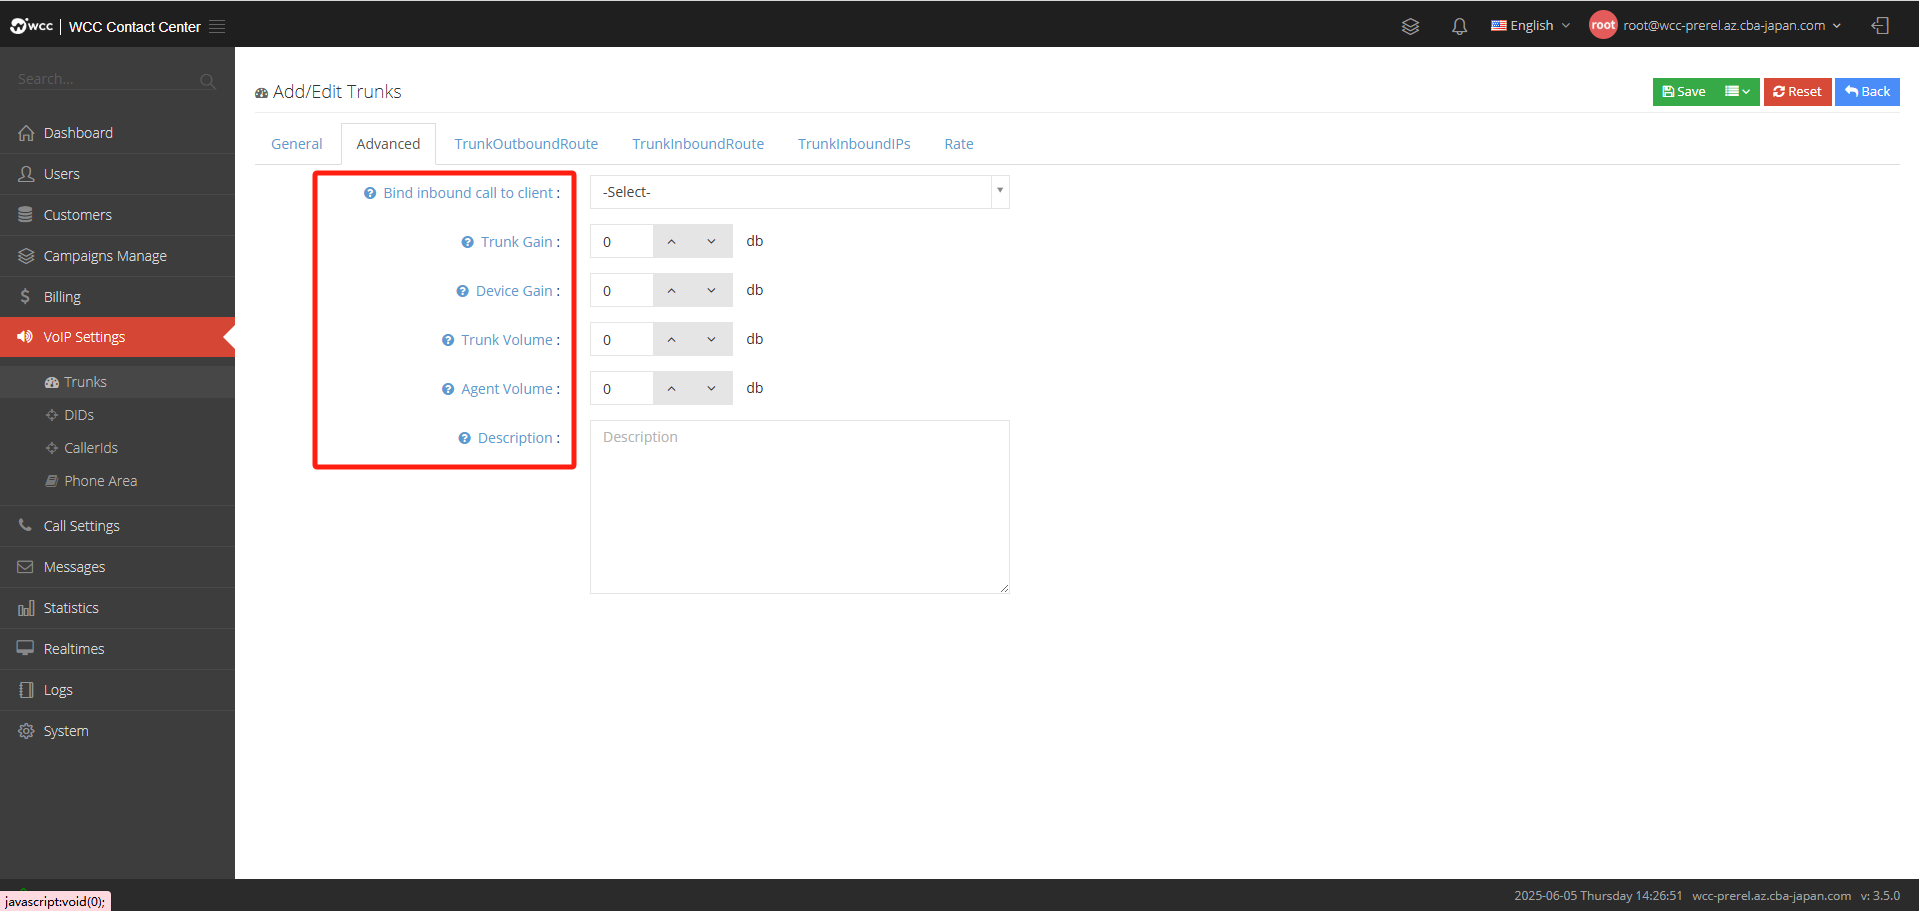
Bind inbound call to client: You can bind this trunk to a client, and then all calls from this trunk will be sent to this client.
trunk Gain: If 0, this function is disabled.
Device Gain: If 0, this function is disabled.
Trunk Volume: If 0, this function is disabled.
Agent Volume: If 0, this function is disabled.
Expiration: When registration is enabled, you can enter the registration timeout.
Description: You can fill in the description information of this relay and make notes.
[Out Call Rules] Settings: Select [Add Out Call Rules] to enter the Add Out Call Rules page. The outgoing call phones called through this relay will use this outgoing call rule.
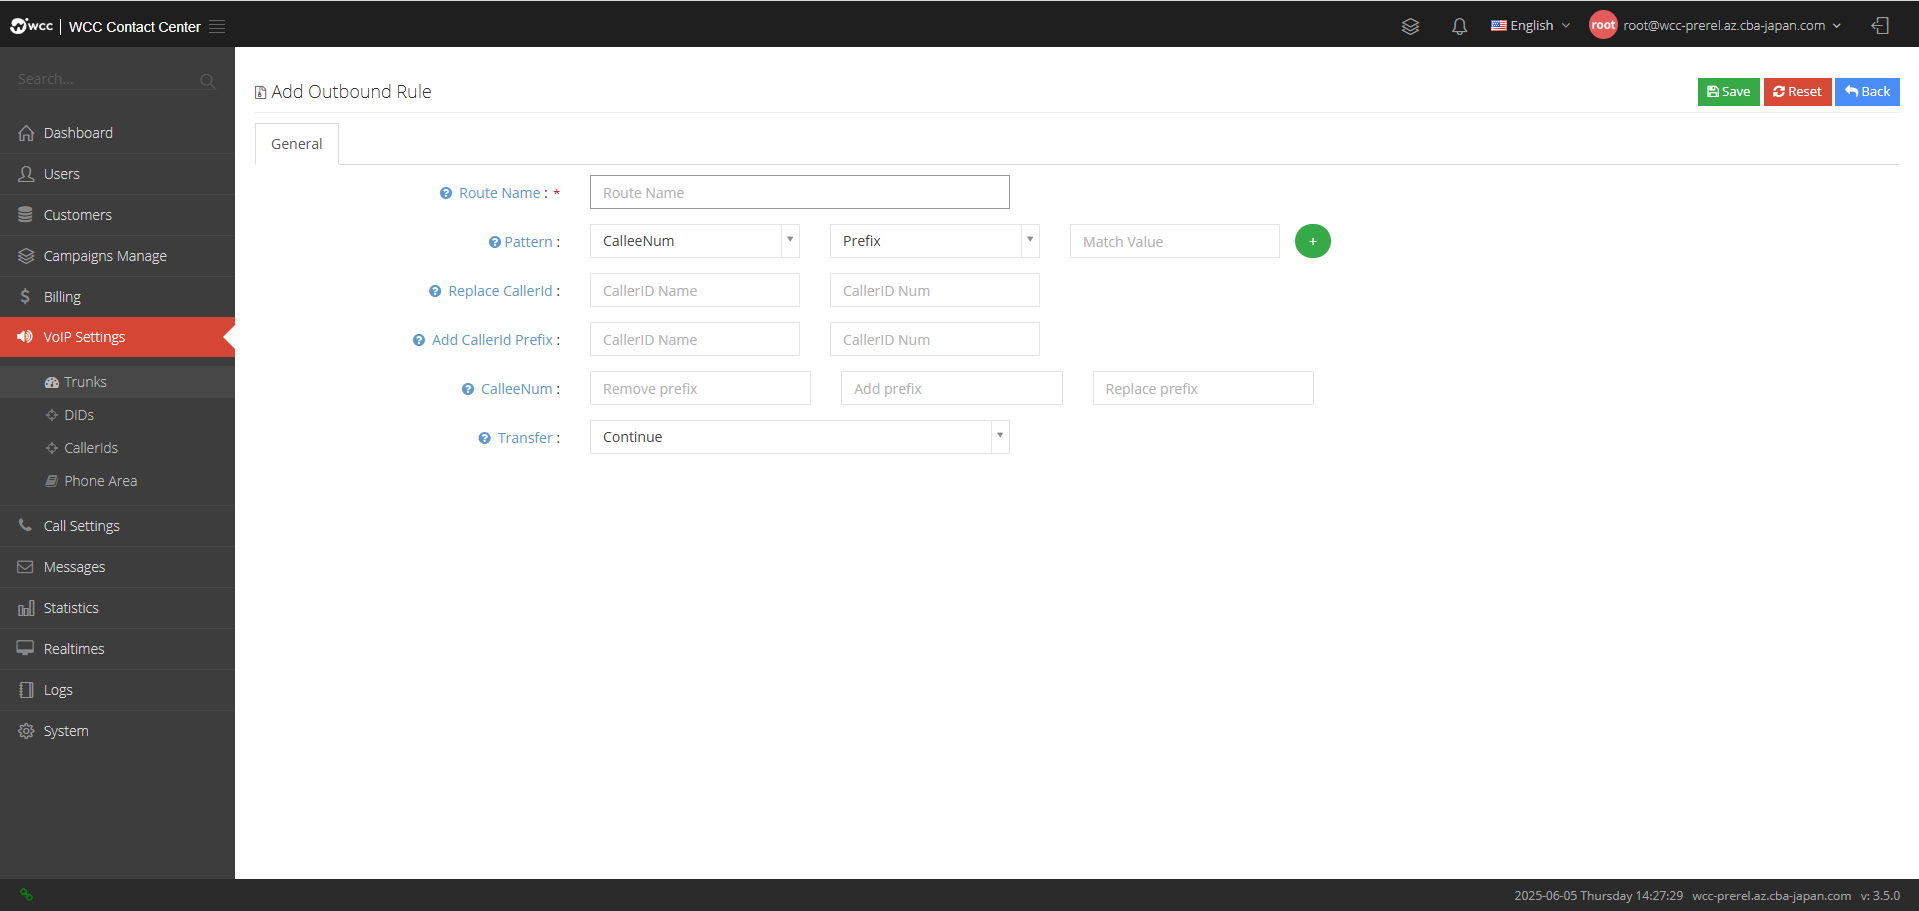
Route Name: Please name this callout rule.
Pattern: Set this matching rule, and calls that comply with this rule will perform the following operations.
Replace CallerId: Here you can reset the caller number and caller number name.
Add caller ID prefix: The system will add a prefix to the call number.
CalleeNum: You can add/remove the called number prefix or reset the called number.
Transfer: The system will perform this action when the route is matched.
[Incoming IP] Settings:
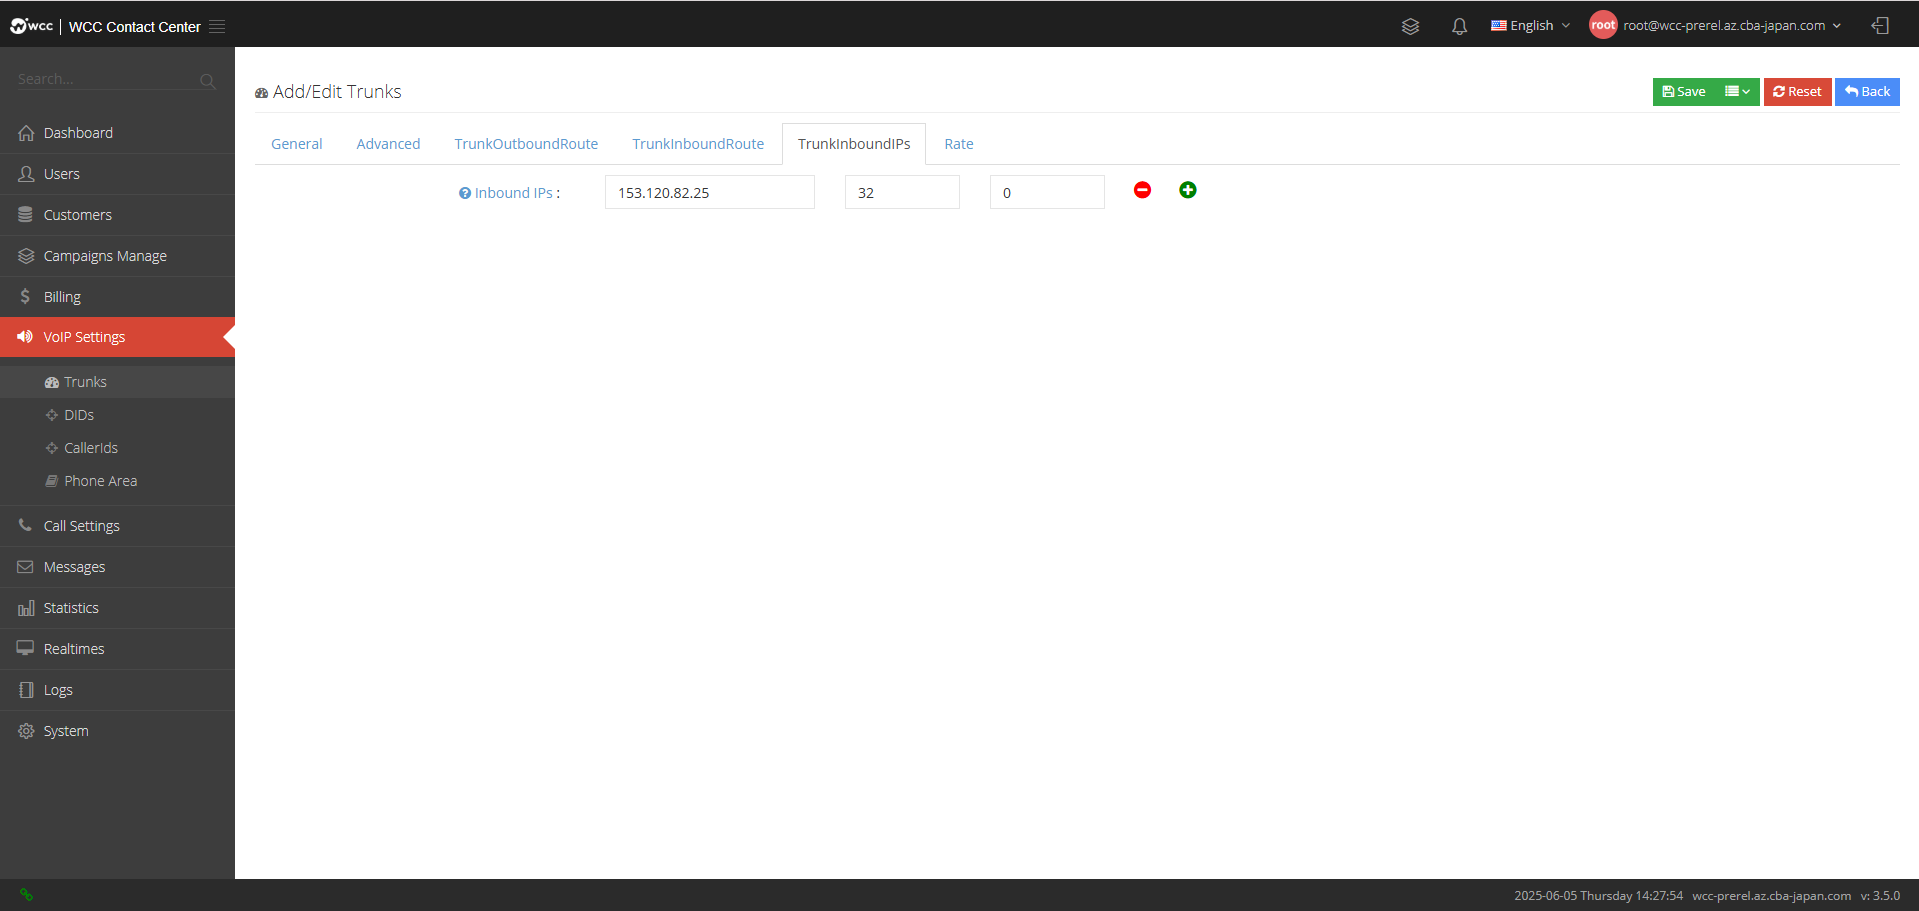
Incoming IPs: Set the IP address that allows access, and you can add multiple IP addresses at the same time.

Rate: The rate of payment.
Common rate: There is no initial time calculation, only the rate is calculated according to the billing method per minute.
Rate plans: Choose billing based on the set rate plan.
DID number:
The DID number refers to the telephone number provided by the telecom operator that can be called into the system. It is the access number when an external call is in, that is, the called number. It is the telephone number announced by the company to the public, and can also be understood as the number dialed by the customer.
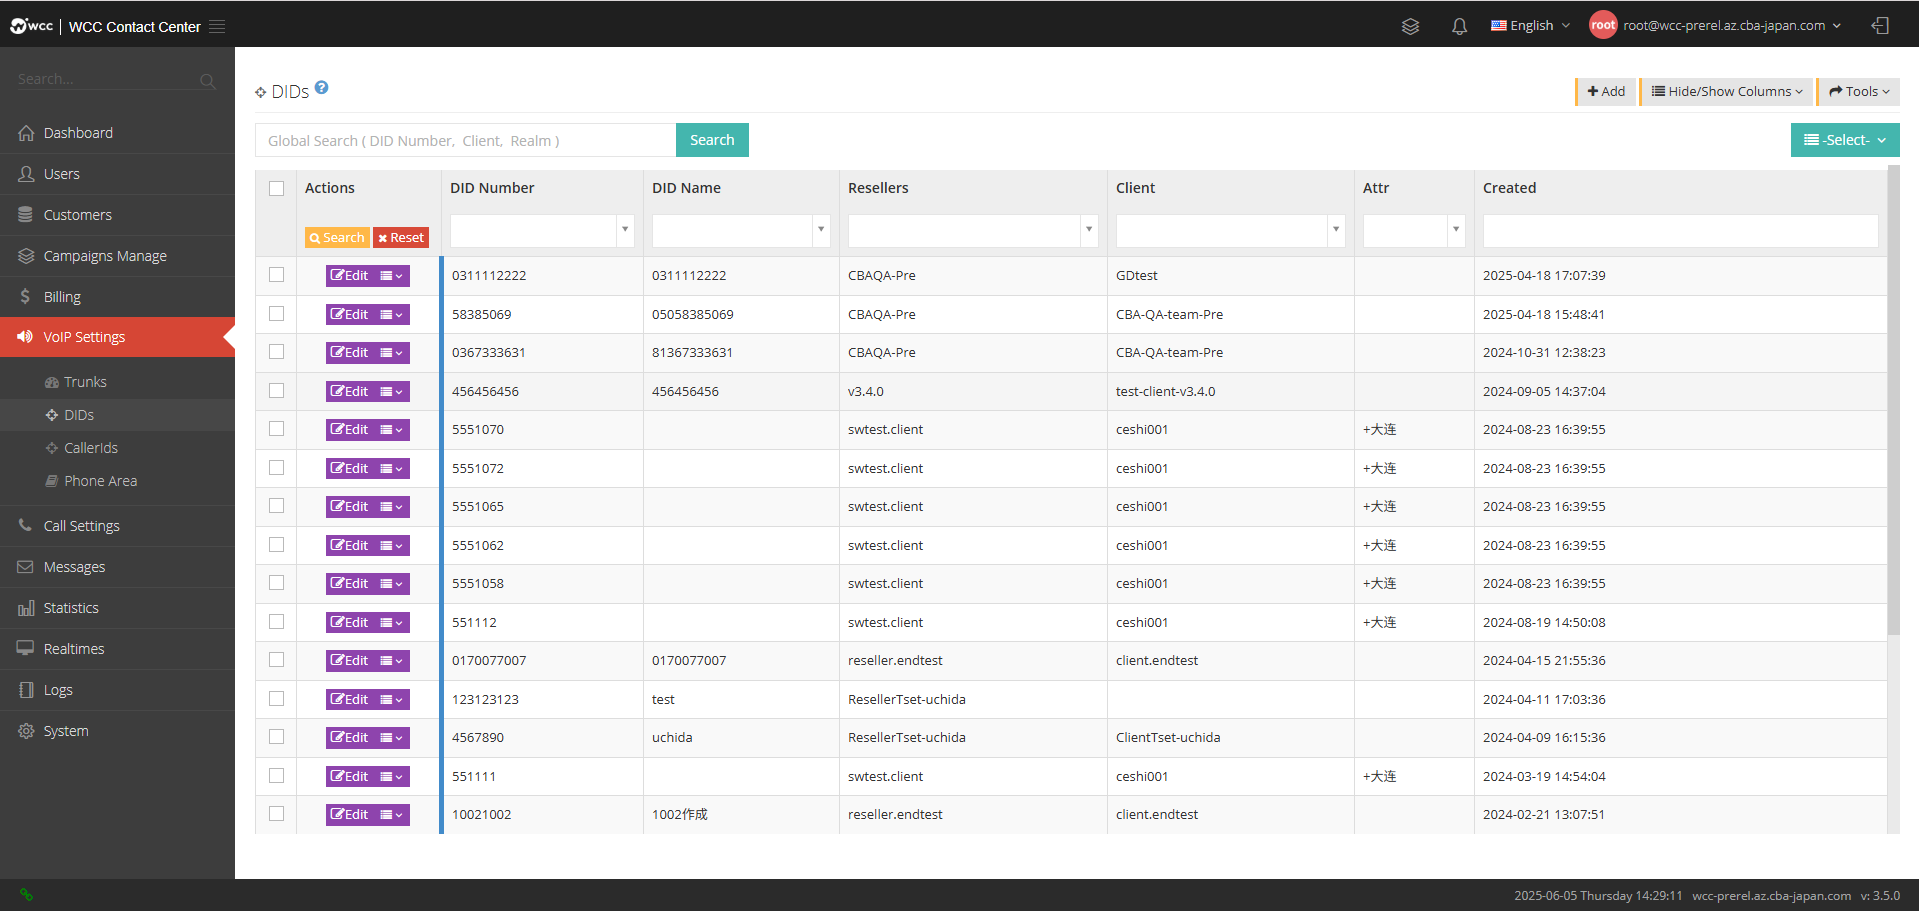
Click Add to add a new relay:
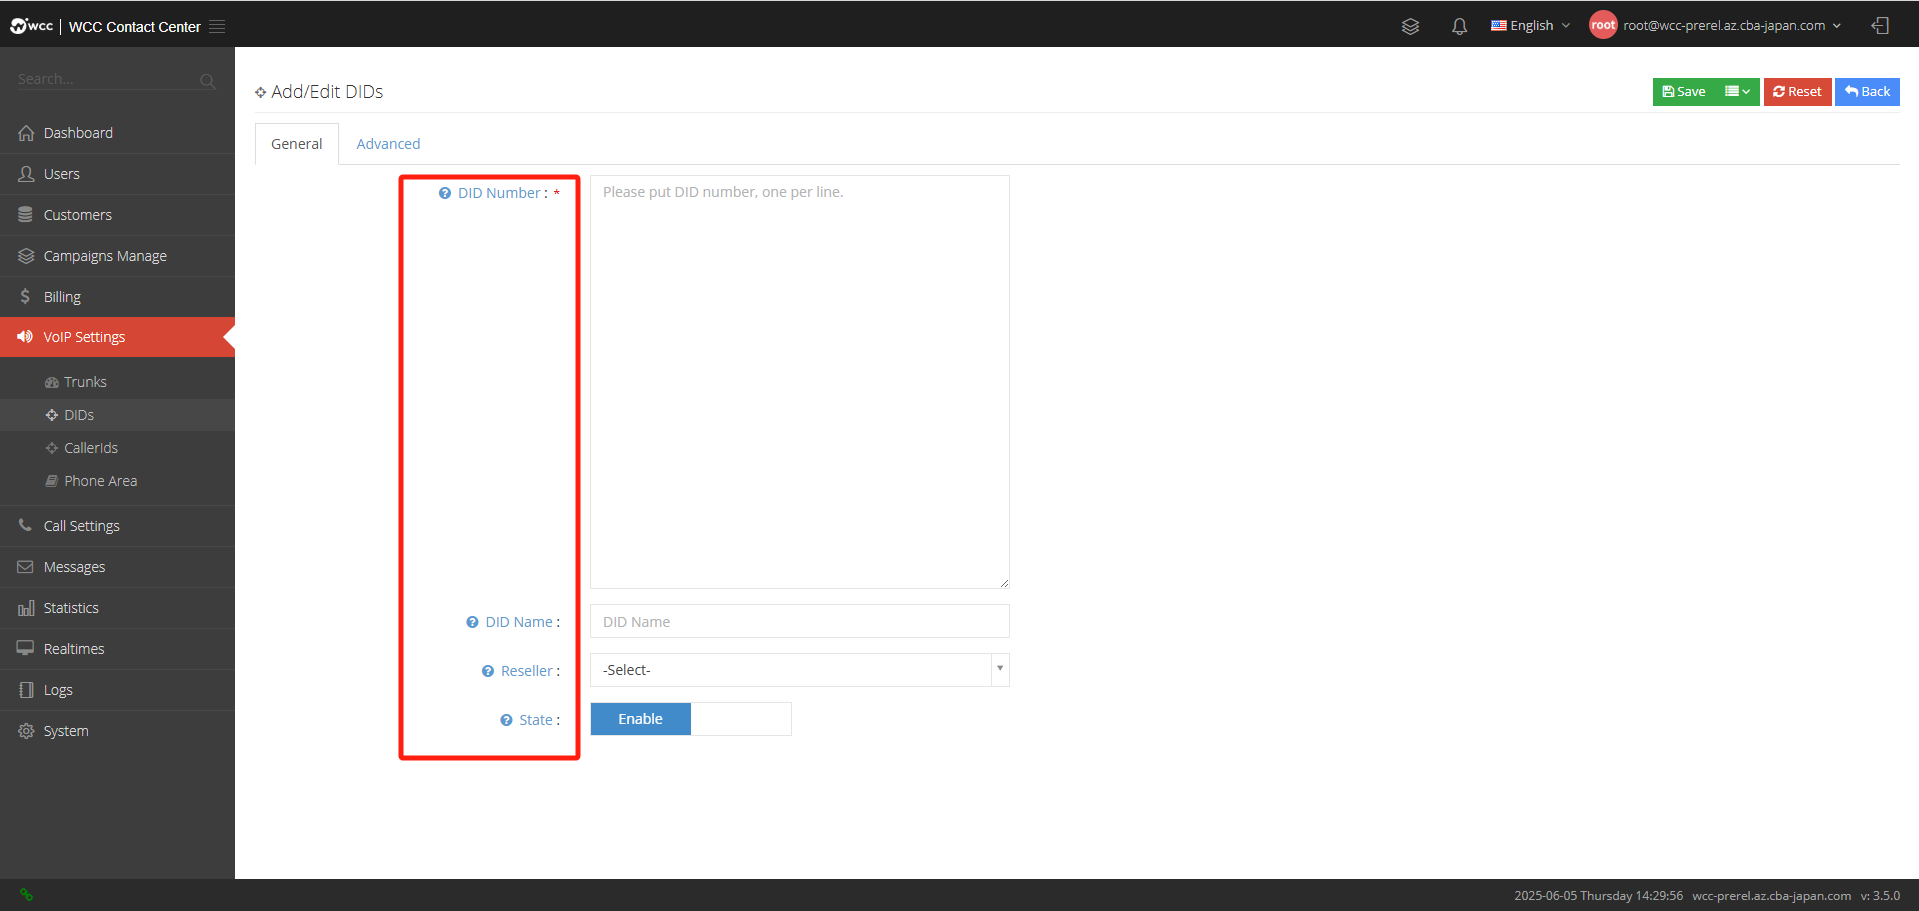
DID Number: Please enter the display number you want to add, one per line.
DID name: The DID name is used to help you identify the number in the system. If the DID name is set during statistics, this name will be used.
Reseller: Please select an agent for this did number.
State: After the DID number is disabled, the incoming call to the current DID will be unavailable.
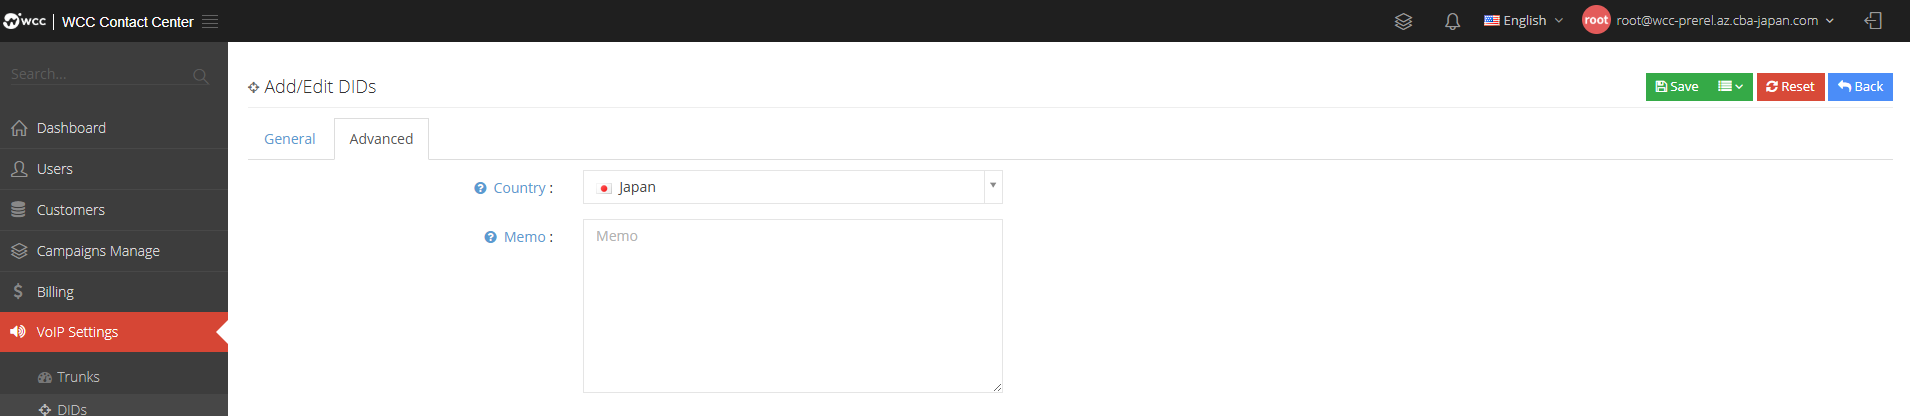
【Advanced】Settings: You can select a country and fill in comments and instructions.
CallerIds:
The displayed number is the call number, which is the number used to call the customer.
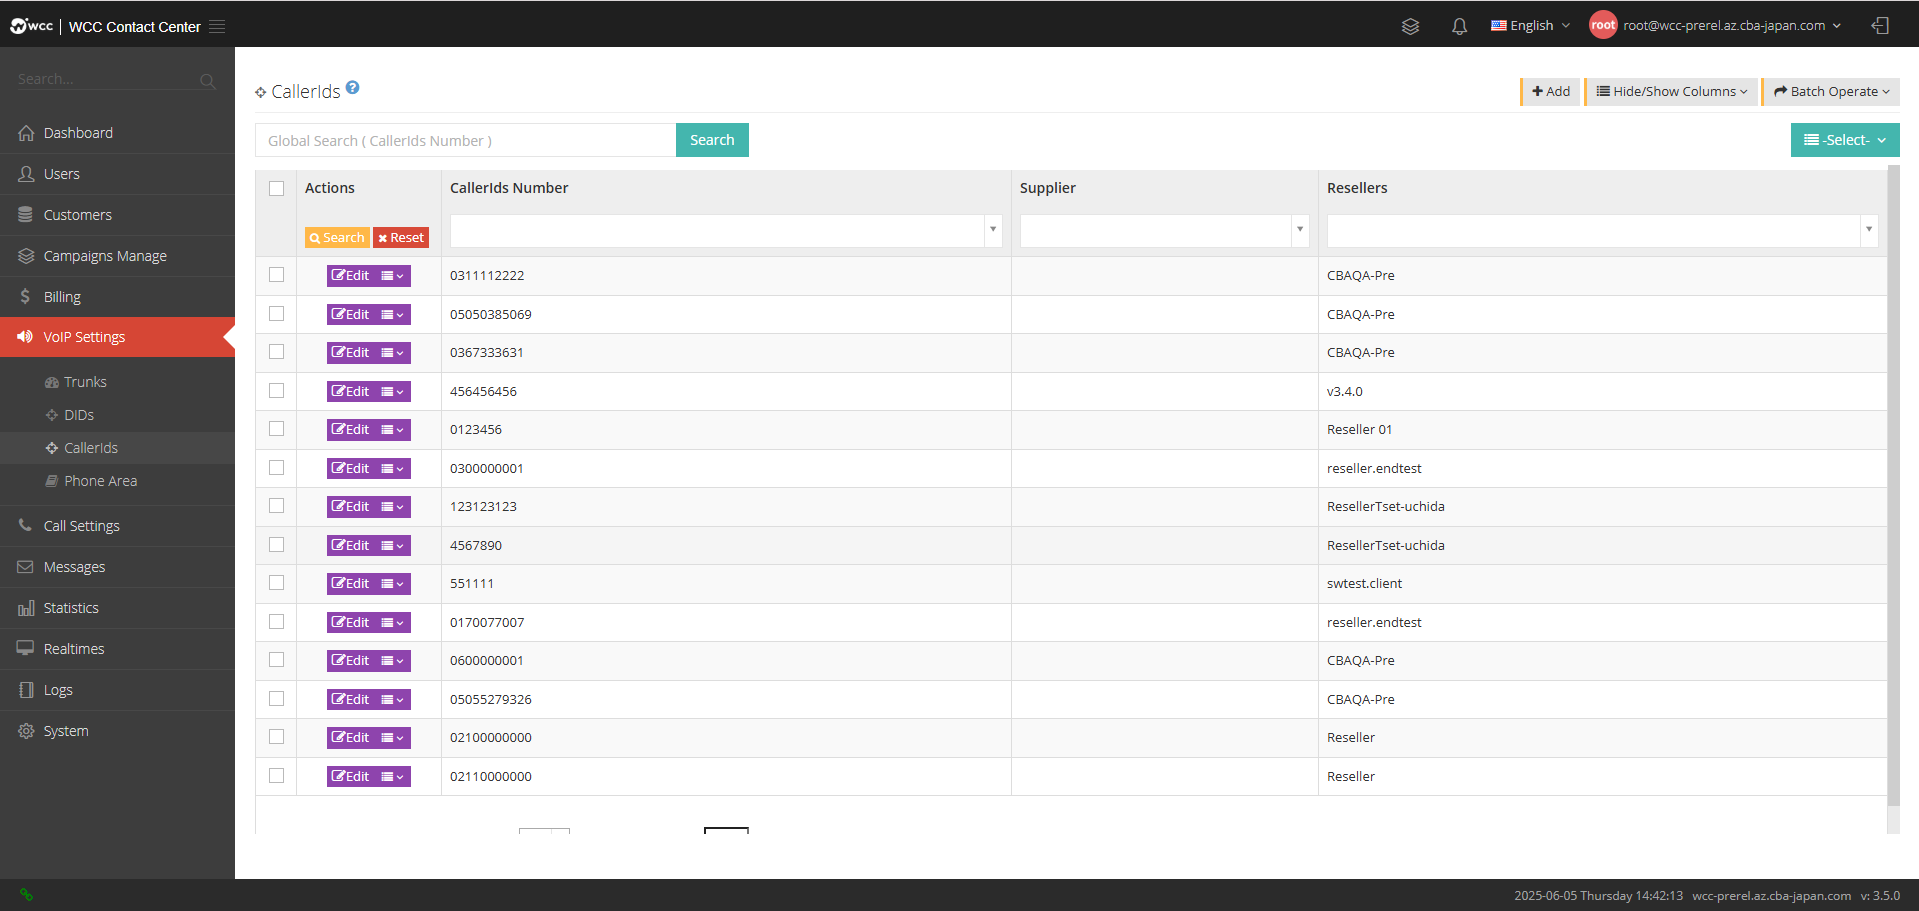
**Select [Add] and enter [General] settings: (as shown below) **
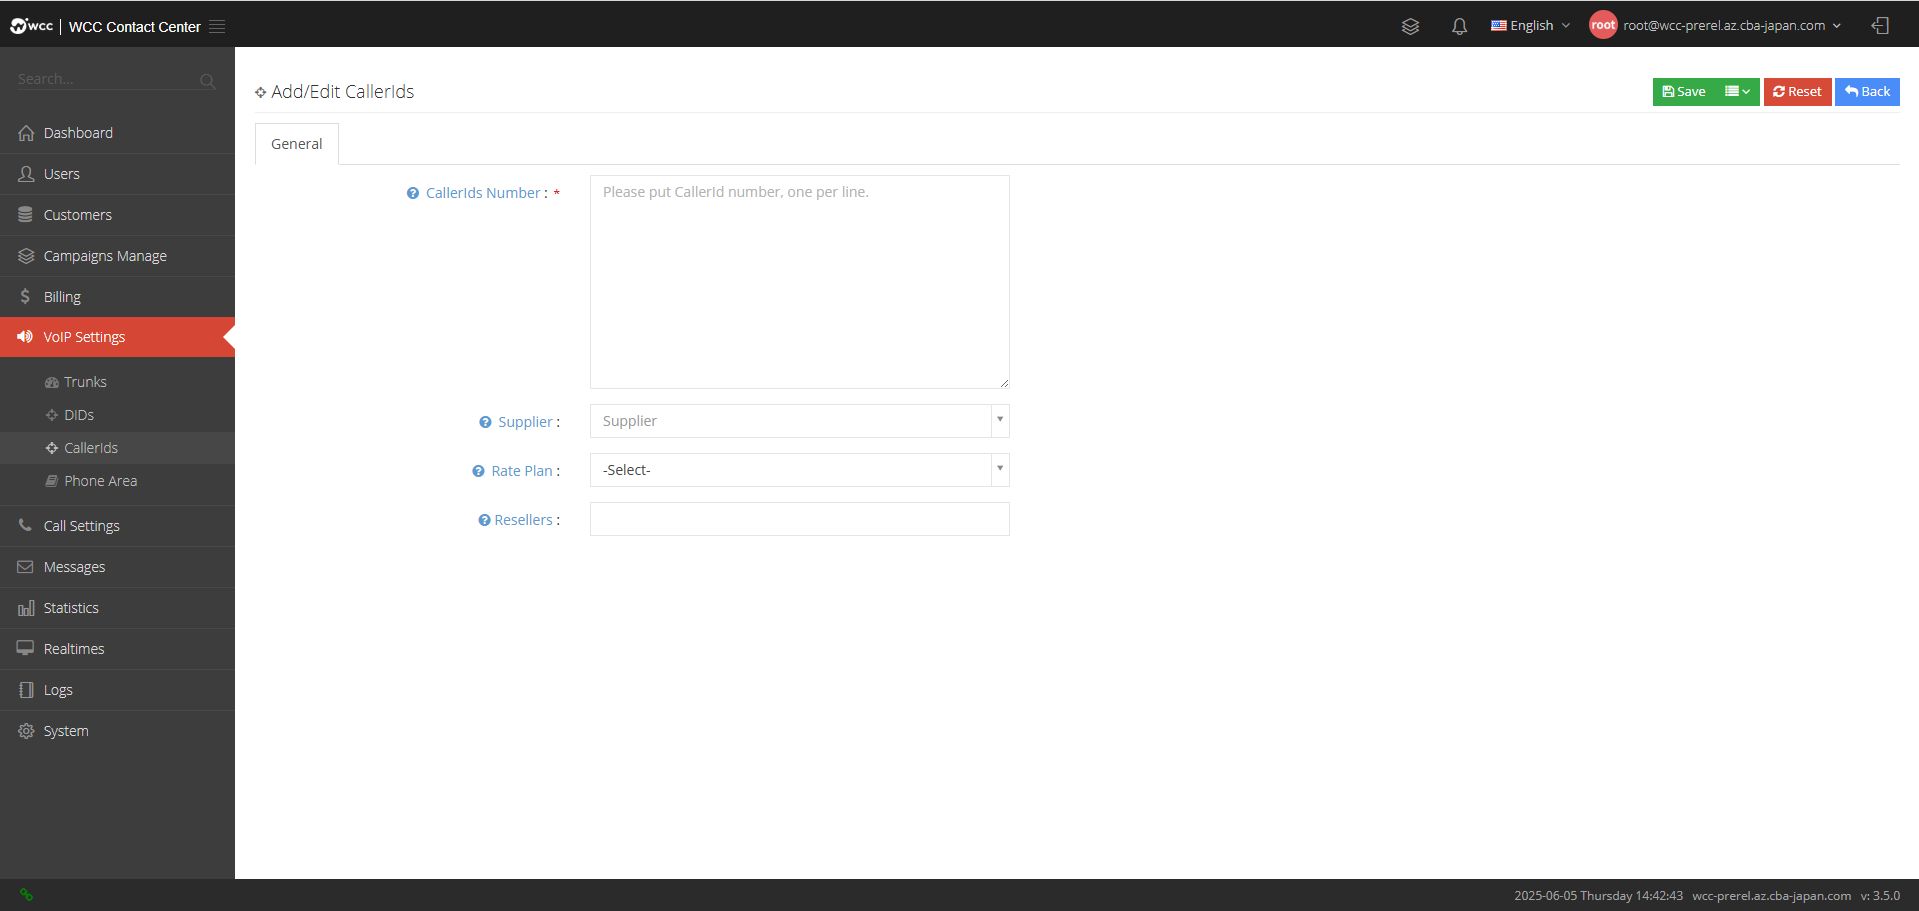
CallerIds Number: Please enter the display number you want to add, one per line.
Supplier: You can select a supplier for this display number.
Rate Plan: You can choose a rate plan for this display number.
Resellers: You can choose an agent for this display number.
Phone Area:
The number area information represents the number’s home location, and the system can match the location of the system’s call number based on the number prefix in the number’s home location.
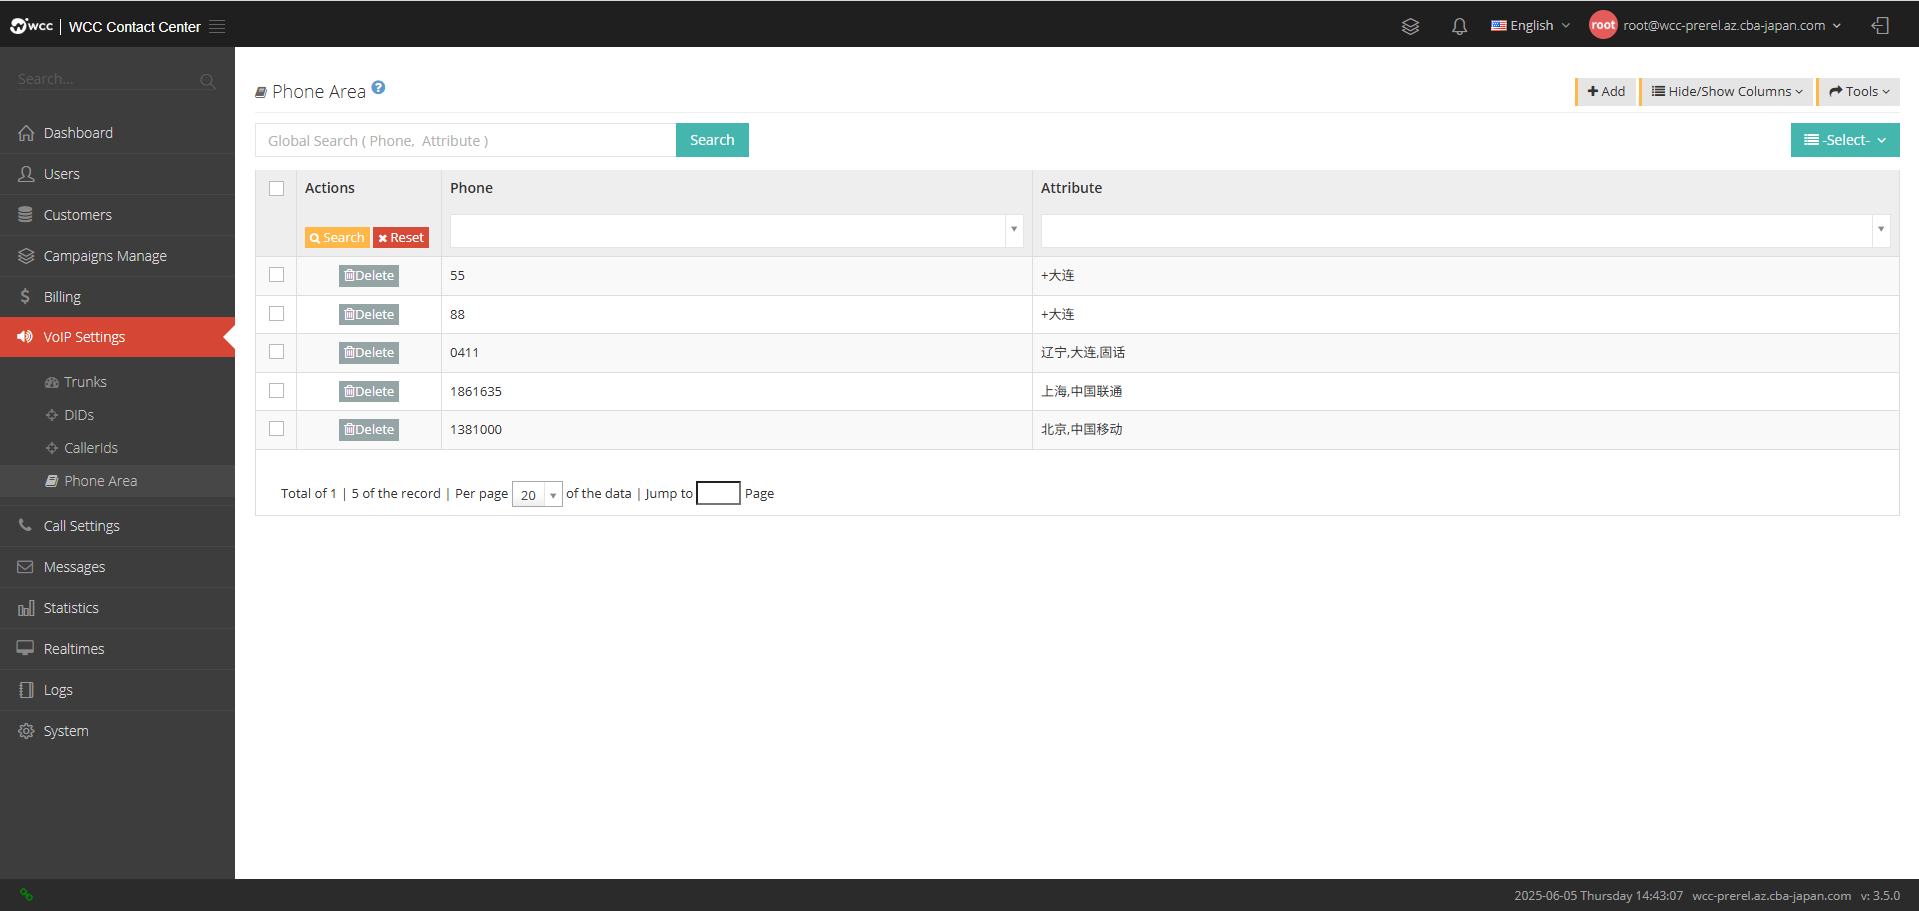
Select [Add] and enter [General] settings: (as shown in the figure below)
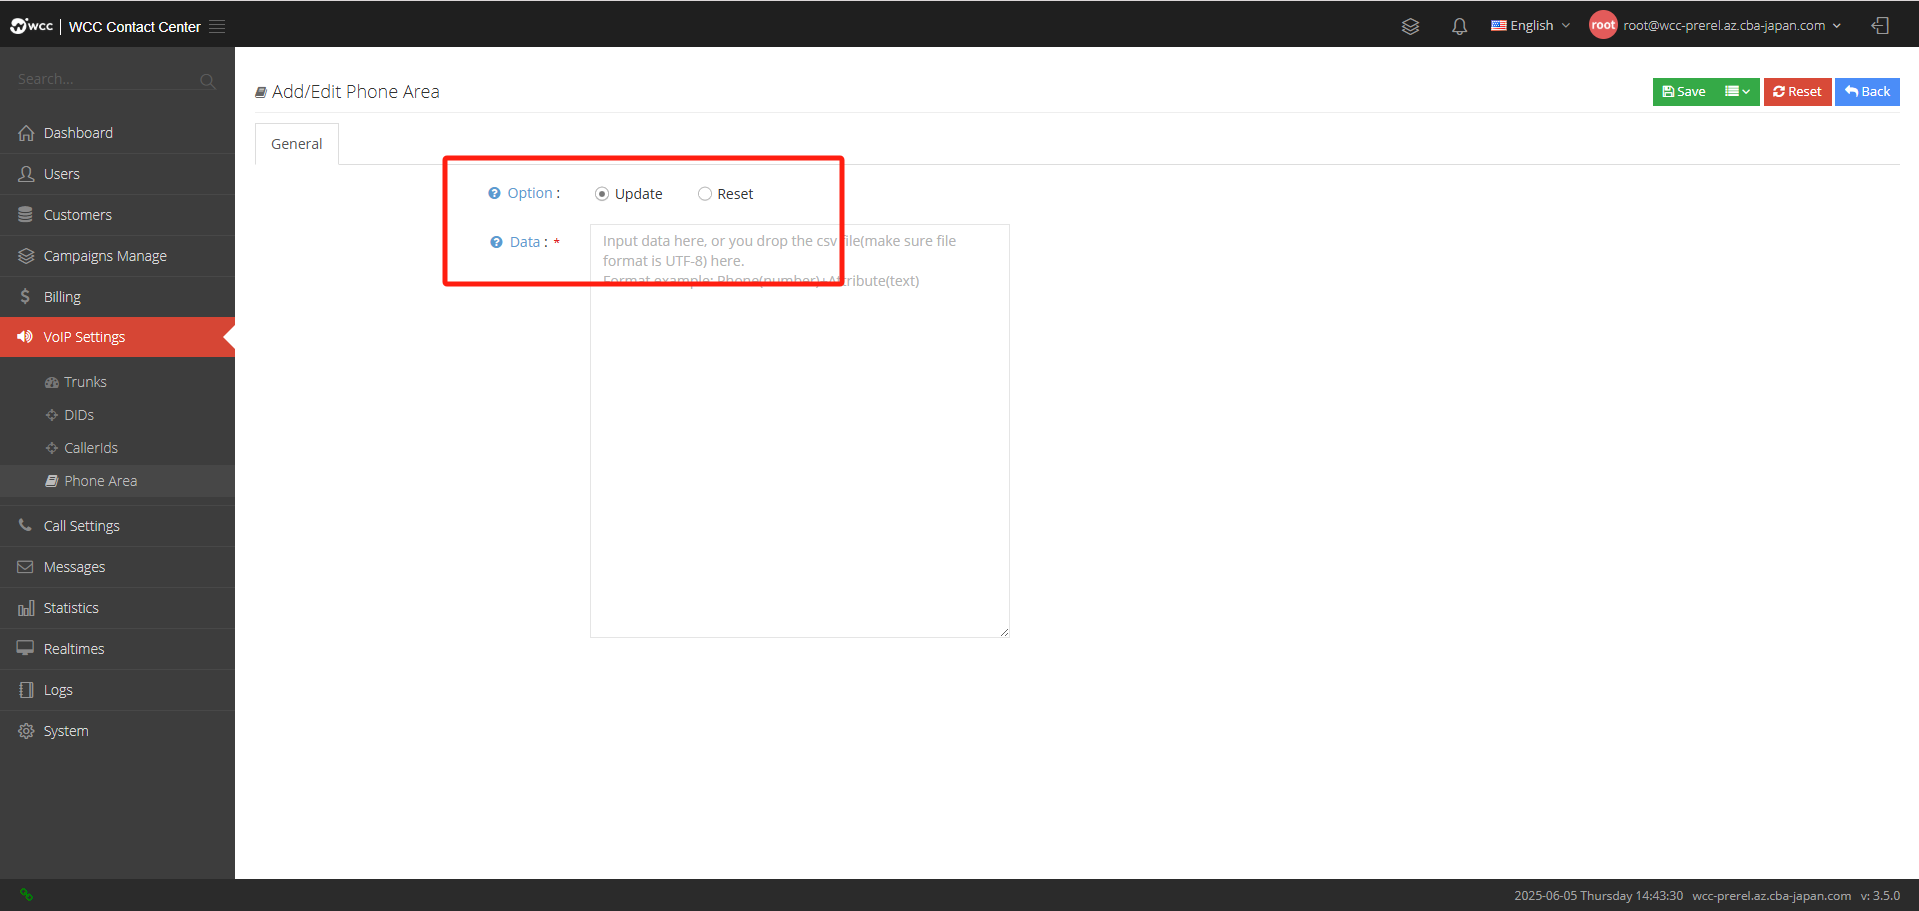
Option:
Update: If the data in the table is repeated with the currently set data, the table will be updated based on the set data.
Reset: Clear all number area information in the table, and then import the currently set data into the table.
Data: Fill in the data directly, or drag the csv file to this area (the file must be encoded using UTF-8).
g. Call settings:
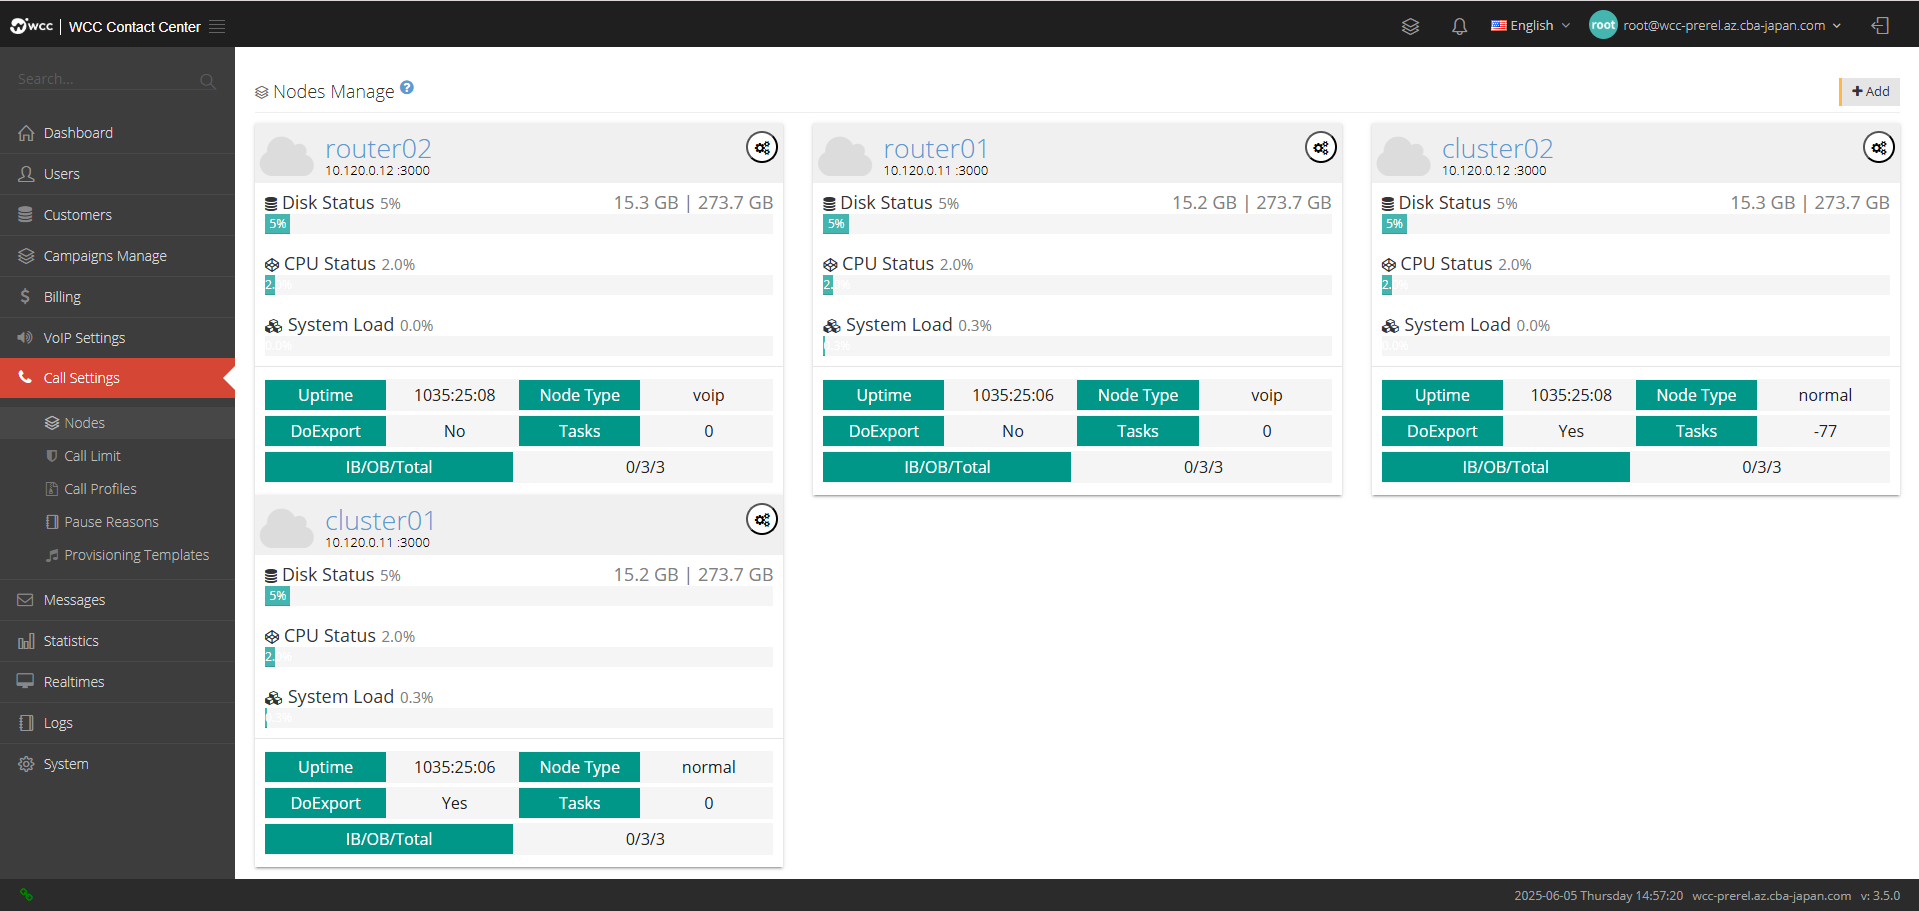
Nodes:
From node management, you can understand the setting status, CPU status, system load, system running time, node type and other system working conditions of the added node.
**Select [Add] and enter [General] settings: **
Node Type: Select the node type, divided into [Normal] and [Opensips].
When the node type is normal: (as shown below)
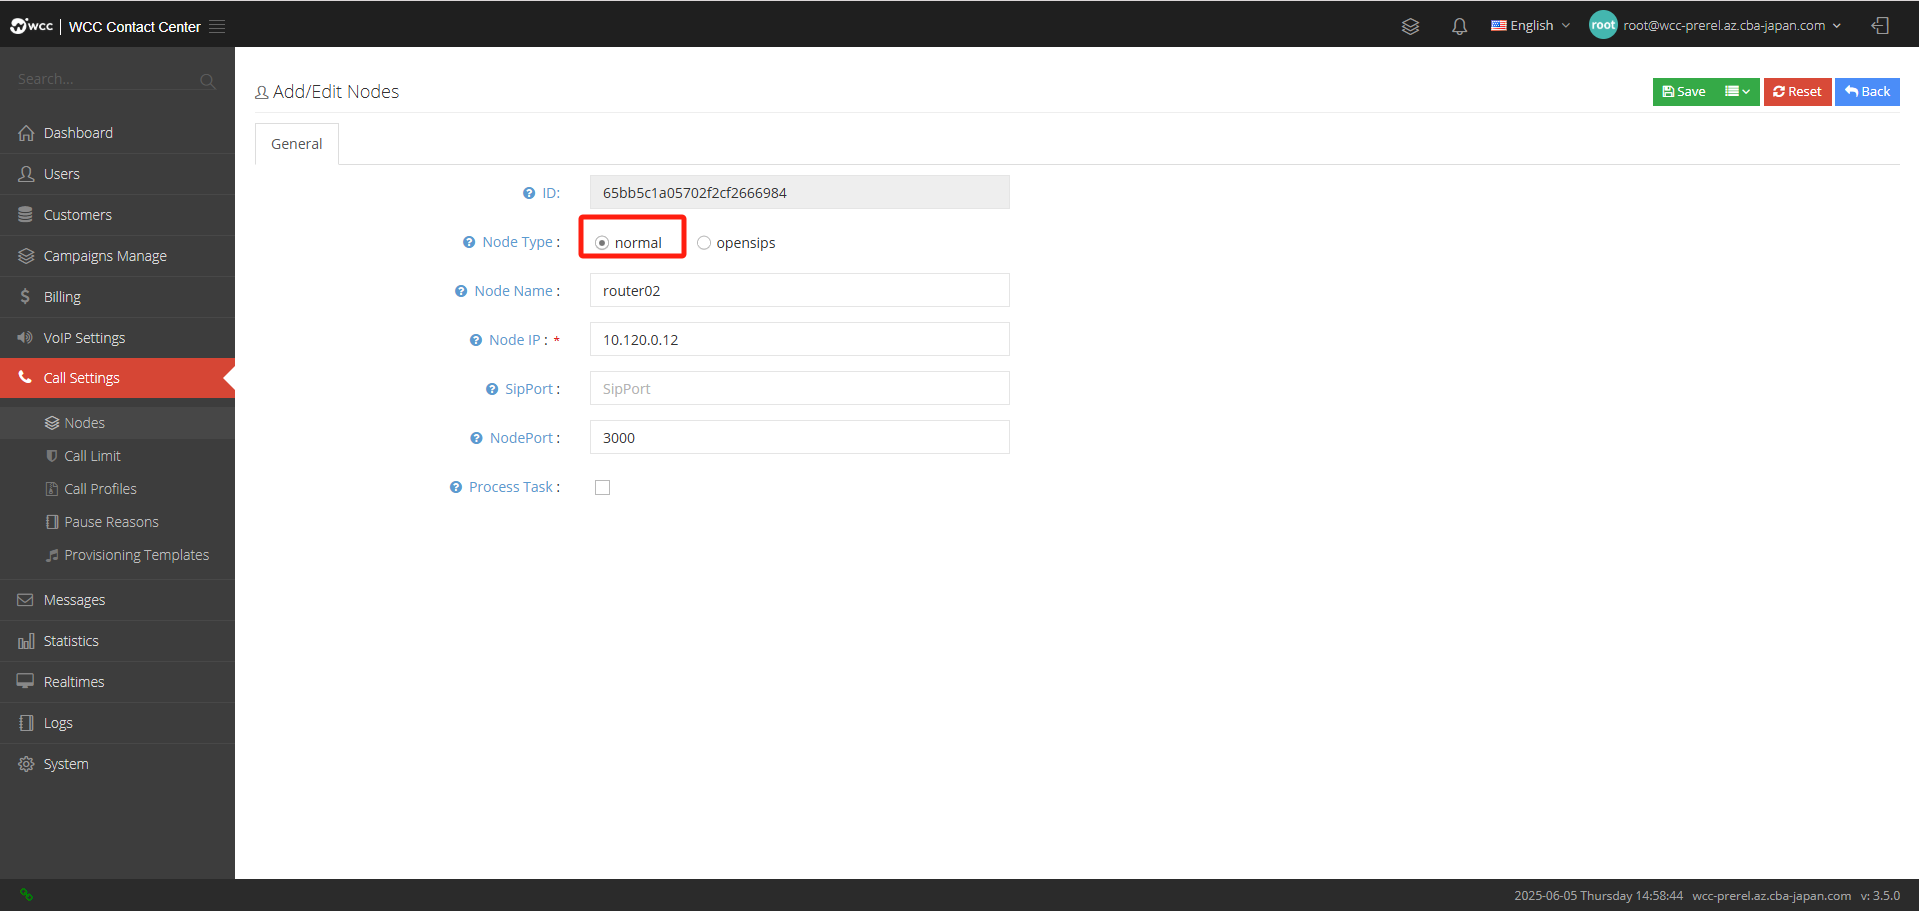
Node Name: Give this node a name for easy identification.
Node IP: Please enter the IP address of the astercc server.
Sip port: Node http port The default value is 3000.
Node port: The address used by the client webrtc.
Process Task: Whether to perform export tasks.
When the node type is opensips: (as shown below)
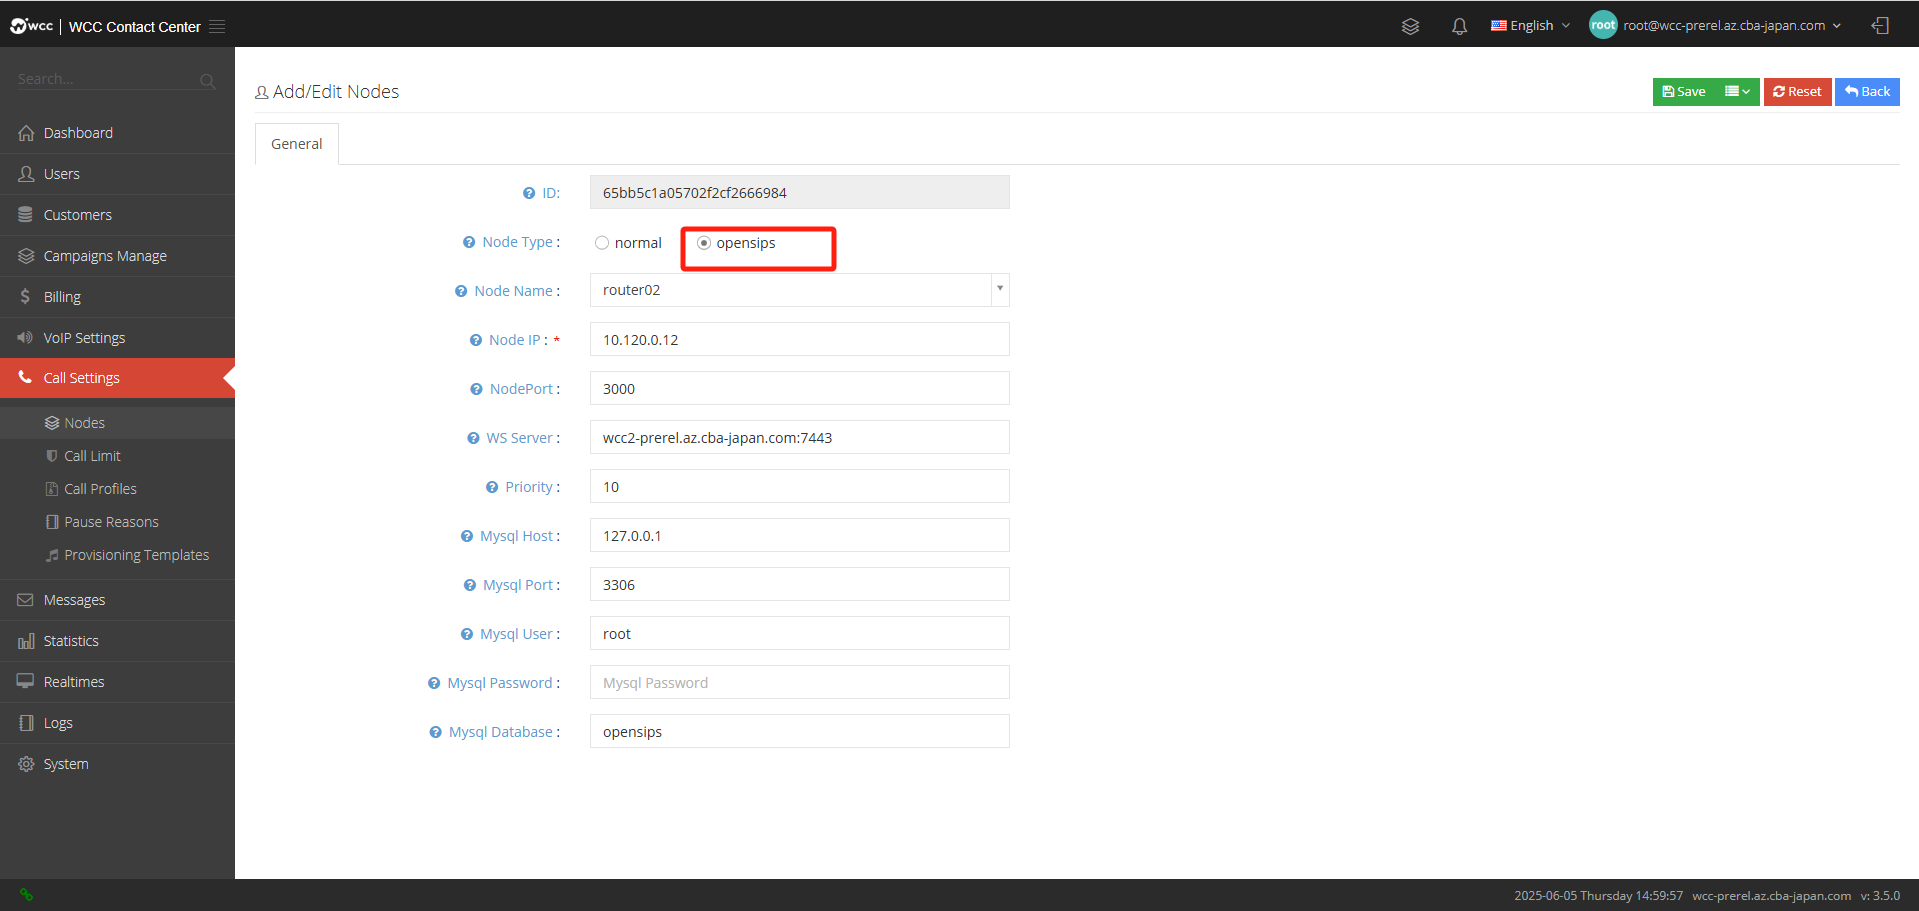
Node Name: Give this node a name for easy identification.
Node IP: Please enter the IP address of the astercc server.
Node port: The address used by the client webrtc.
WS Server: The address used by the client webrtc.
Priority: The priority of the use of WS servers, the agent will prioritize connections to WS servers with a higher priority. The larger the value, the higher the priority.
Mysql Host: Fill in the MySQL address used by Opensips.
Mysql port: Fill in the MySQL port used by Opensips.
Mysql user: Fill in the MySQL username used by Opensips.
Mysql password: Fill in the MySQL password used by Opensips.
Mysql database: Fill in the MySQL database used by Opensips.
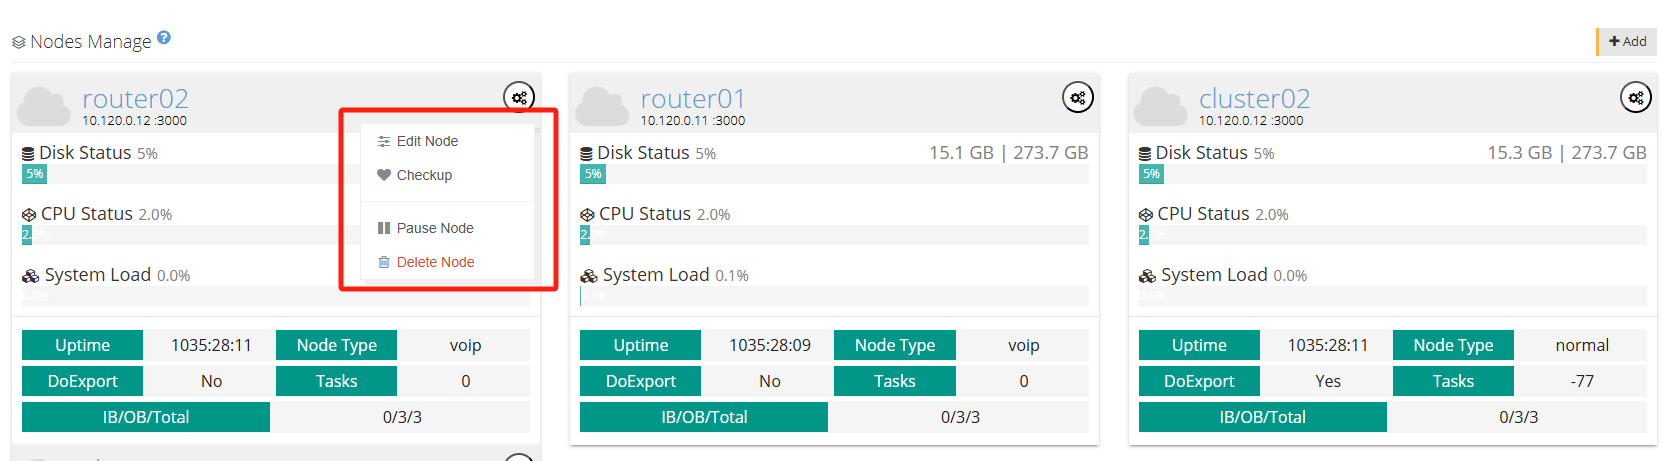
Edit node: Edit this node.
Checkup: Perform a health check on the node.
Pause Node: Pause the use of this node.
Delete node: Delete this node
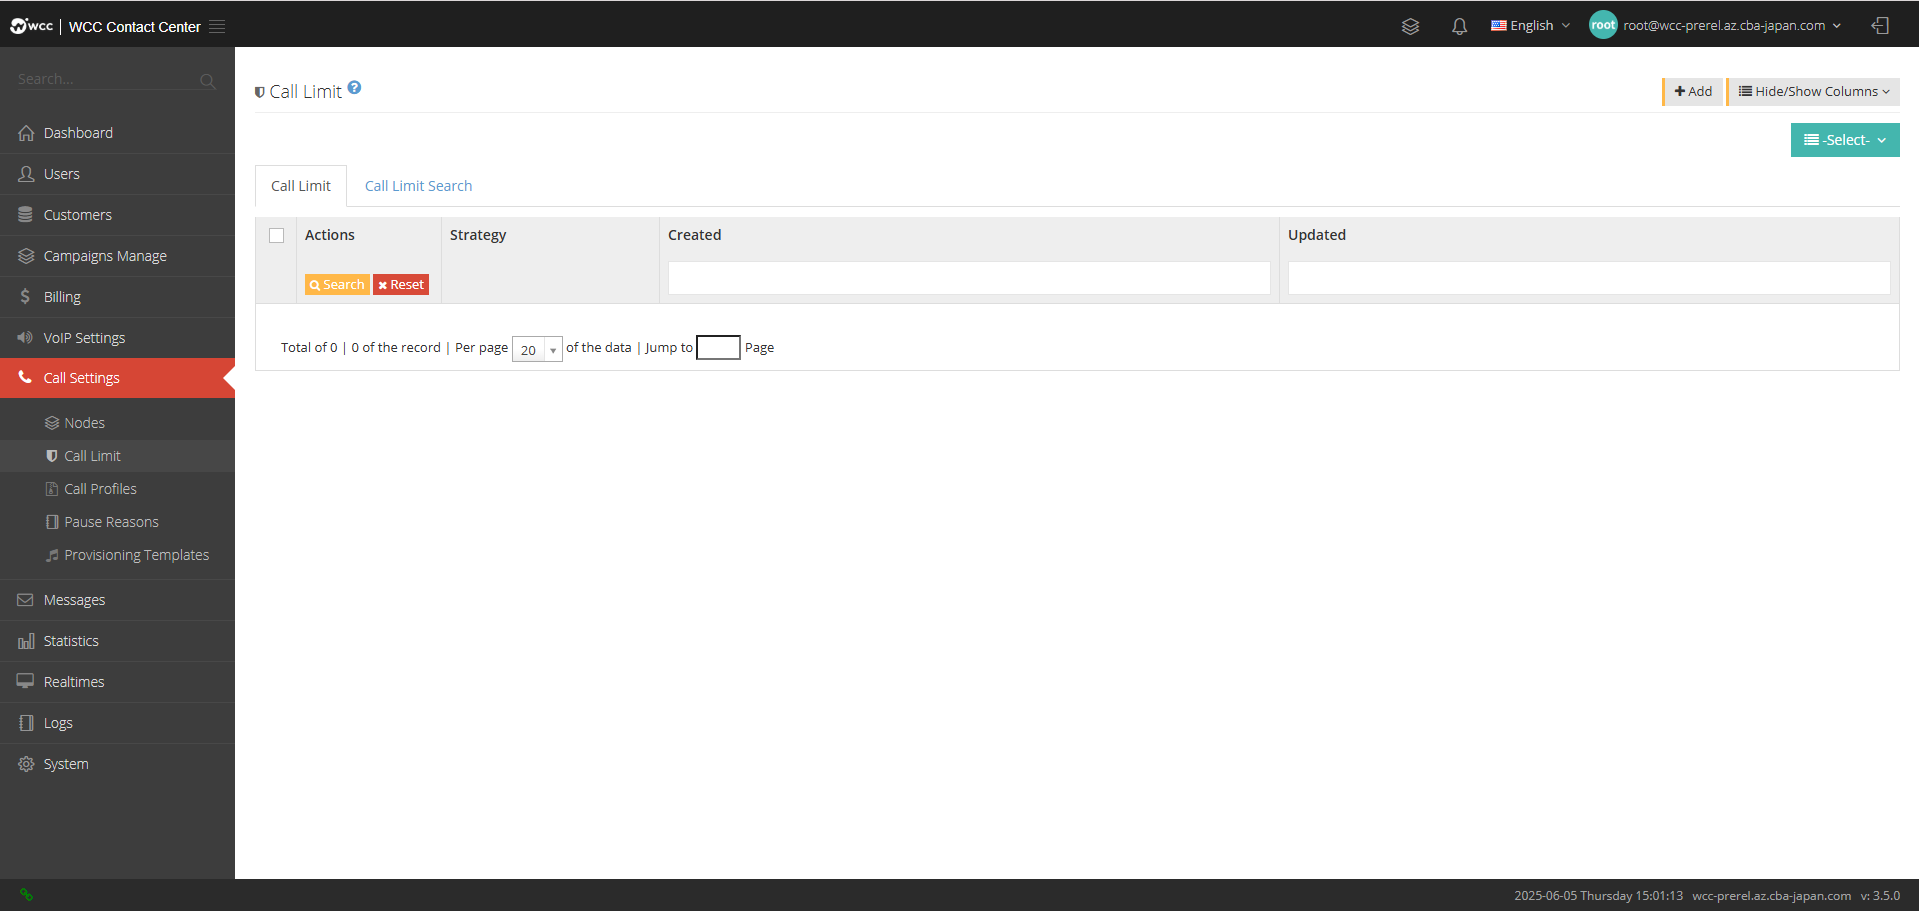
Call limit:
Call limit is the number of times a number can be called; at the same time, you can search for restricted phone numbers in Call limit search.
Select [Add] and enter [General] settings: (as shown below)
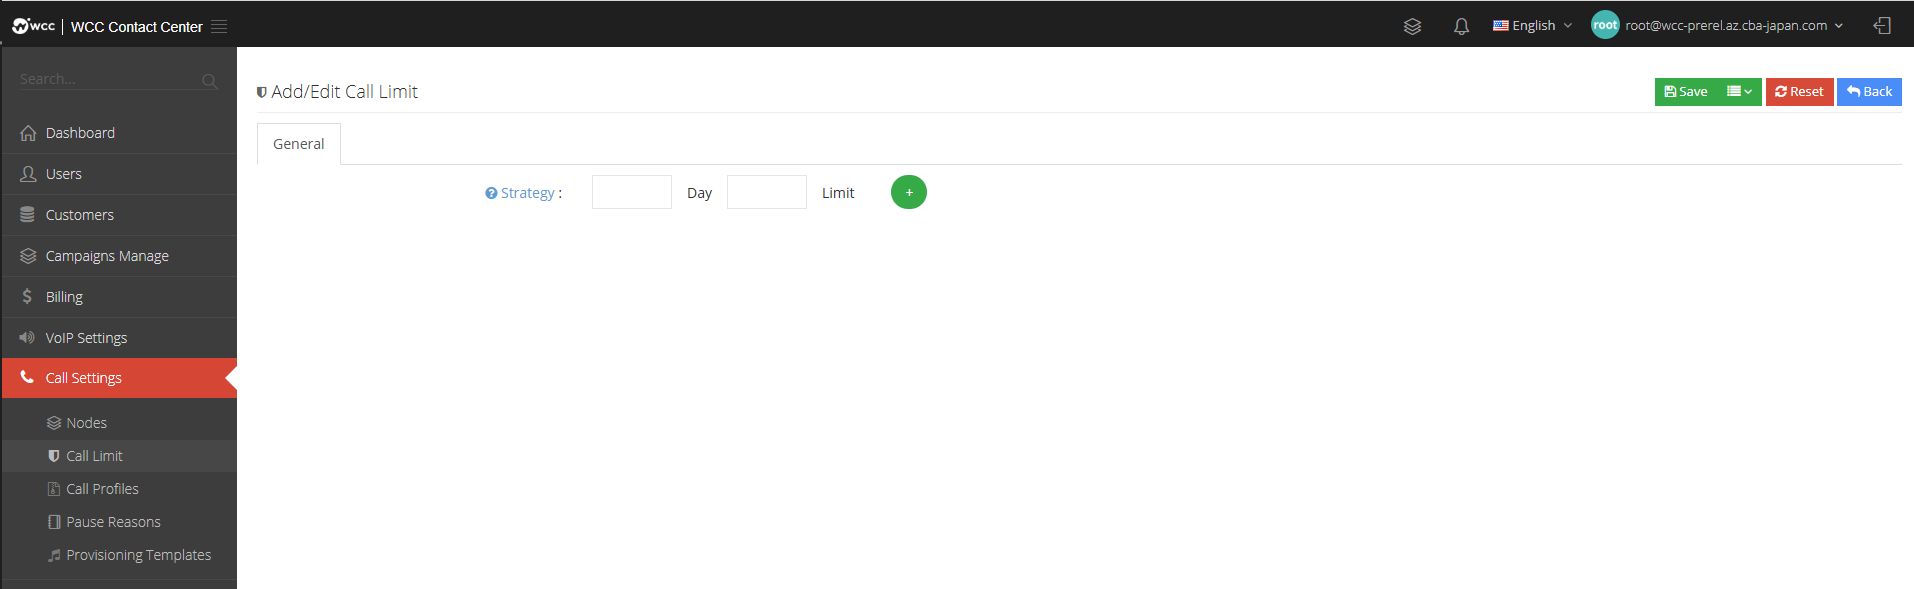
Strategy: You can call N times in M days beyond the set number of calls will be limited.
Call Profiles:
外呼档案用于为坐席选择外呼中继线,在一个外呼档案中可以配置有多个呼出路由呼入路由按顺序依次向下匹配,Client选择外呼档案后,根据匹配进行外呼。
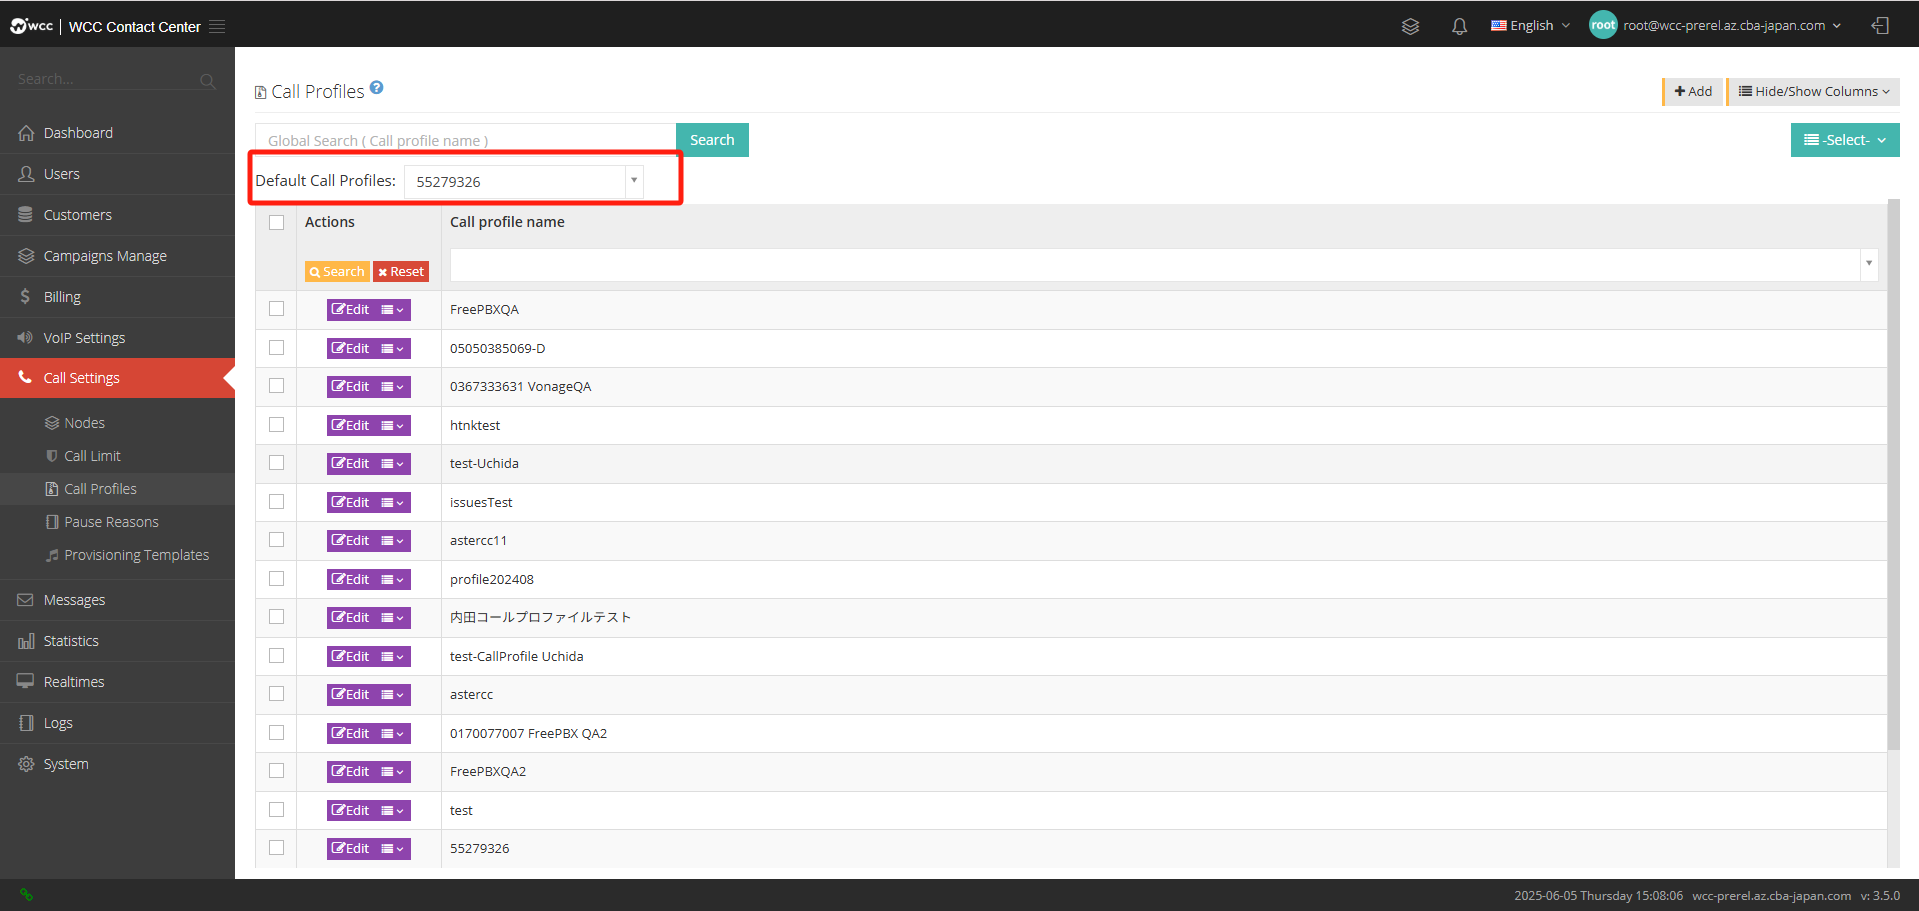
Click [Add] to enter [General] settings: (as shown in the figure below)
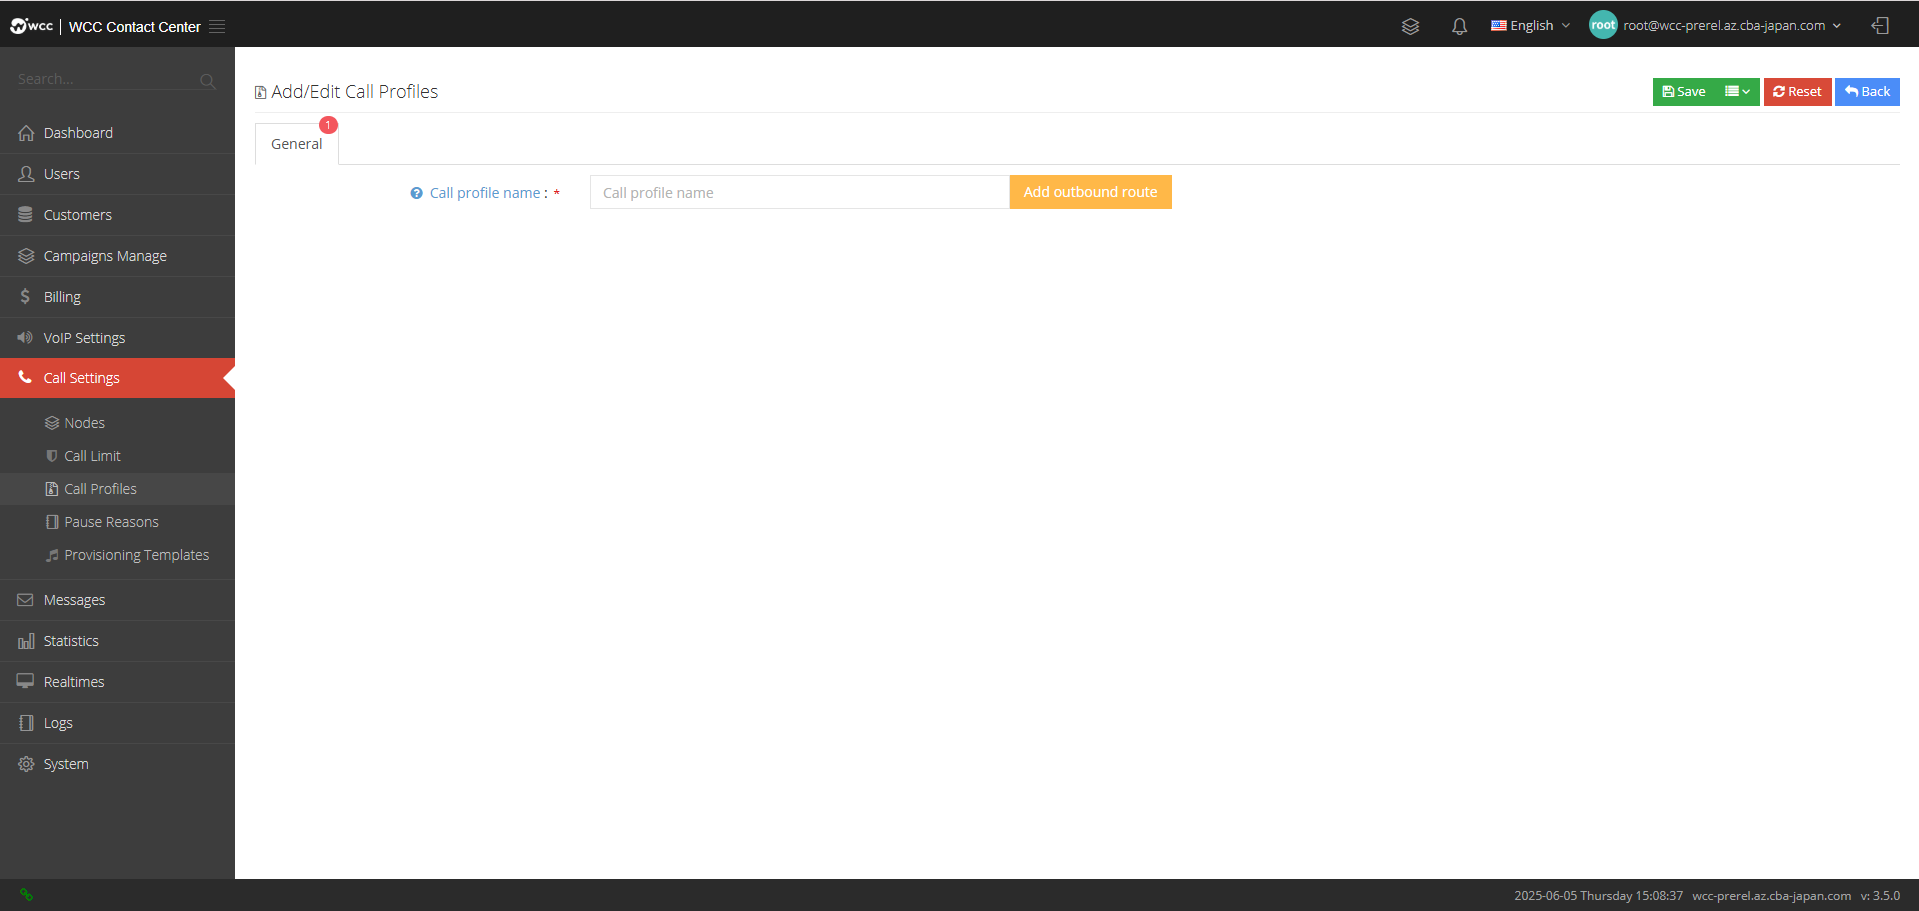
Call profile name: Please name the outbound call file.
After setting the file name, click “Add Outbound Call Routing” to set the outbound route (as shown in the figure below)

Route Name: Please name the route.
Pattern: Set a matching rule, and calls that satisfy this rule will perform the following operations.
Replace CallerID: Here you can set the caller number and caller number name from the new one.
CalleeNum: You can add/remove the prefix of the called number or reset the called number.
Transfer: The system will perform this action when the route is matched.
Policy:
顺序:每个来电从第一个中继开始(始终为 123)
Polling: The first incoming call runs in the order added by the relay, the second incoming call starts with the next order of the first relay, and so on, the third call.
Random: No mode
PauseReasons:
The reason for pause is a pause reason selected when the agent is busy. On the pause reason page, system users can add/view/edit/delete the pause reason.
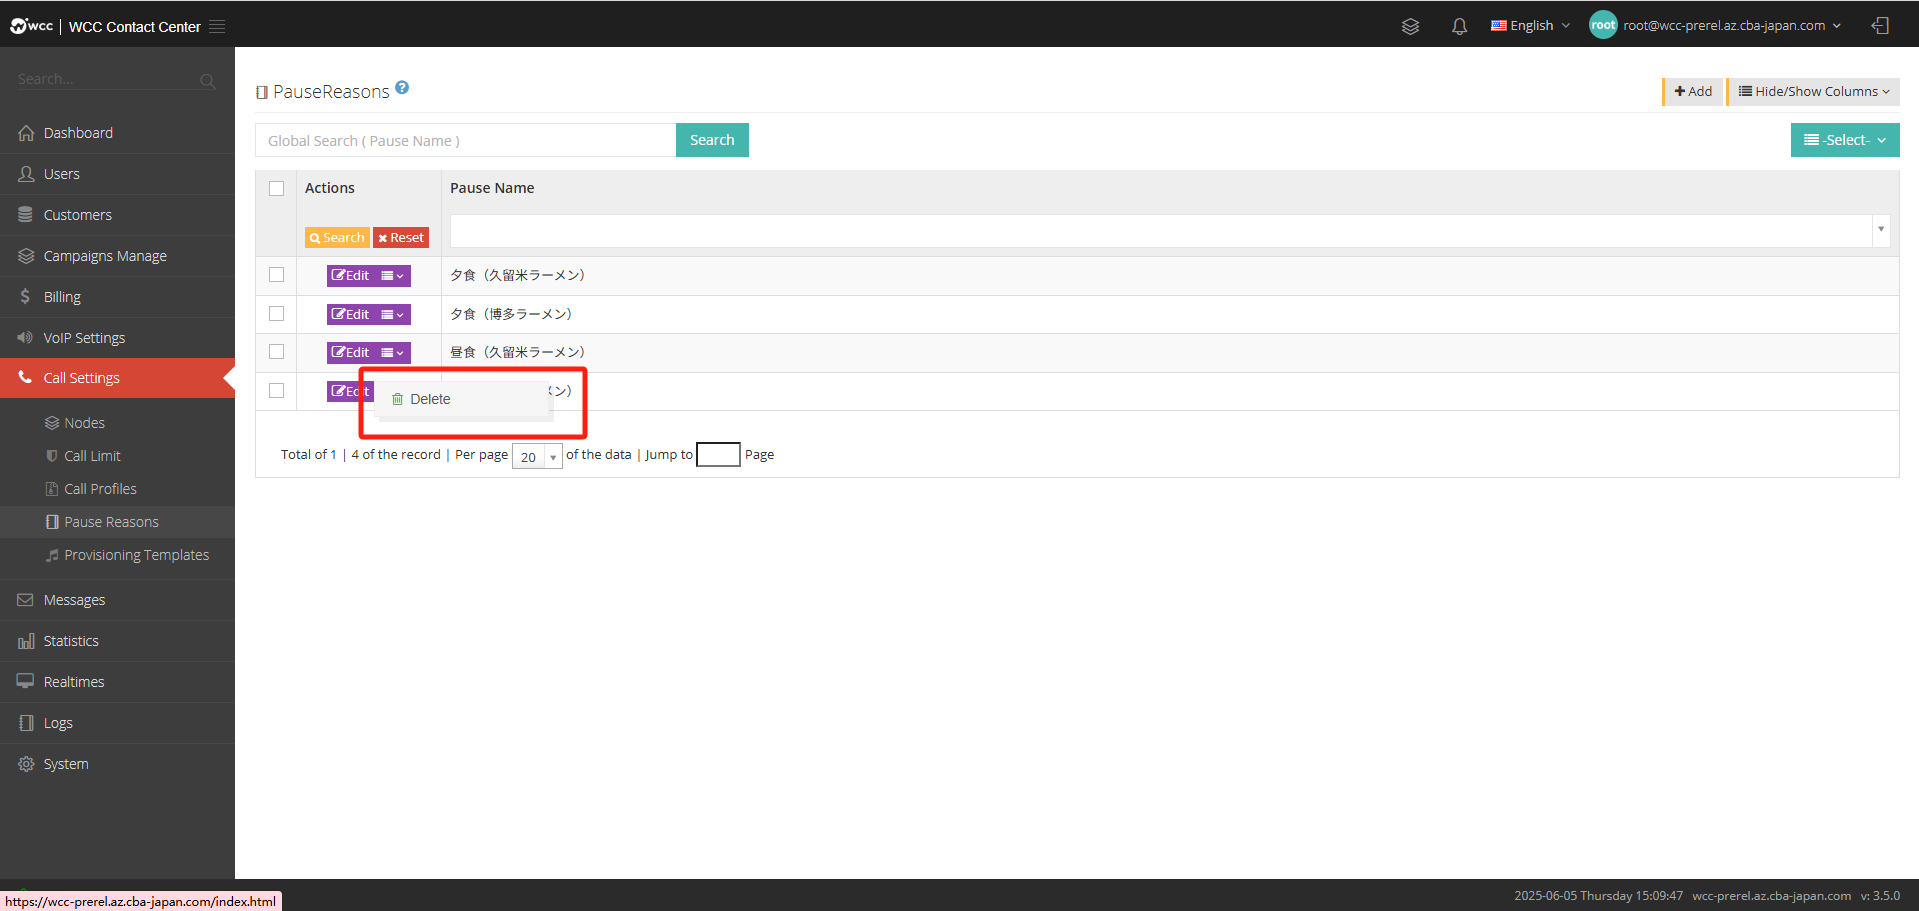
Click [Add] to enter [General] settings: (as shown below)
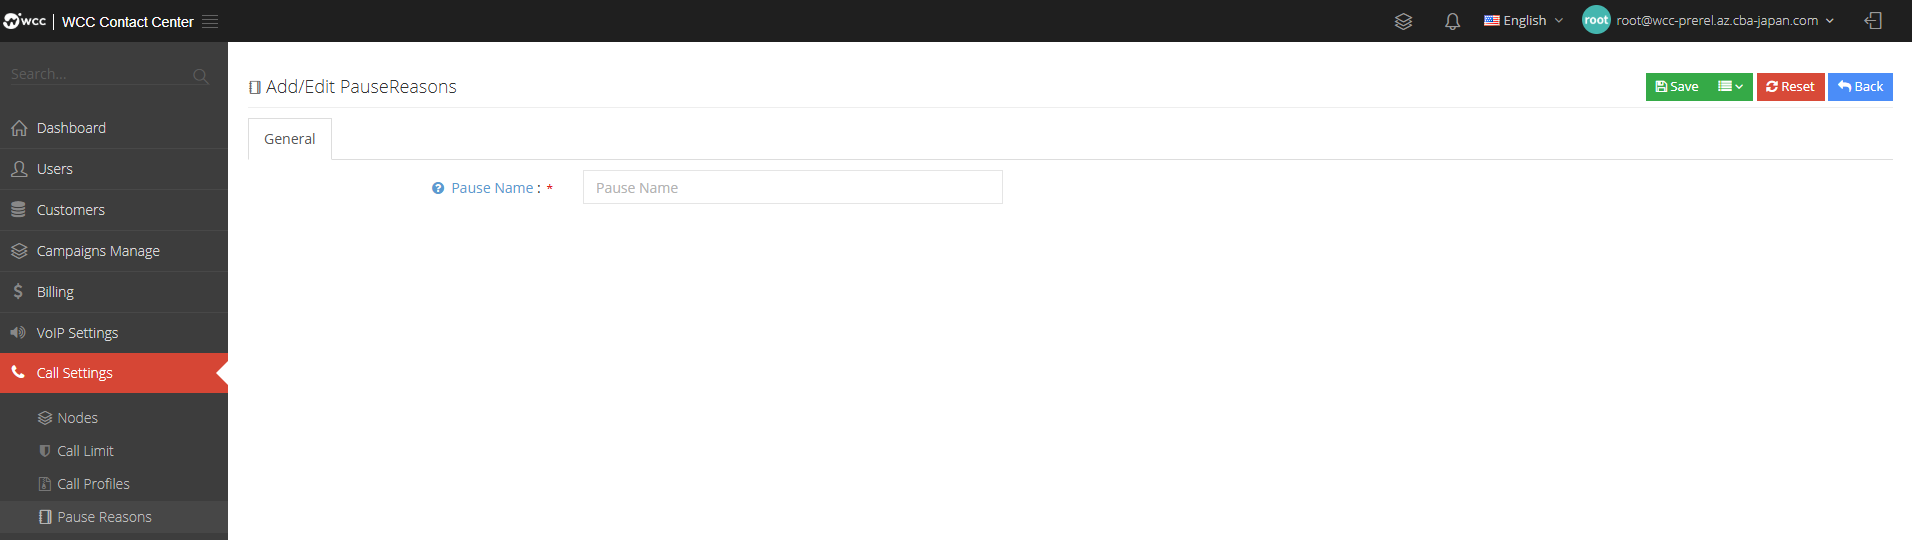
Pause Name: Set the pause reason to name it.
Provisioning Templates:
The phone deployment template can be configured directly by the phone settings, and the template content can be added independently for default configuration, which can save more time when using multiple phones.
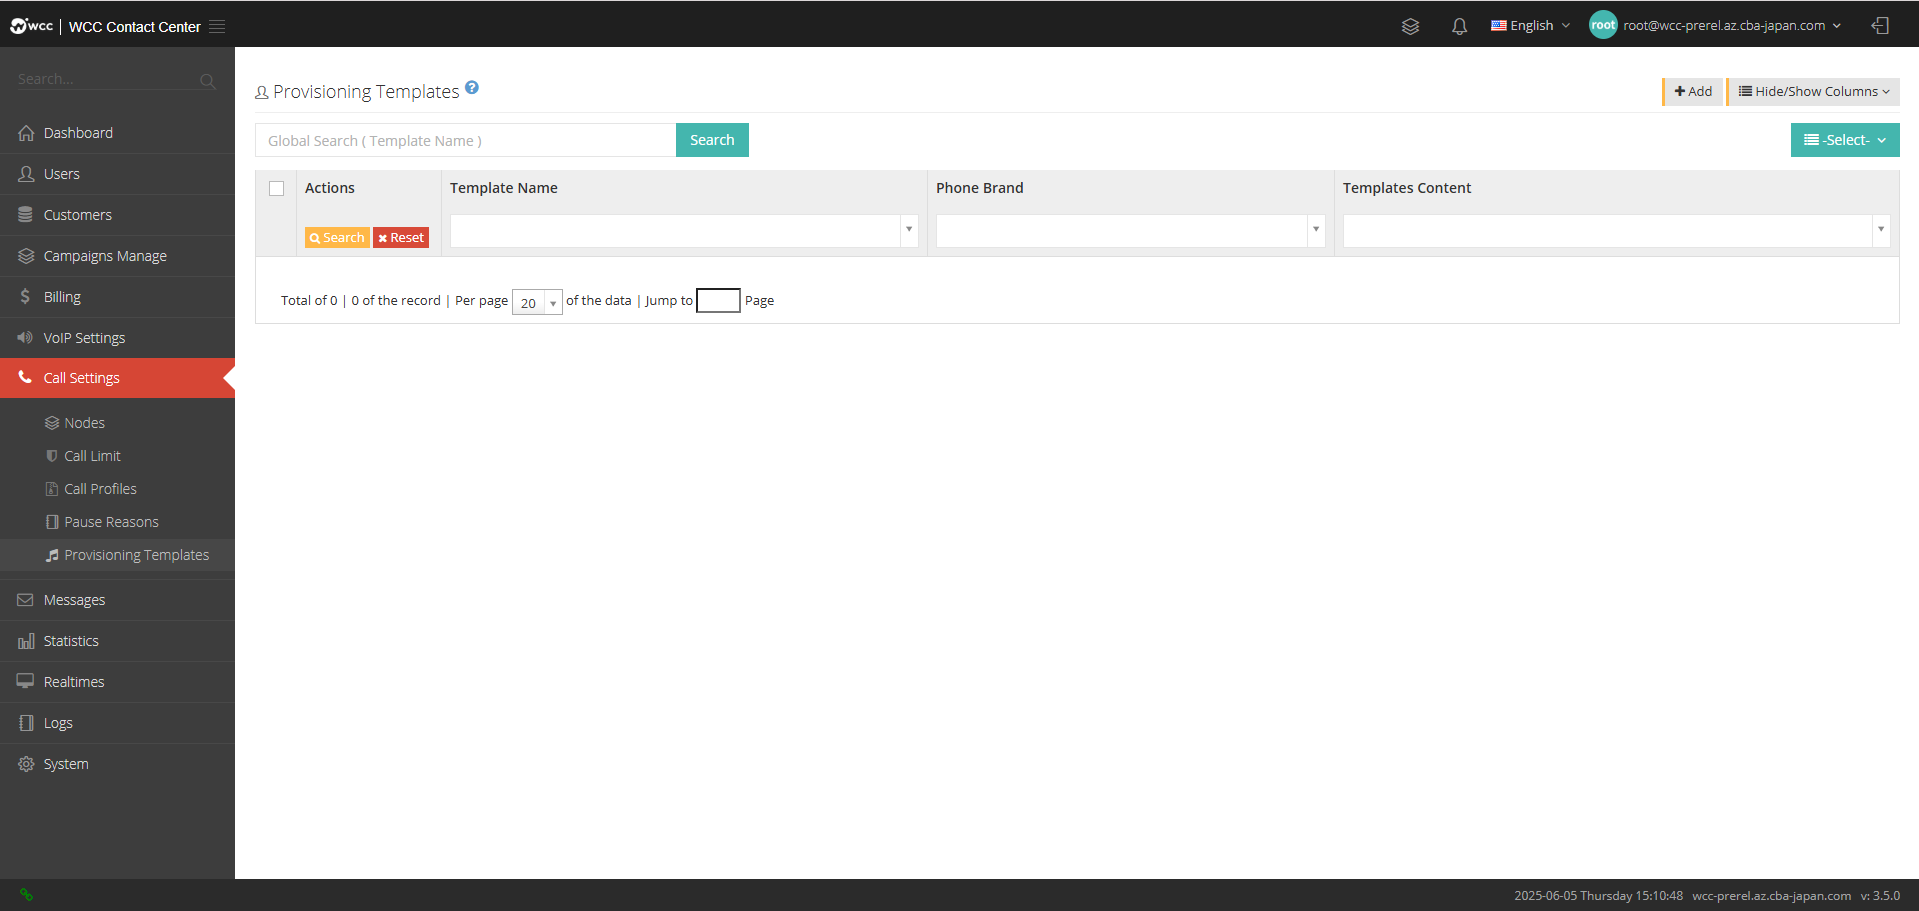
Click [Add] to enter [General] settings: (as shown below)

Template name: Please fill in the template name.
Phone brand: Please enter the phone model.
Template content: Enter the template (a template prepared by root or administrator in advance, the templates for different phones are different).
h. Messages:
SMS Profiles:
SMS files are used to configure the route when customers send SMS messages. In each file, you can bind the matching identity to the SMS provider. When the customer initiates a request to send SMS, you can select the vendor to use by using different identification strings.
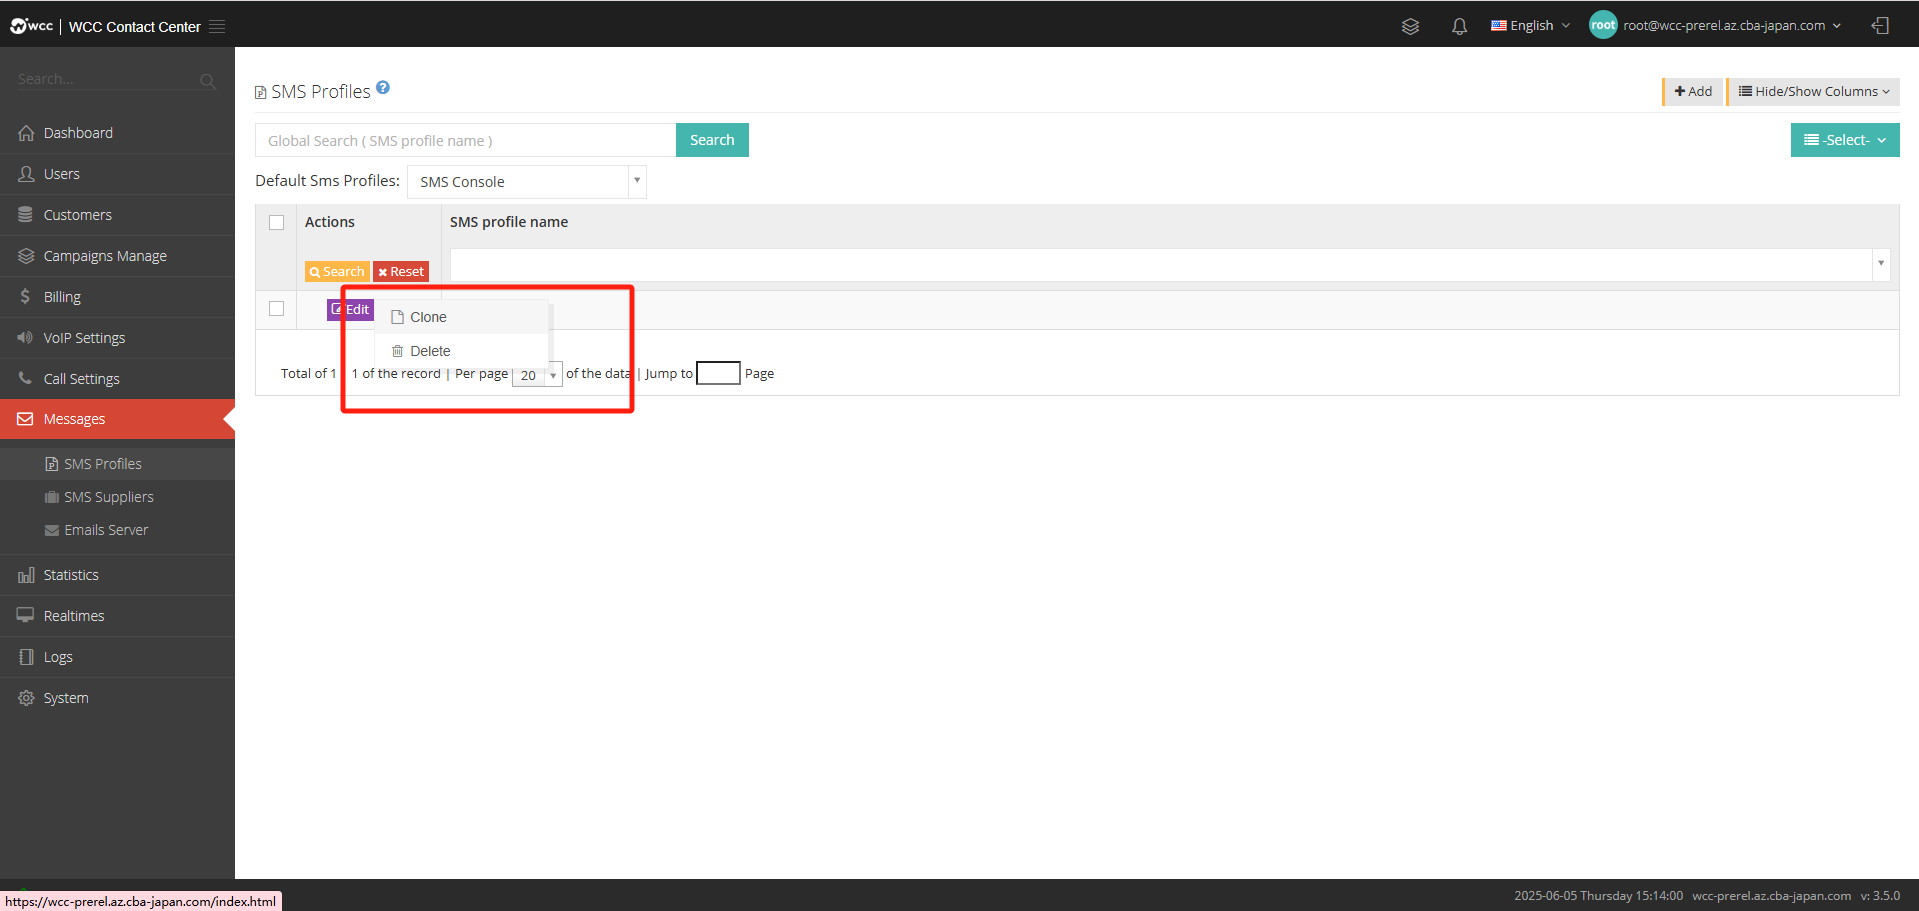
Click [Add] to enter [General] settings: (as shown in the figure below)
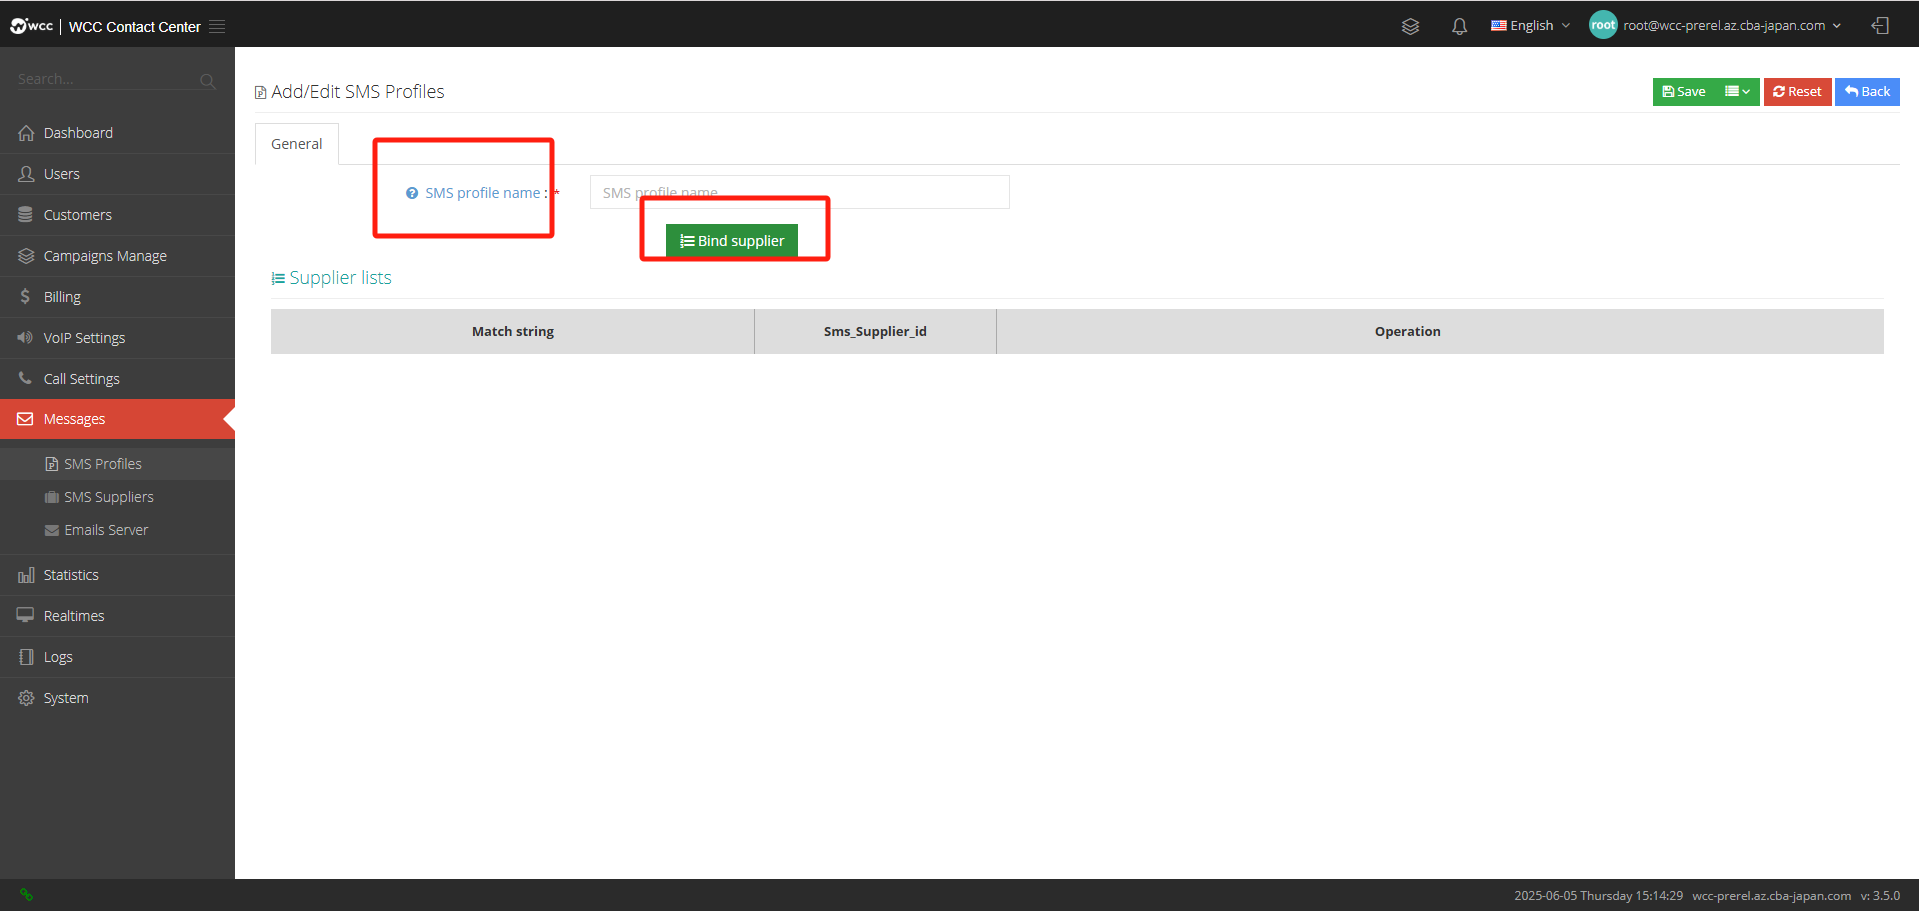
SMS profile name: Please name the SMS file.
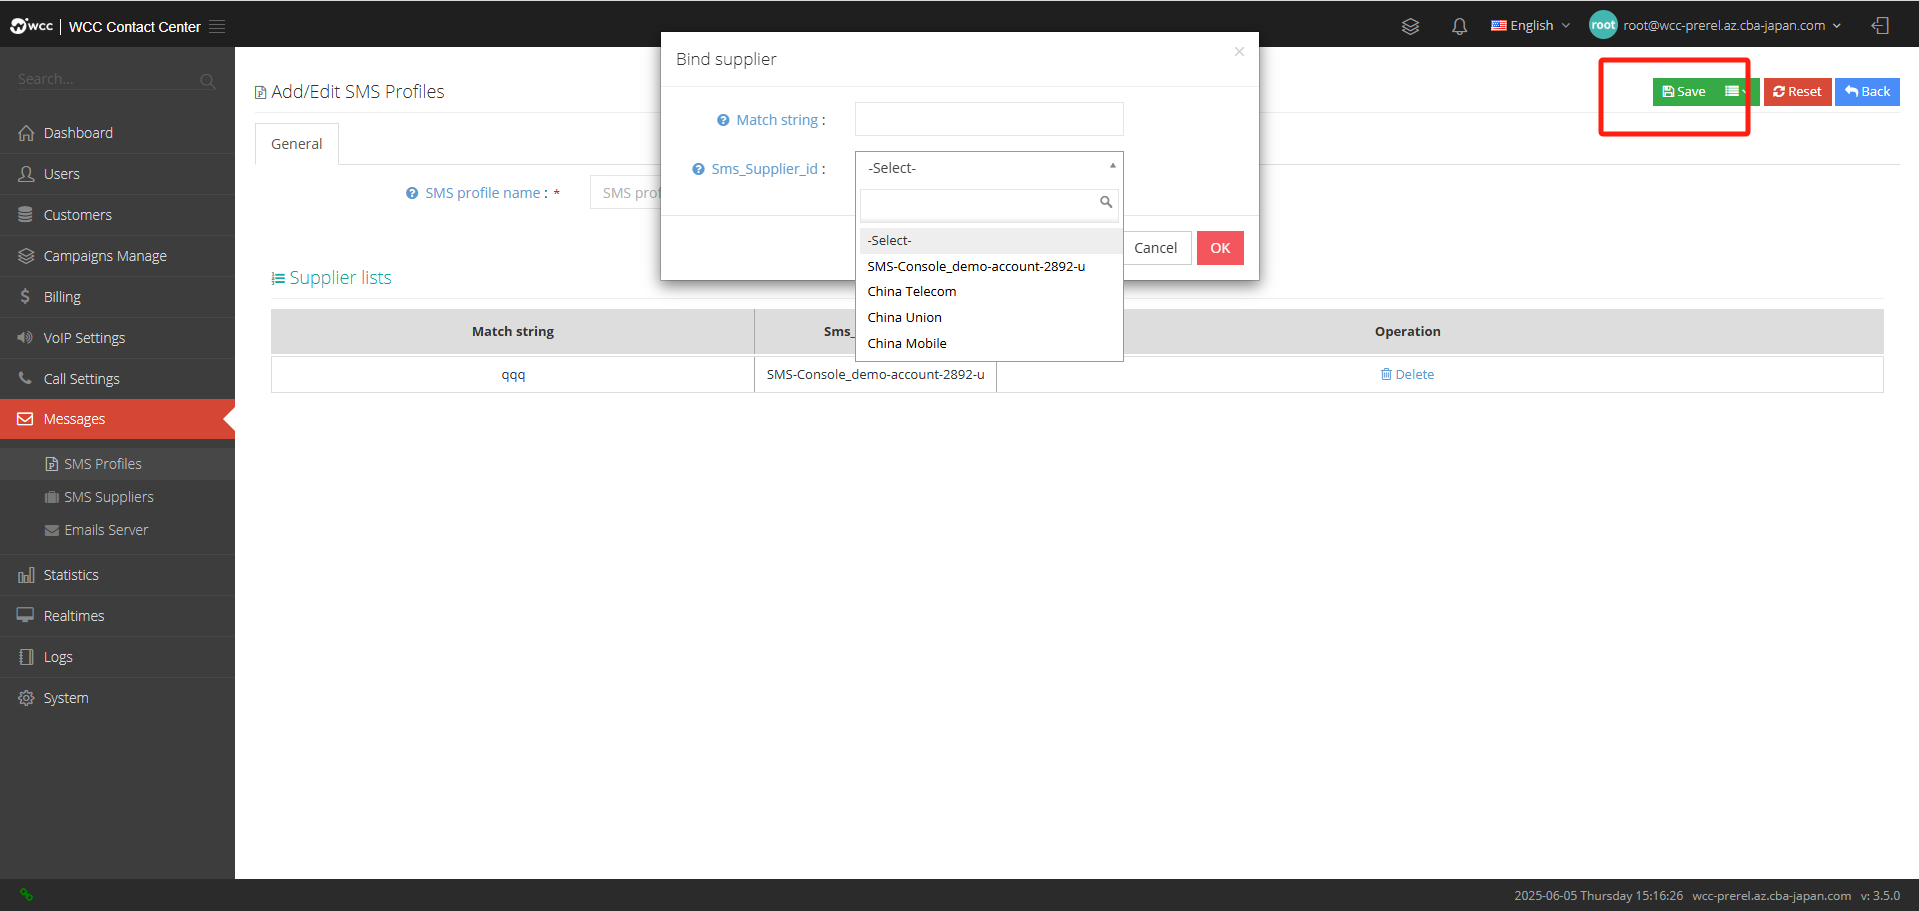
After setting up the [File Name], click [Binding Supplier] to set the bound supplier: (as shown in the figure below)
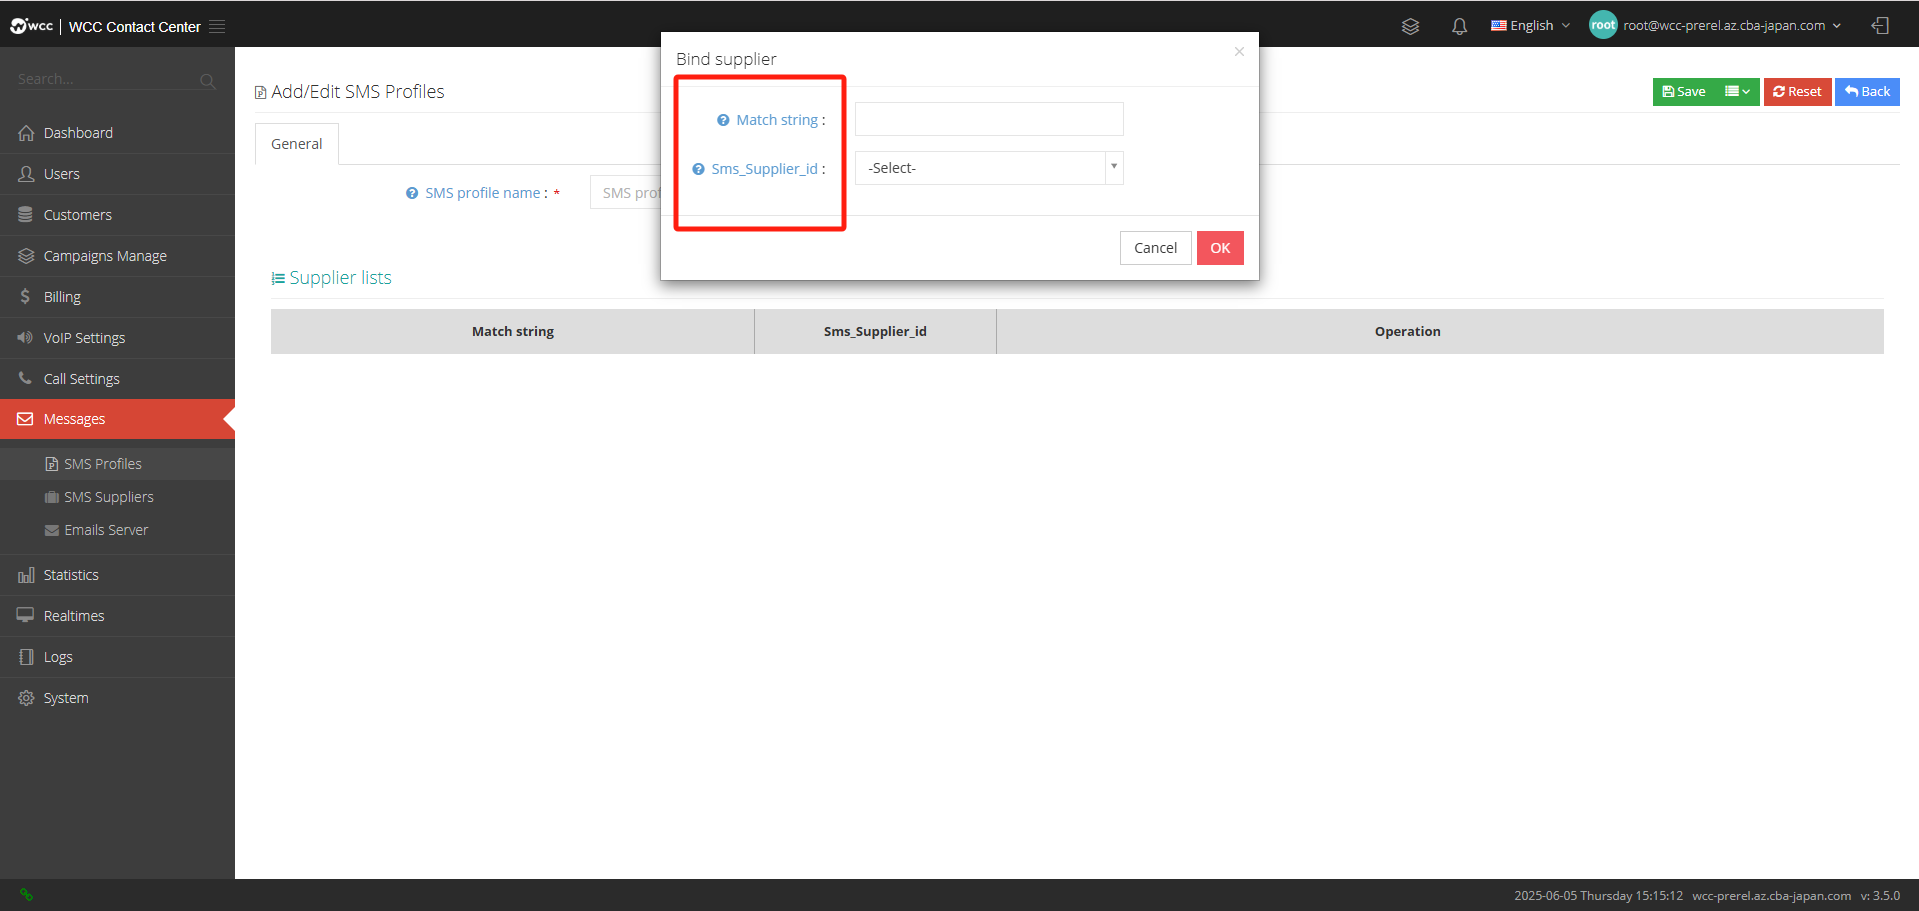
Match string: The identification string used in the customer request to select the vendor to send the SMS.
**Sms_Supplier_id **: The vendor used when string matching.
After editing [SMS File], as shown in the figure below, click Save (as shown in the figure below)
SMS supplier:
The SMS Provider page is used to manage SMS providers. You can configure multiple vendors in the system and then configure how to select these vendors to send text messages in the SMS profile.
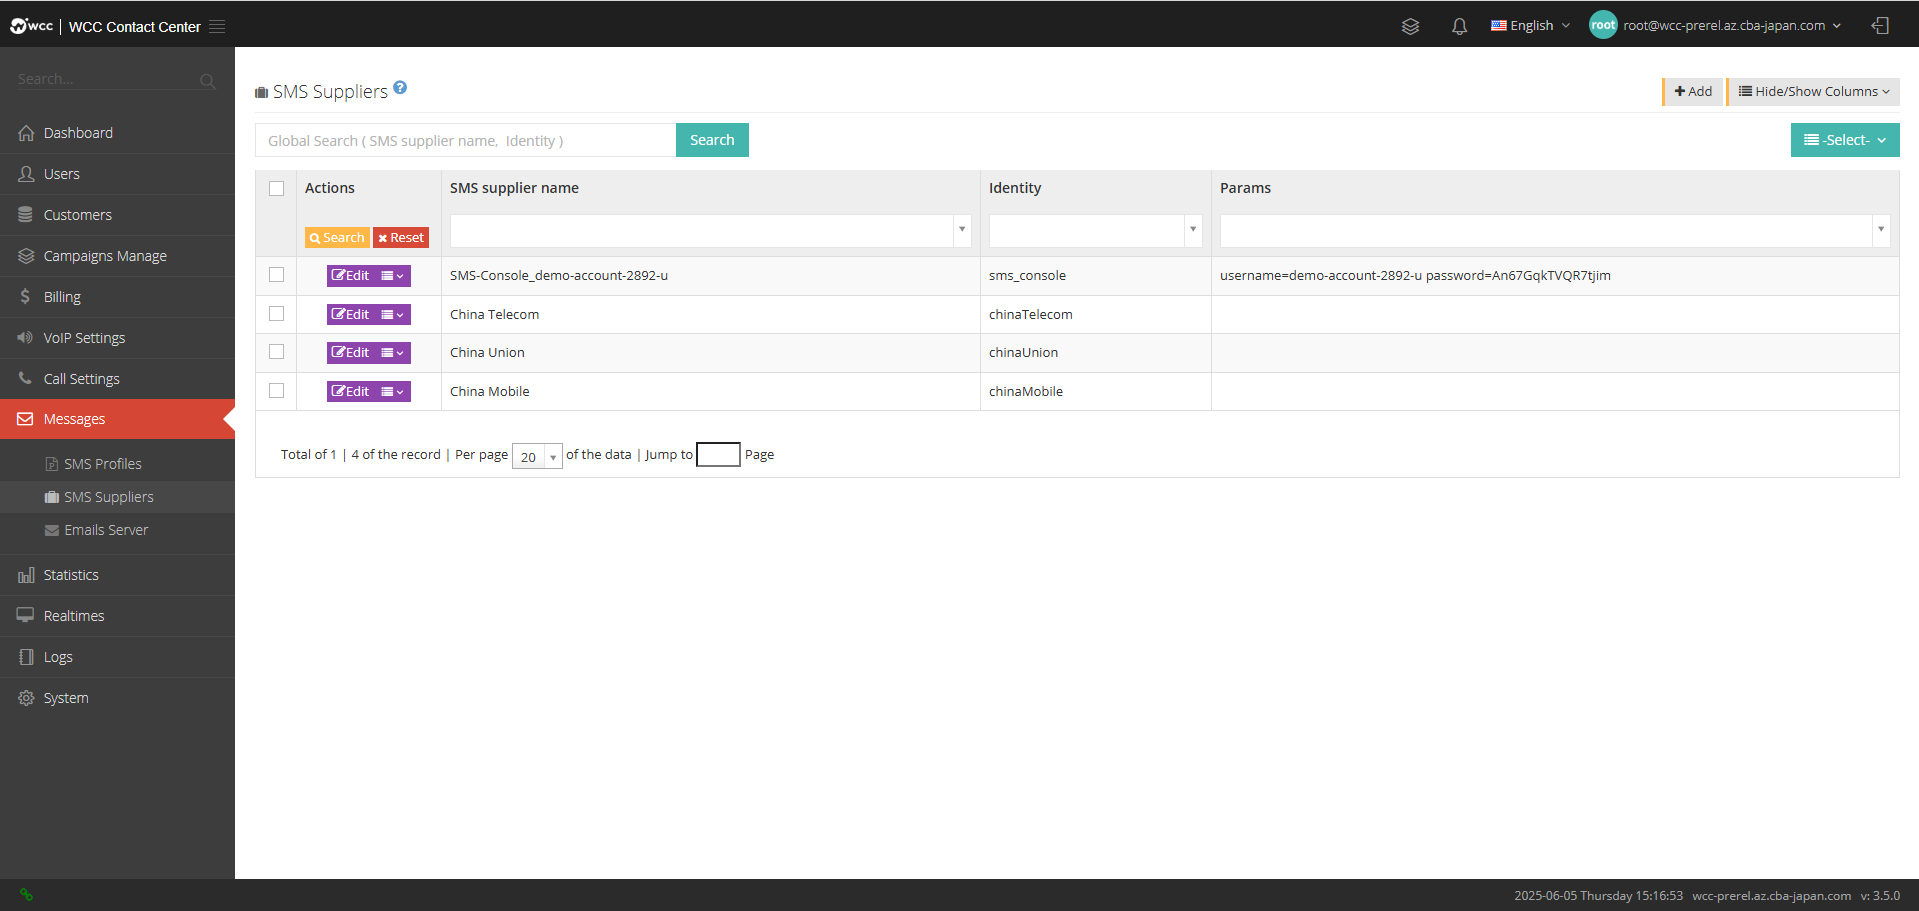
Select [Add] and enter [General] settings: (as shown below)
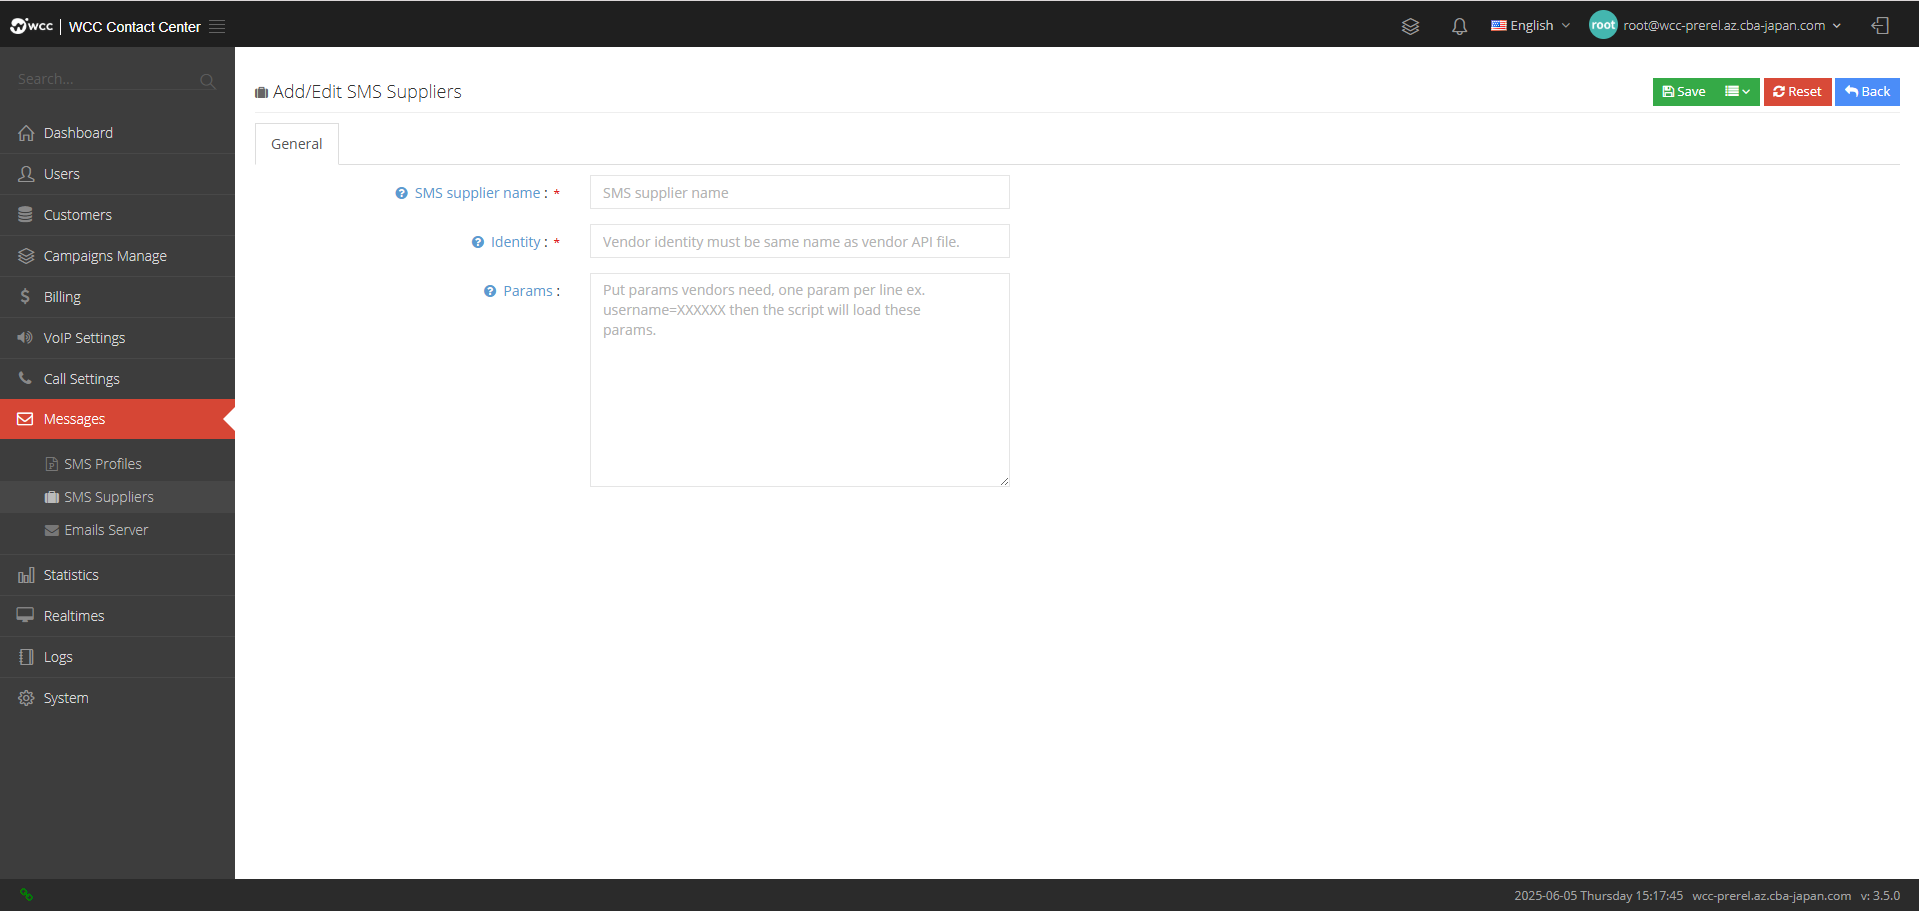
SMS supplier name: Please enter the SMS supplier name.
Identity: Every supplier needs a logo, and the logo consists of letters.
Params: If you want to use multiple accounts for the same vendor, you can set the parameters passed to the script file here.
Emails Server:
邮件服务器页面用于管理电子邮件收发的管理设置,配置好的邮件服务器可以在client编辑中进行选择使用。

Select [Add] and enter [General] settings: (as shown below)
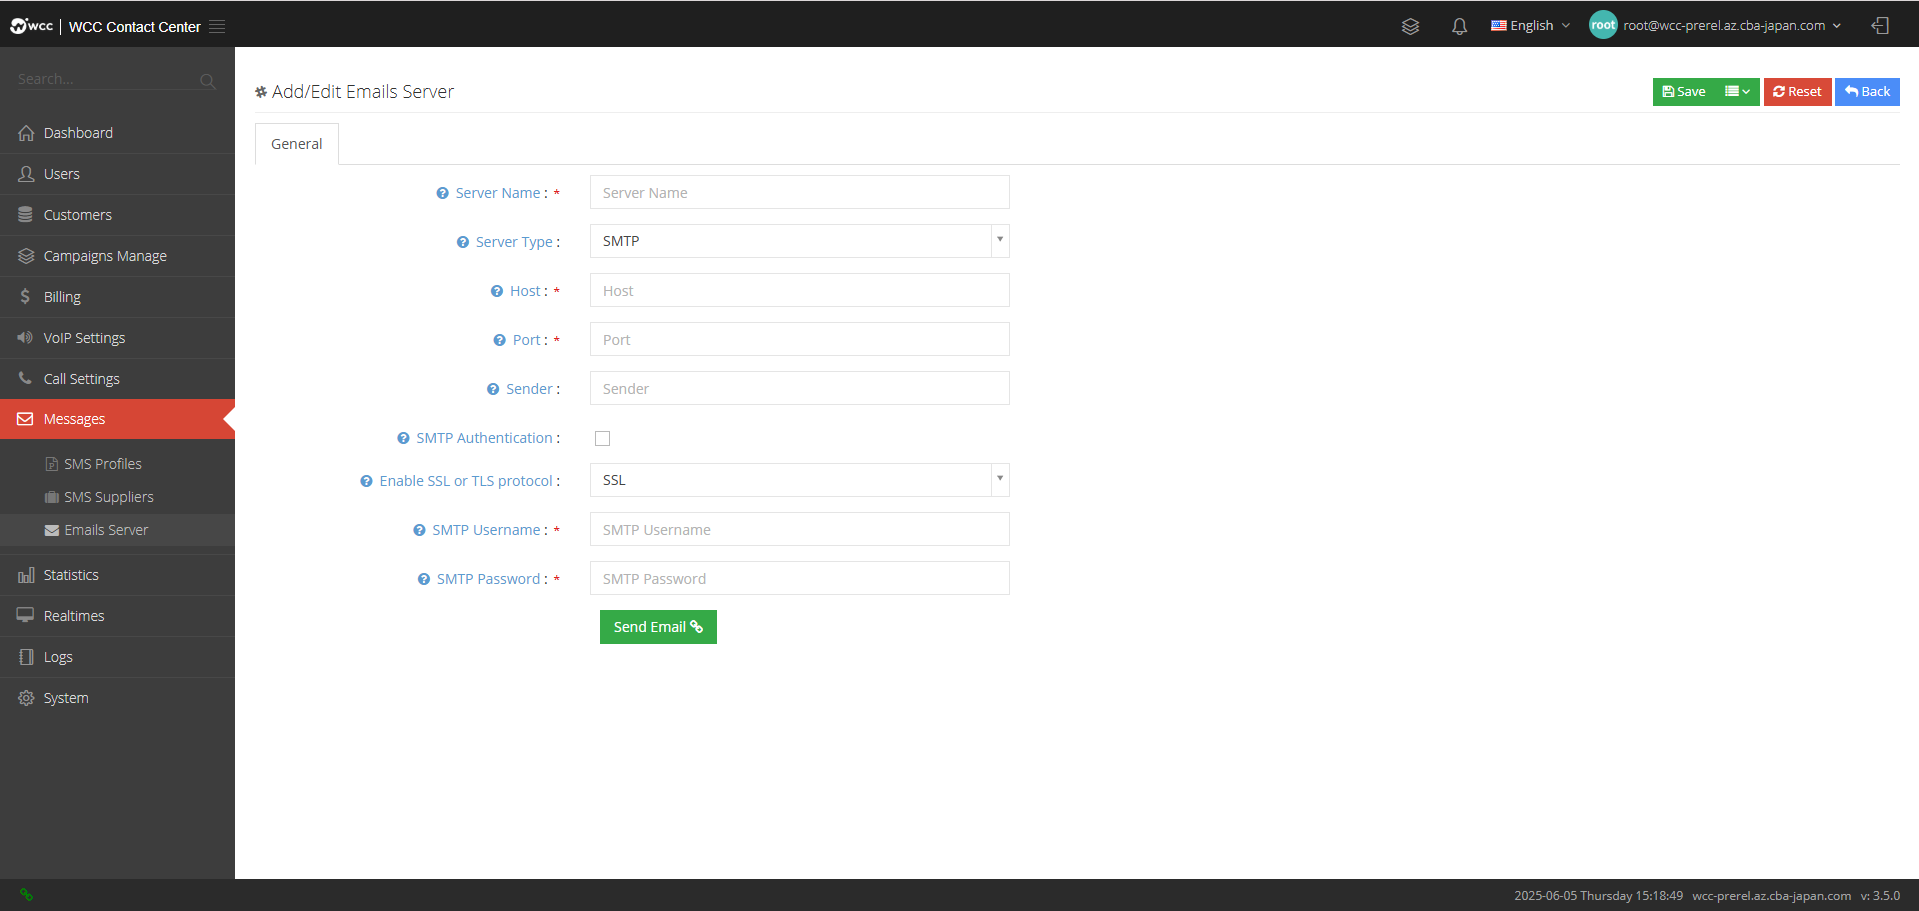
Server name: Please name this server.
Server Type: Please select the type of this server.
Host: Please enter the domain name of this mail server.
Port: Please enter the port number of this mail server.
Sender: Please enter the sender email of this email server.
SMTP authentication: Please confirm whether you need SMTP authentication.
Enable SSL or TLS protocol: Select a startup protocol.
SMTP username: If SMTP authentication is activated, please enter the SMTP username.
Password: Please enter the password corresponding to the SMTP username.
i. Statistics:
统计报表:root级别统计暂不显示。(如下图所示)
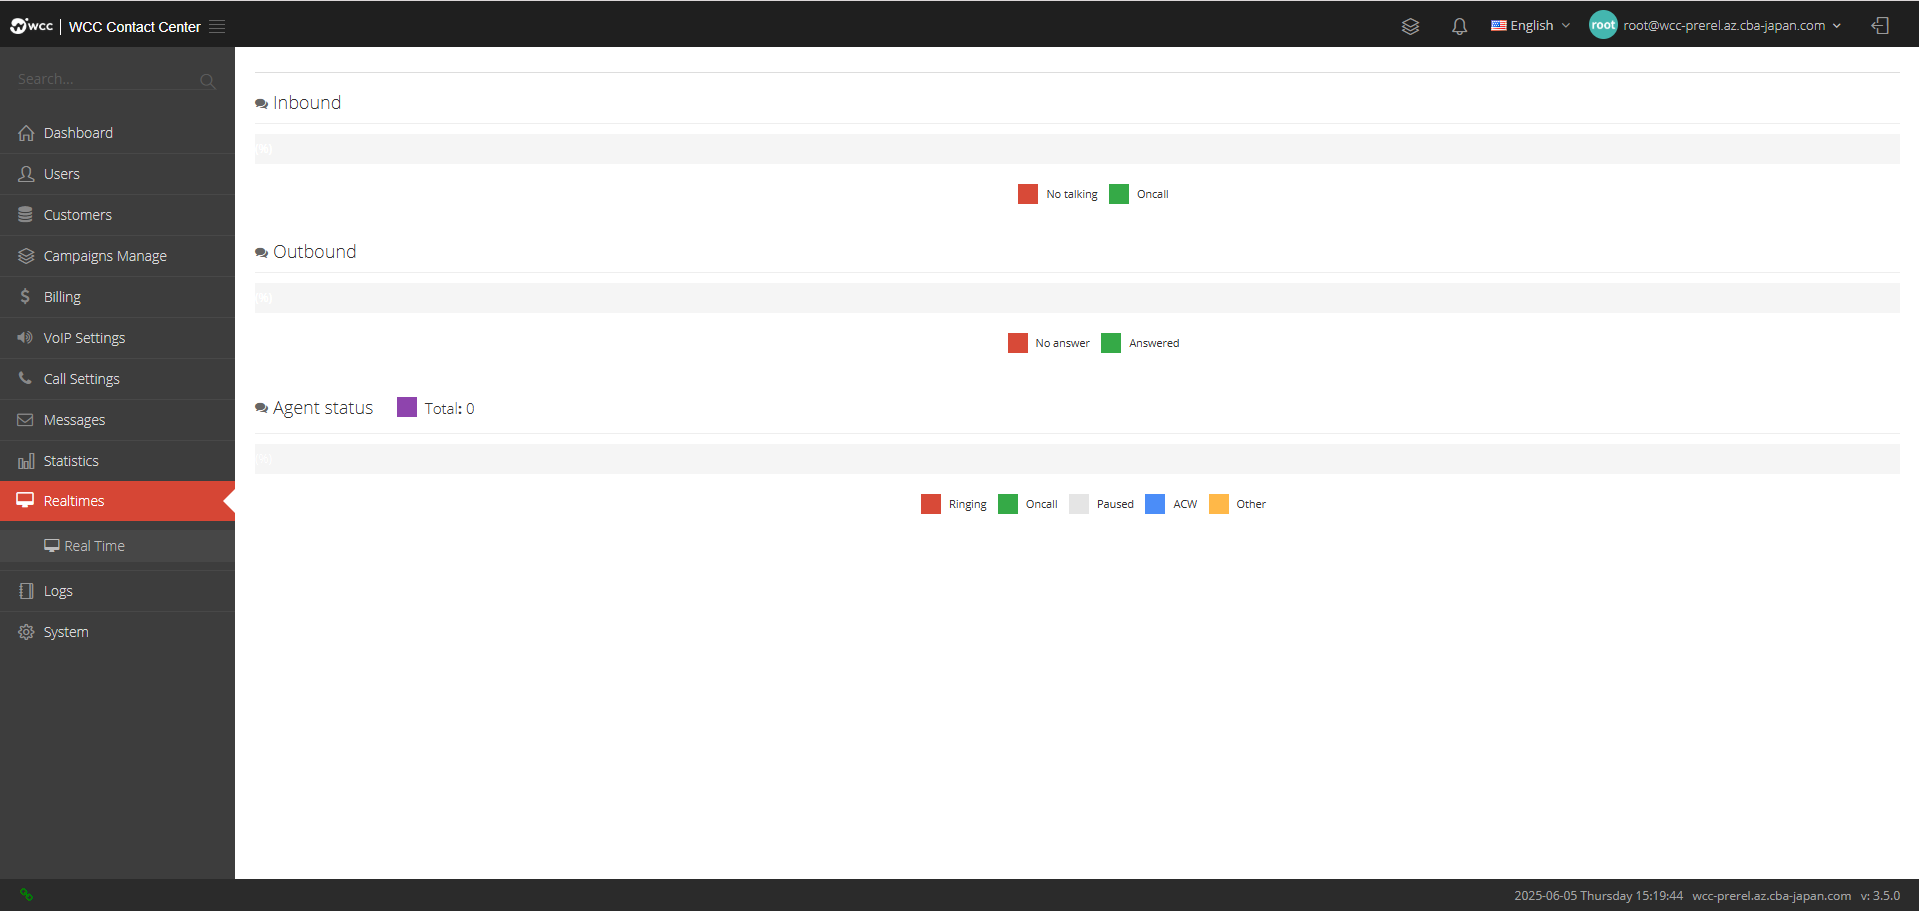
j. Realtimes:
Real Time: System users can monitor the incoming/outgoing status and whether the seat is online in real time (as shown in the figure below)
k. Logs:
Logs: You can view all users’ behavior (as shown in the figure below)
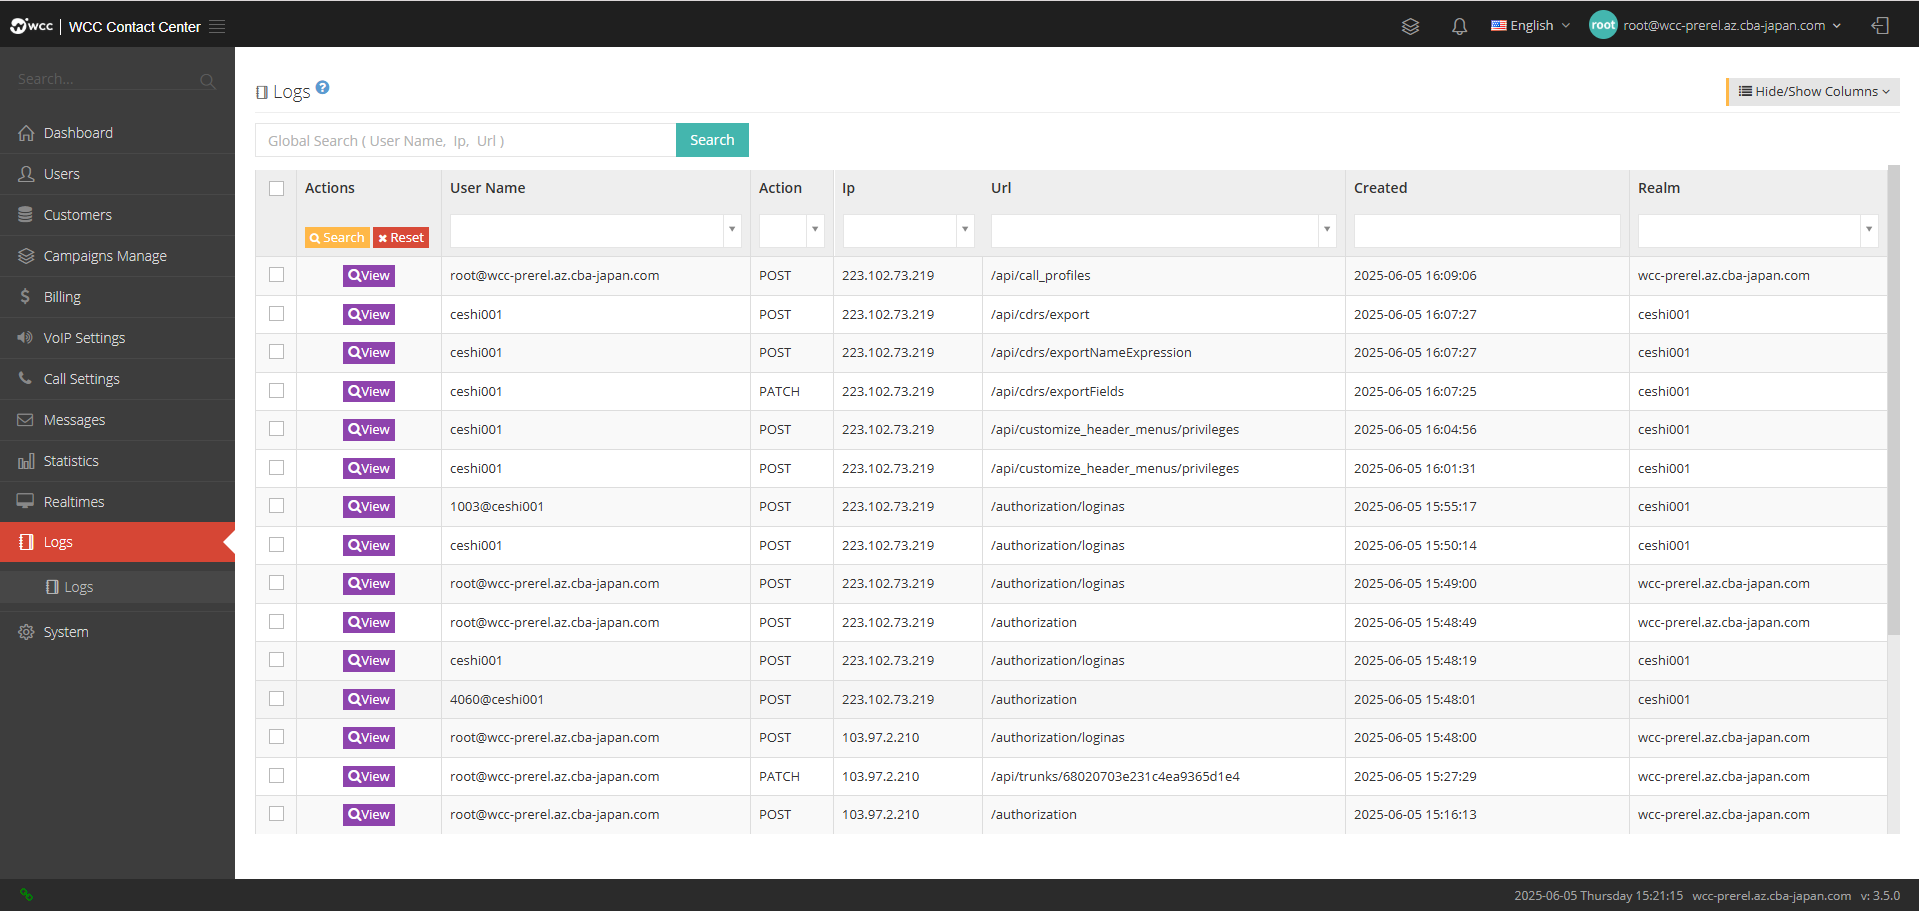
点击查看可以对日志记录进行更详细查看(如下图所示)
l. System:
preferences:
That is, system settings, users can set the system normally as needed
【General】Setting page: (as shown below)
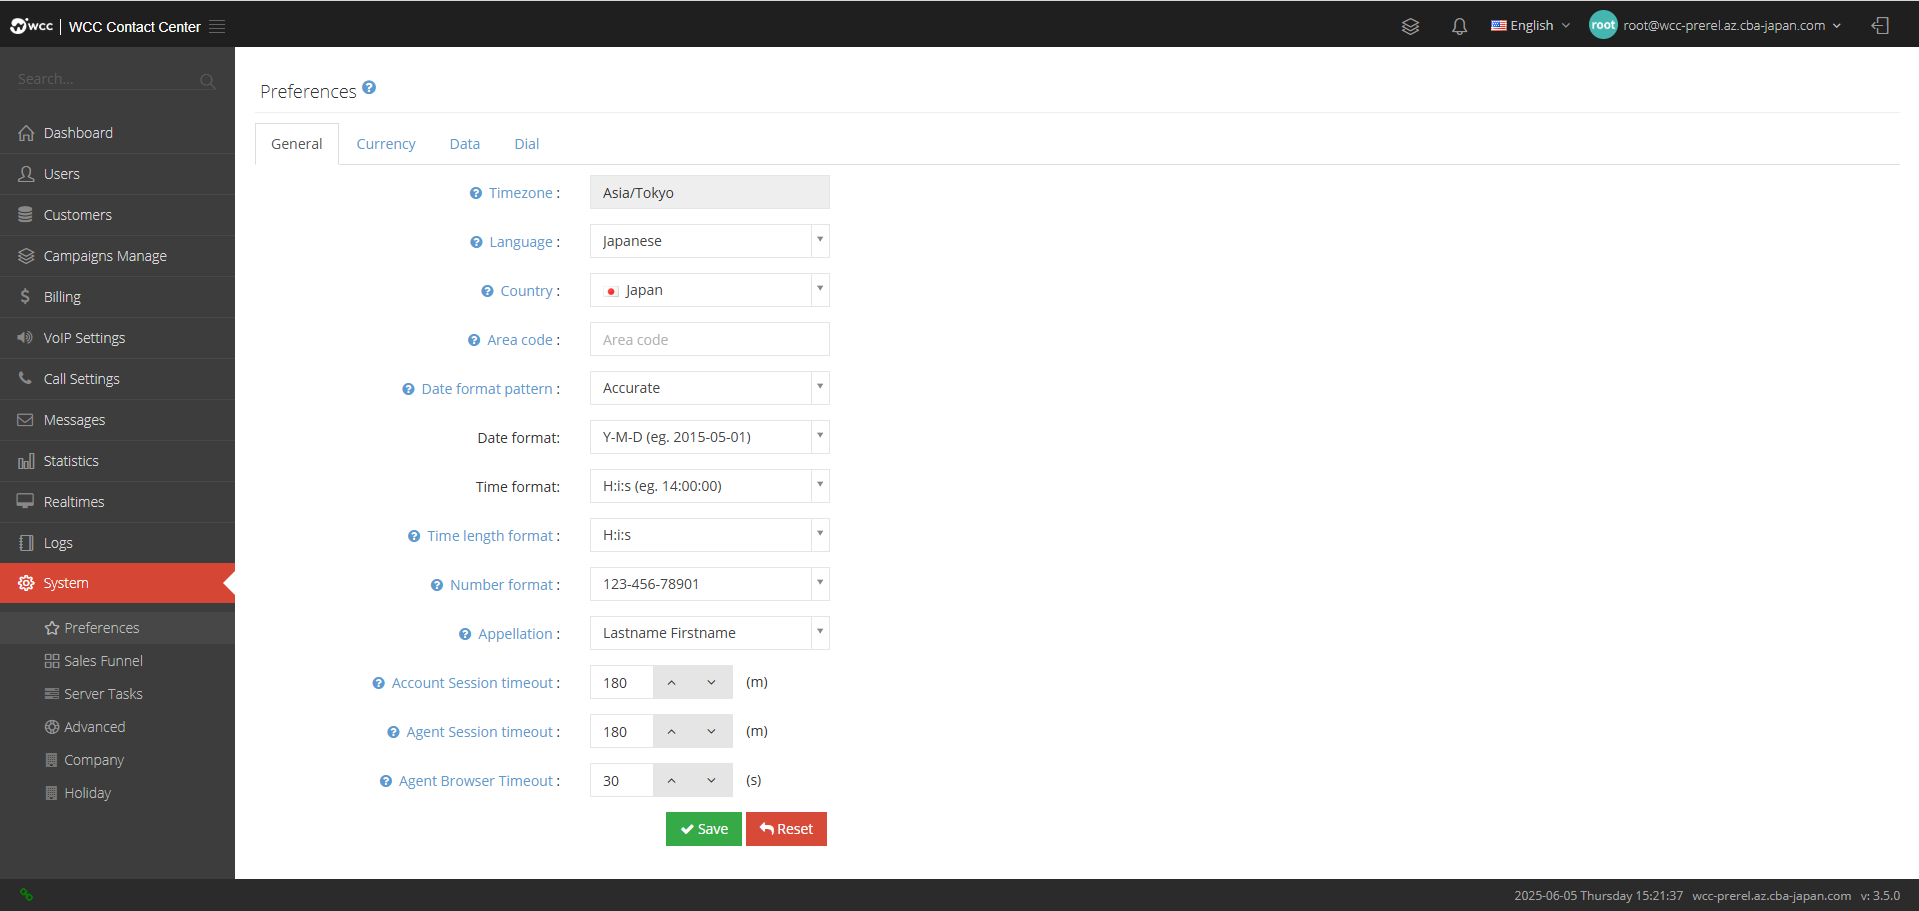
Time Zone: The current time zone is Tokyo by default and cannot be modified.
Language: You can set the language.
Country: You can set up a country
** Area Code**: You can set the area code.
Date format pattern: You can set the date format mode.
Date Format: You can set the date format and select the exact mode in the date format mode to display.
Time Format: You can set the time format and the exact mode in date format mode will be displayed.
Time length format: You can set the format of the duration.
Number format: You can set the format of the number.
Appellation: You can set the format of your name call.
Account Session timeout: Account login timeout time (unit: minutes)
Agent Session timeout: Agent login timeout time (unit: minutes)
Agent Browser Timeout: If the proxy is set to be used with the browser, when the browser closes and reaches this timeout, the system will check out all dynamically checked-in proxy groups (in seconds).
[Currency] Setting Page: (As shown below)
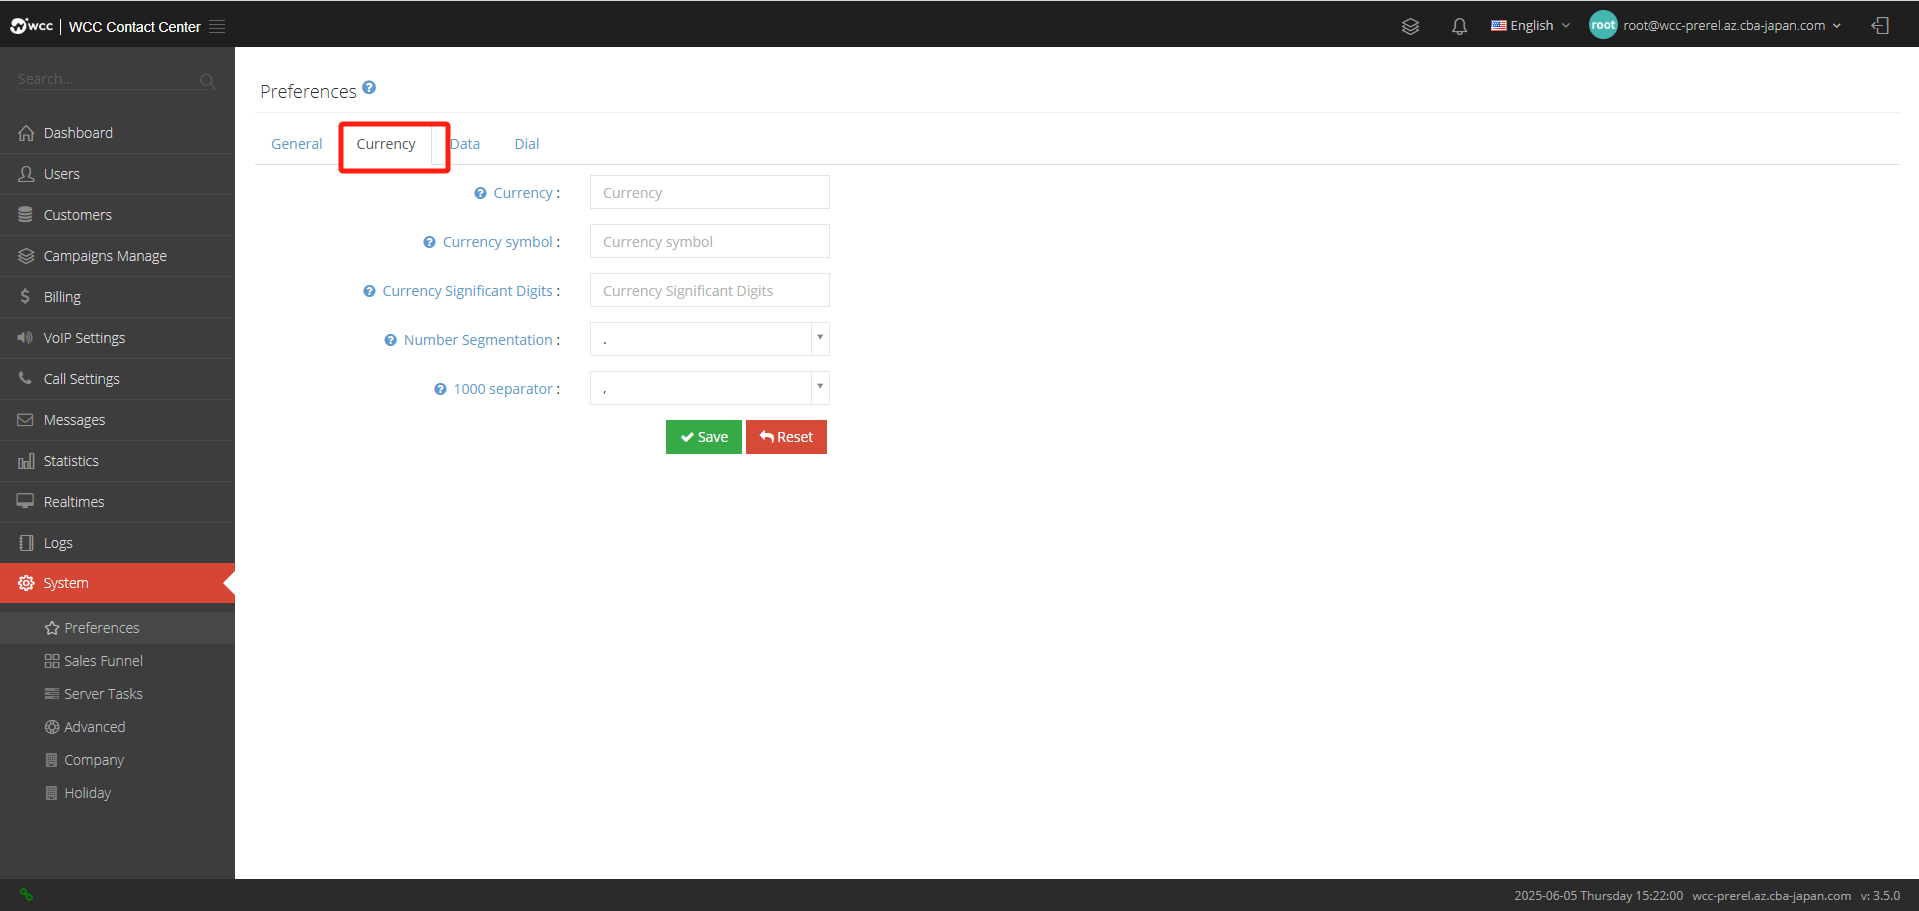
Currency: Set currency.
Currency Symbol: Set currency symbol.
Currency Significant Digits: Set currency decimal point
Number Segmentation: Set the numeric delimiter.
1000 separator: Set the Thousand Delimiter.
【Data】Setting page: (as shown below)
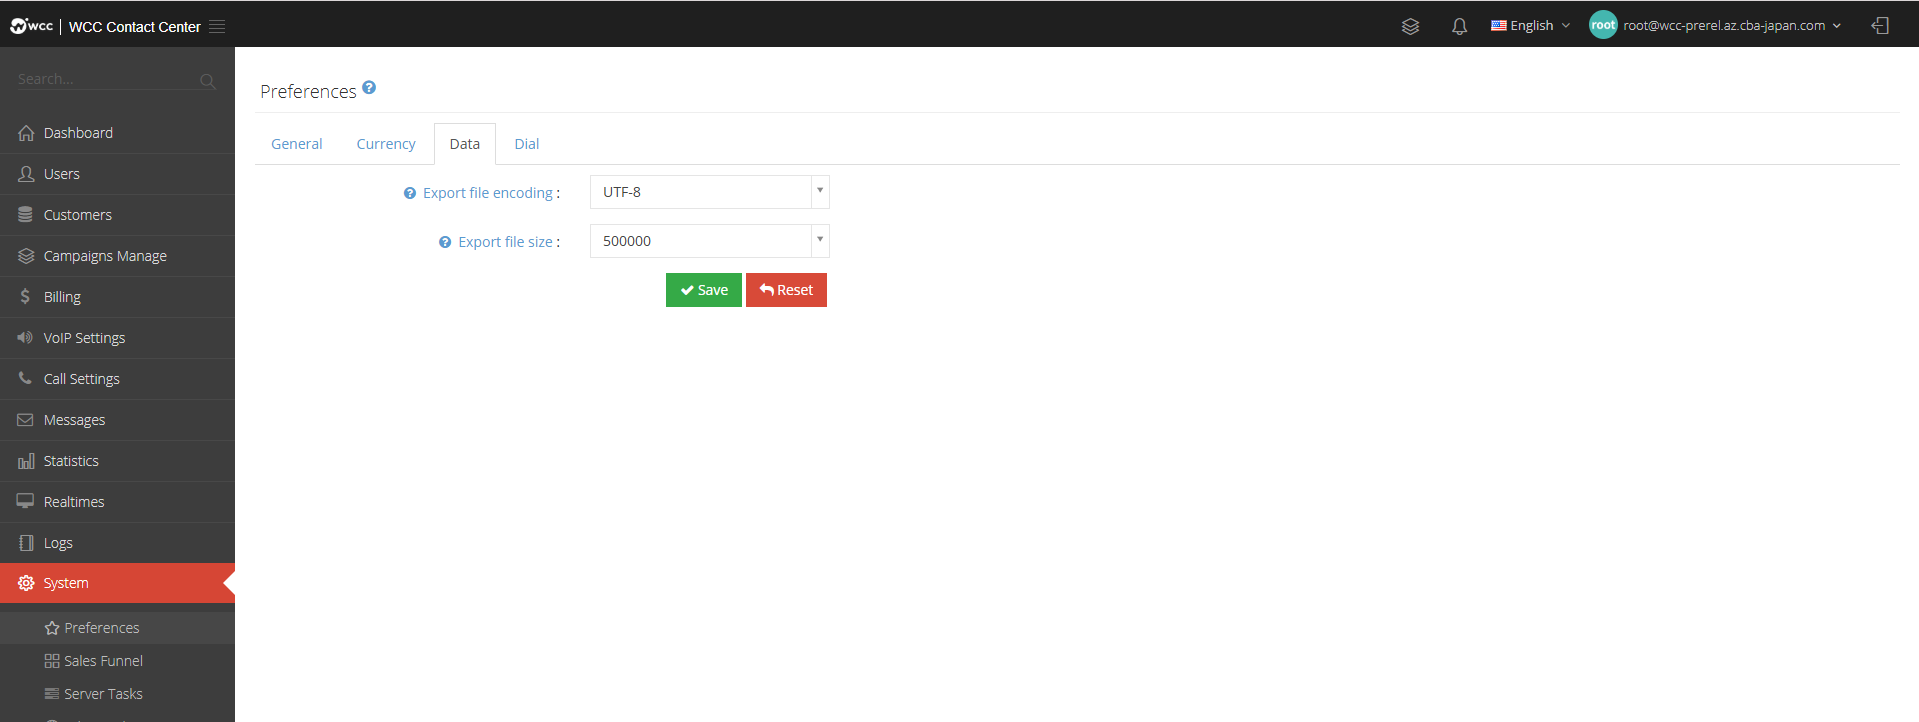
Export file encoding: Set the export file encoding.
Export file size: Set the maximum number of lines for exporting files.
[Dial] Setting page: (as shown below)
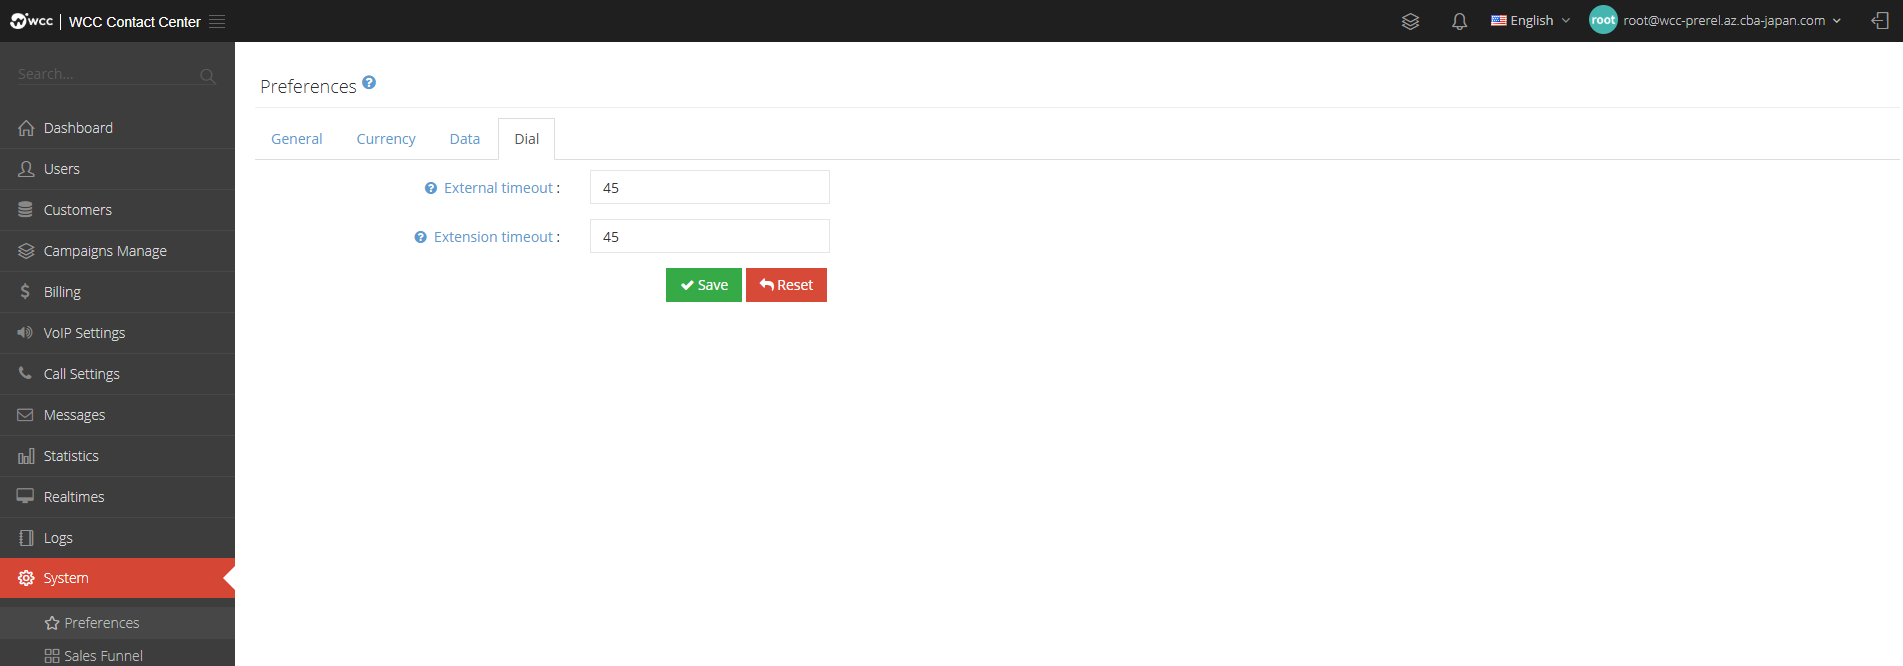
External timeout: External call ringing duration.
Extension timeout: Inside line ringing timeout.
Sales funnel:
Sales funnel is used to mark the status of customer call recorded by the agent. There are three types by default: Success/Failure/Tracking, and can be added/edited/deleted as needed.
The score of the sales funnel represents the call and contact scores of the agent, which can be finally ranked based on the total score of the agent, which can be viewed in the ranking list of the agent data page.
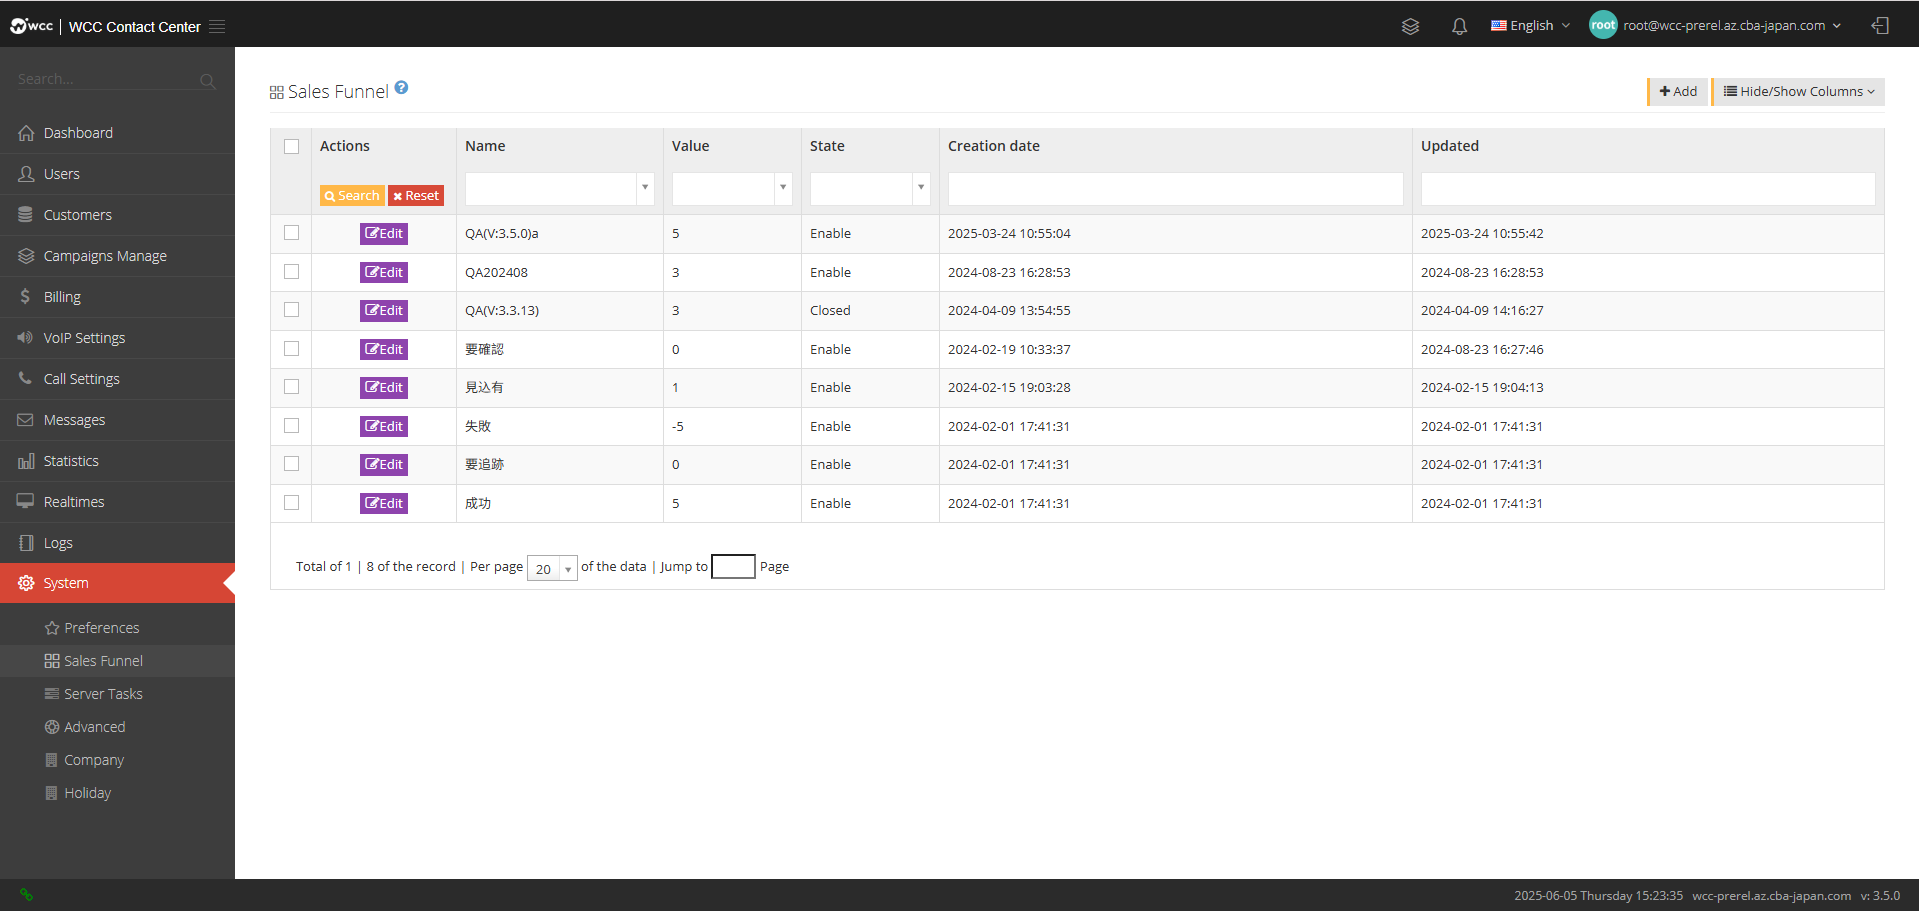
Select [Add] and enter [General] settings: (as shown below)

Name: Name this sales funnel.
Value: Please set the score of this sales funnel, the score can reflect the working status of the seat.
State: Status of sales funnel:
Enable: Display normally
Invisible: The seat is invisible
Closed: The system is not visible
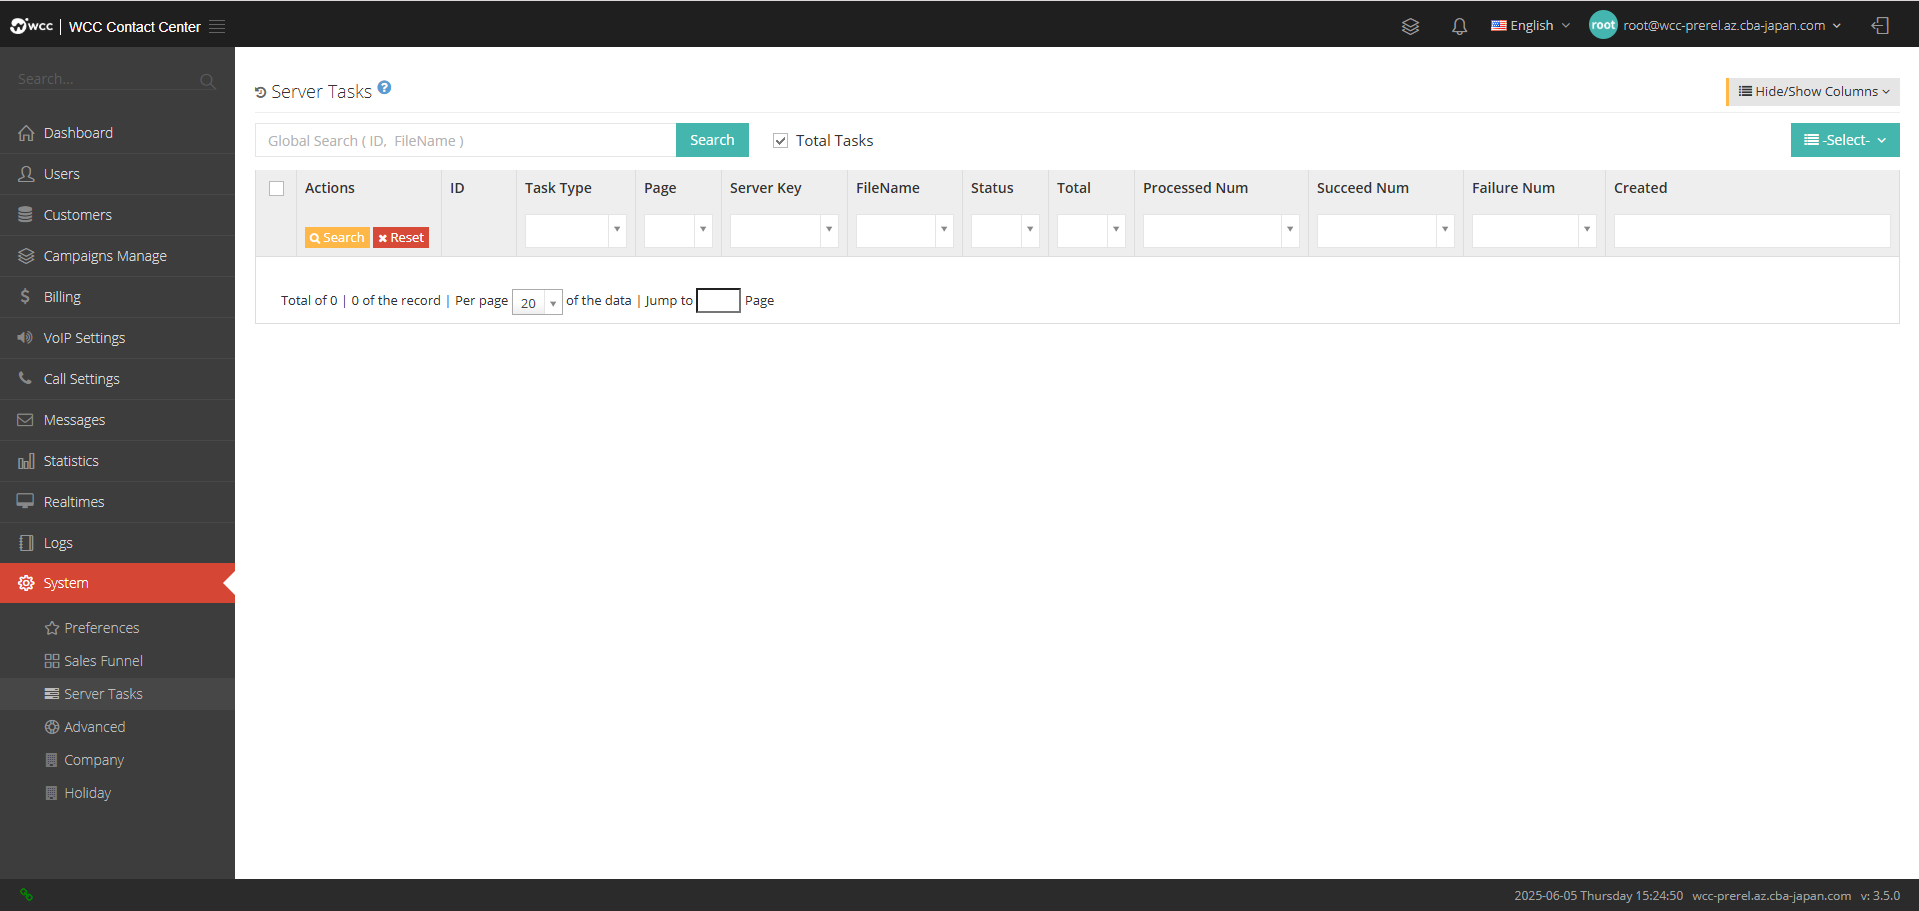
Server tasks:
Background tasks are allowed to program tasks in the system, and they are usually time consuming, such as importing and exporting reports.
advanced:
You can view and edit certain system settings
**[Basic] Settings: (as shown below) **
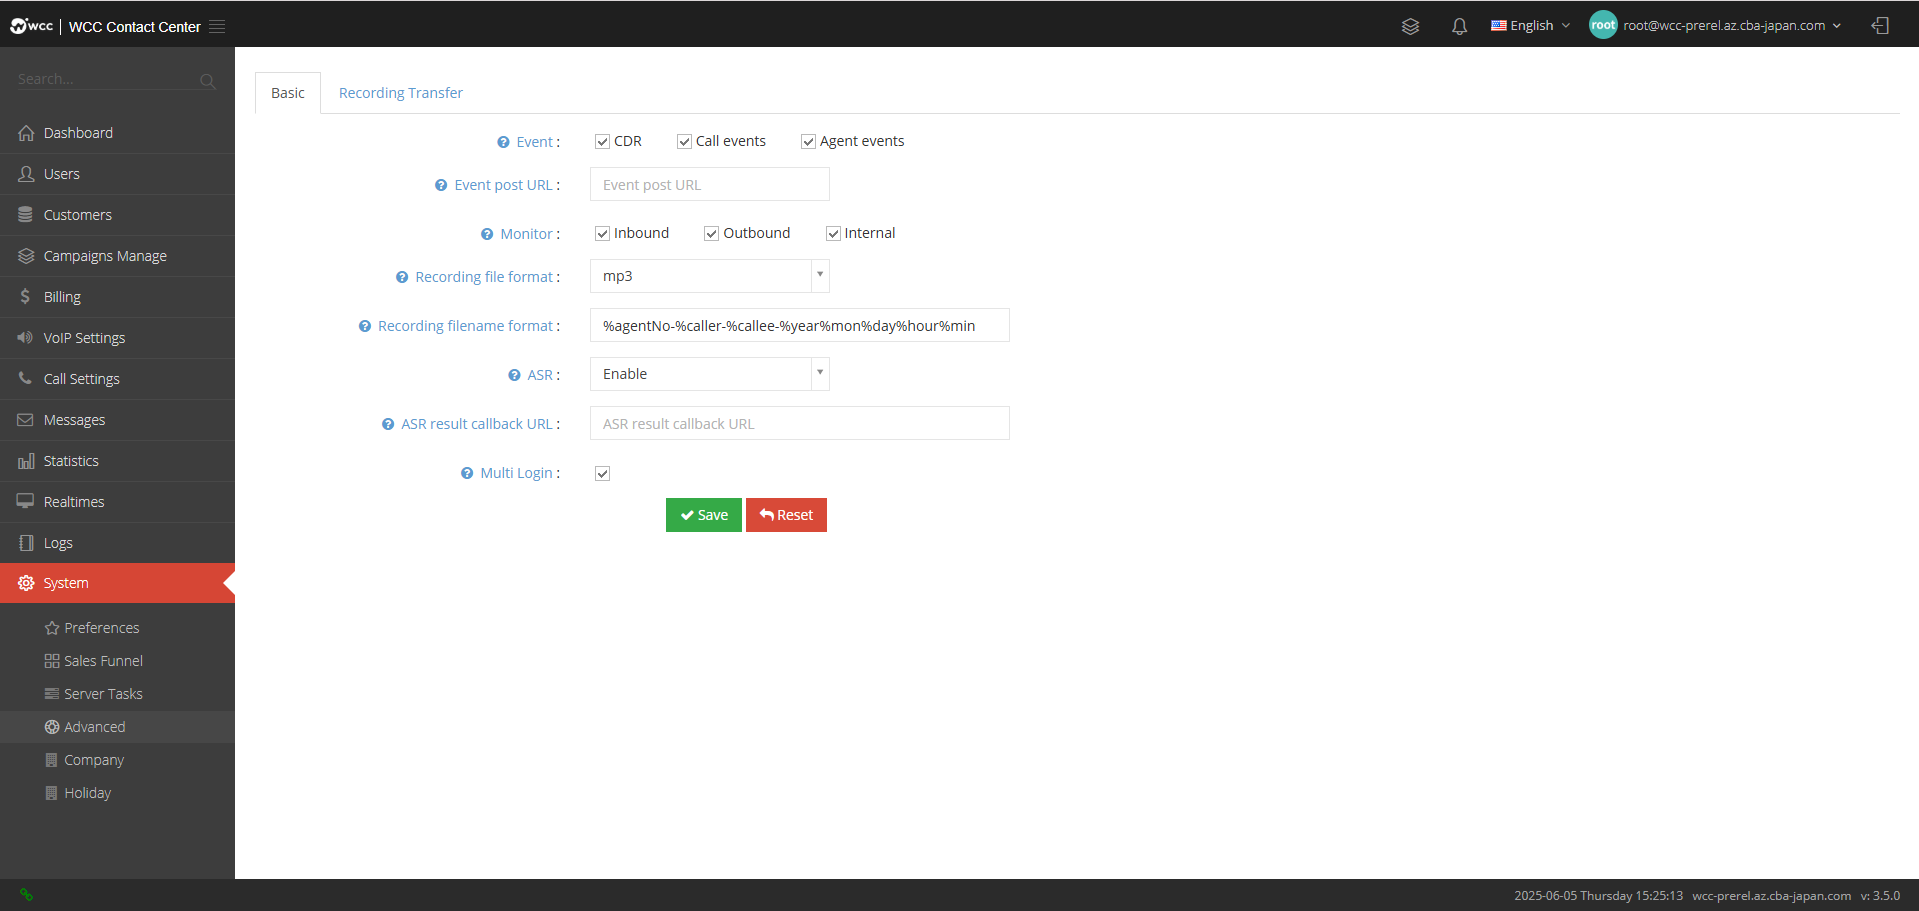
Event;
The system provides two kinds of events: call history: When a call is hung up, the system publishes the call history to a specific URL.
Agent events: The system will publish all agent events, such as ringing, answering, hanging up, checking in, checking out, pausing, canceling pause, etc.
Event post URL: The system will send event data to this URL.
Monitor: Please set the recording type you need.
Recording file format: Please select the recording format.
Recording filename format: You can customize the naming rules of recording files, and the available variables include:
%agentNo%caller-%callee%year%mon%day%hour%min%sec

%agentNo:坐席工号

%caller:主叫号码

%callee:被叫号码

%year,%mon,%day,%hour,%min,%s年-月-日-时-分-秒
ASR: Whether the voice recognition function is enabled as needed.
ASR result callback URL: If configured, the system will send the voice recognition result to this URL.
Multi Login: Allow multiple login for one account.
**[Record Transfer] Settings: (as shown below) **

Transfer path: After recording and synthesis, the system will send the file to this address.
Transfer strategy: The transfer policy is real-time or timed.
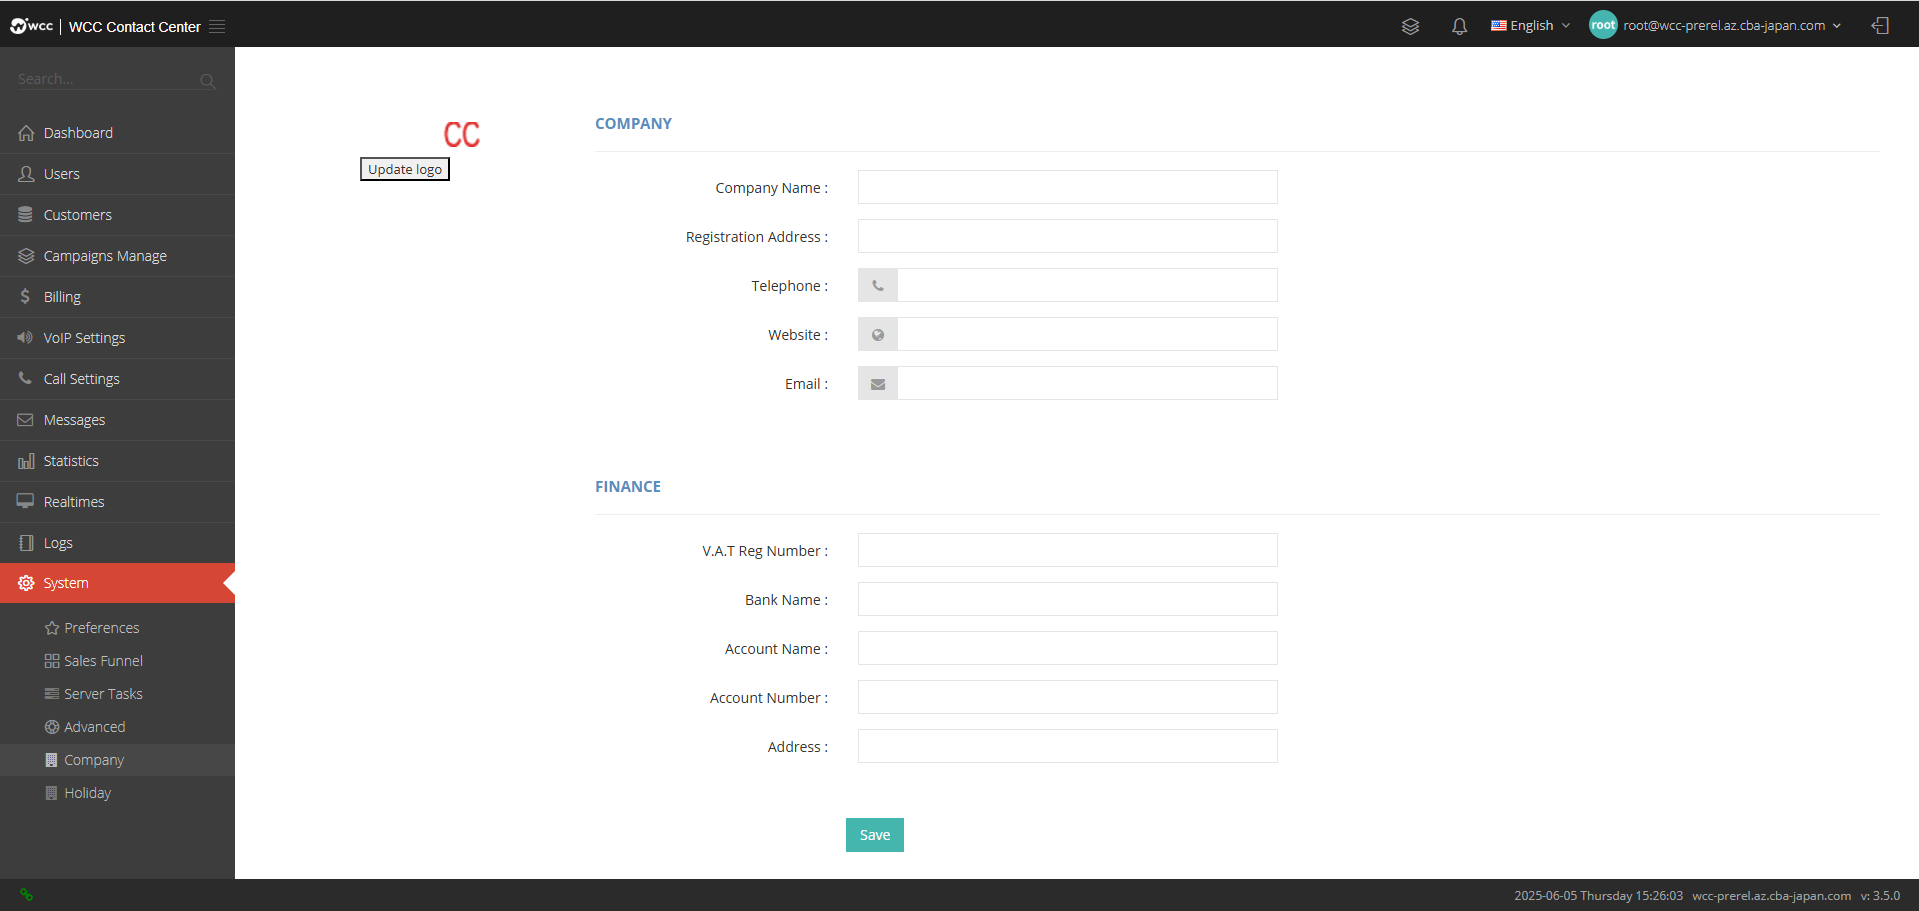
Company Information:
On this page, you can view and edit the system’s company information.
Holiday:
According to the customs and commemorative requirements of various countries and ethnic groups, the celebration and vacation rest time is uniformly designated.
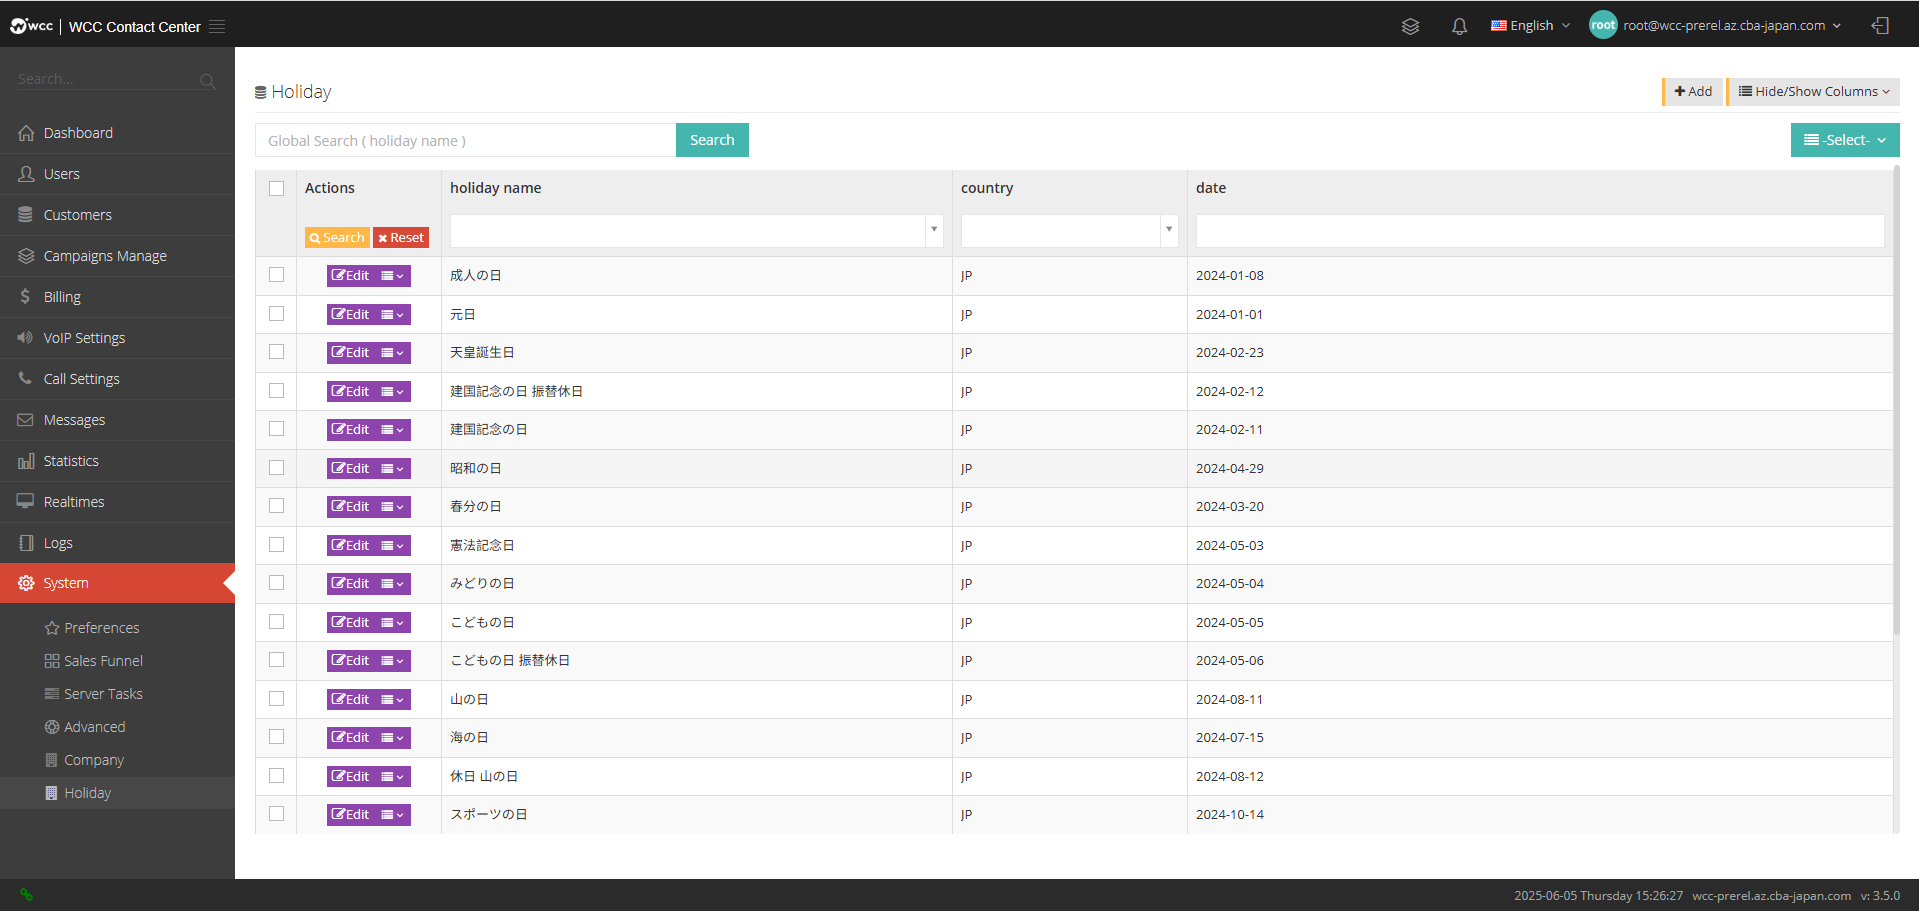
Click [Add] to enter [General] settings: (as shown below)
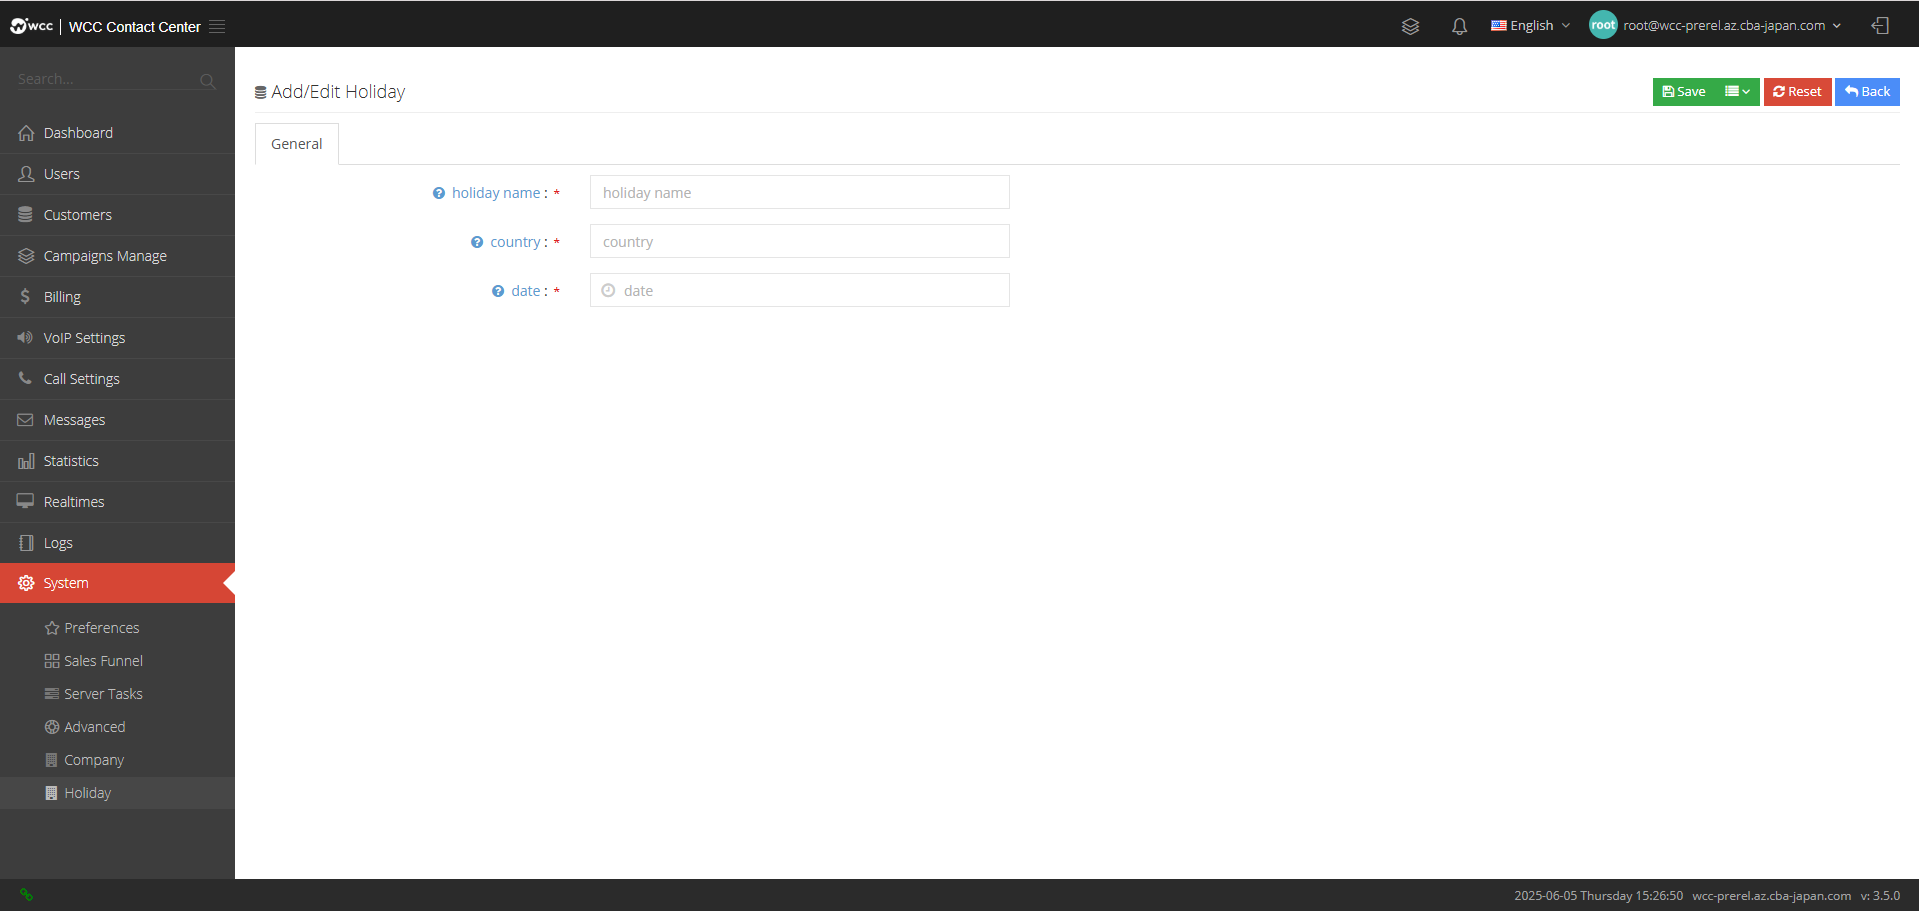
Holiday Name: Holiday Name.
Country: Country code (ISO 3166-1 2-digit code).
Date: Date.
Status bar
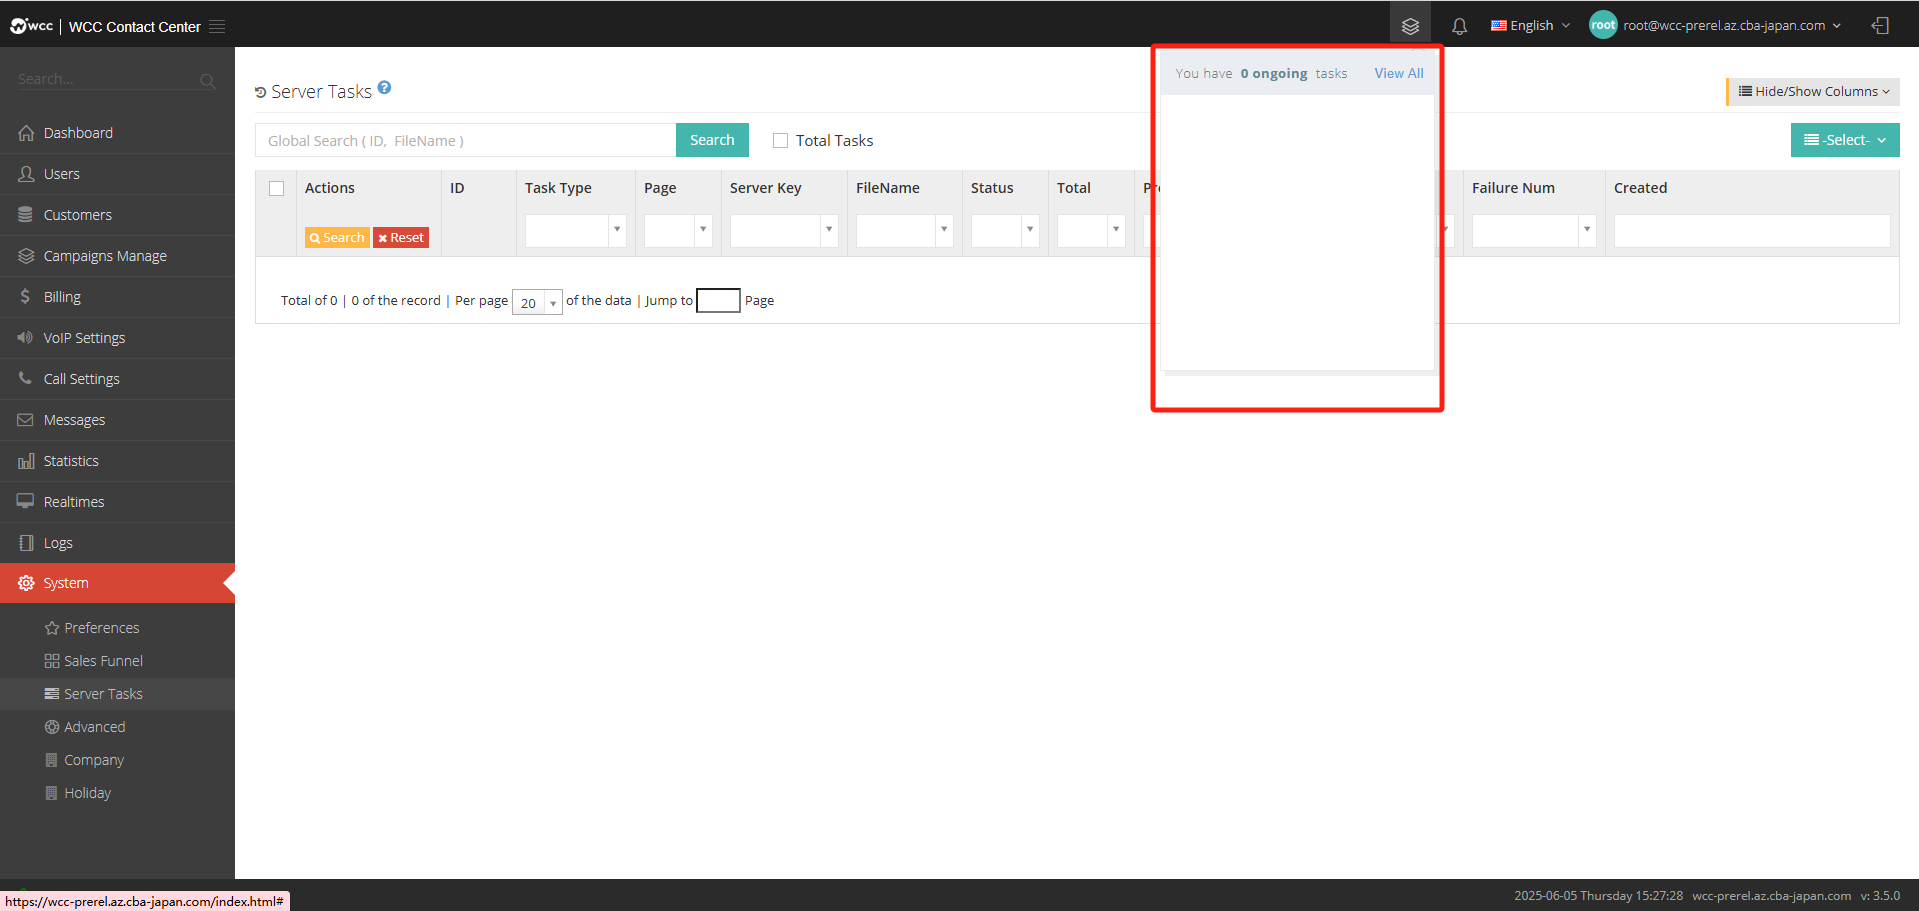
Server tasks: You can view tasks in progress in the background here, as shown in the figure: If there are no tasks in progress, they will appear as zero.
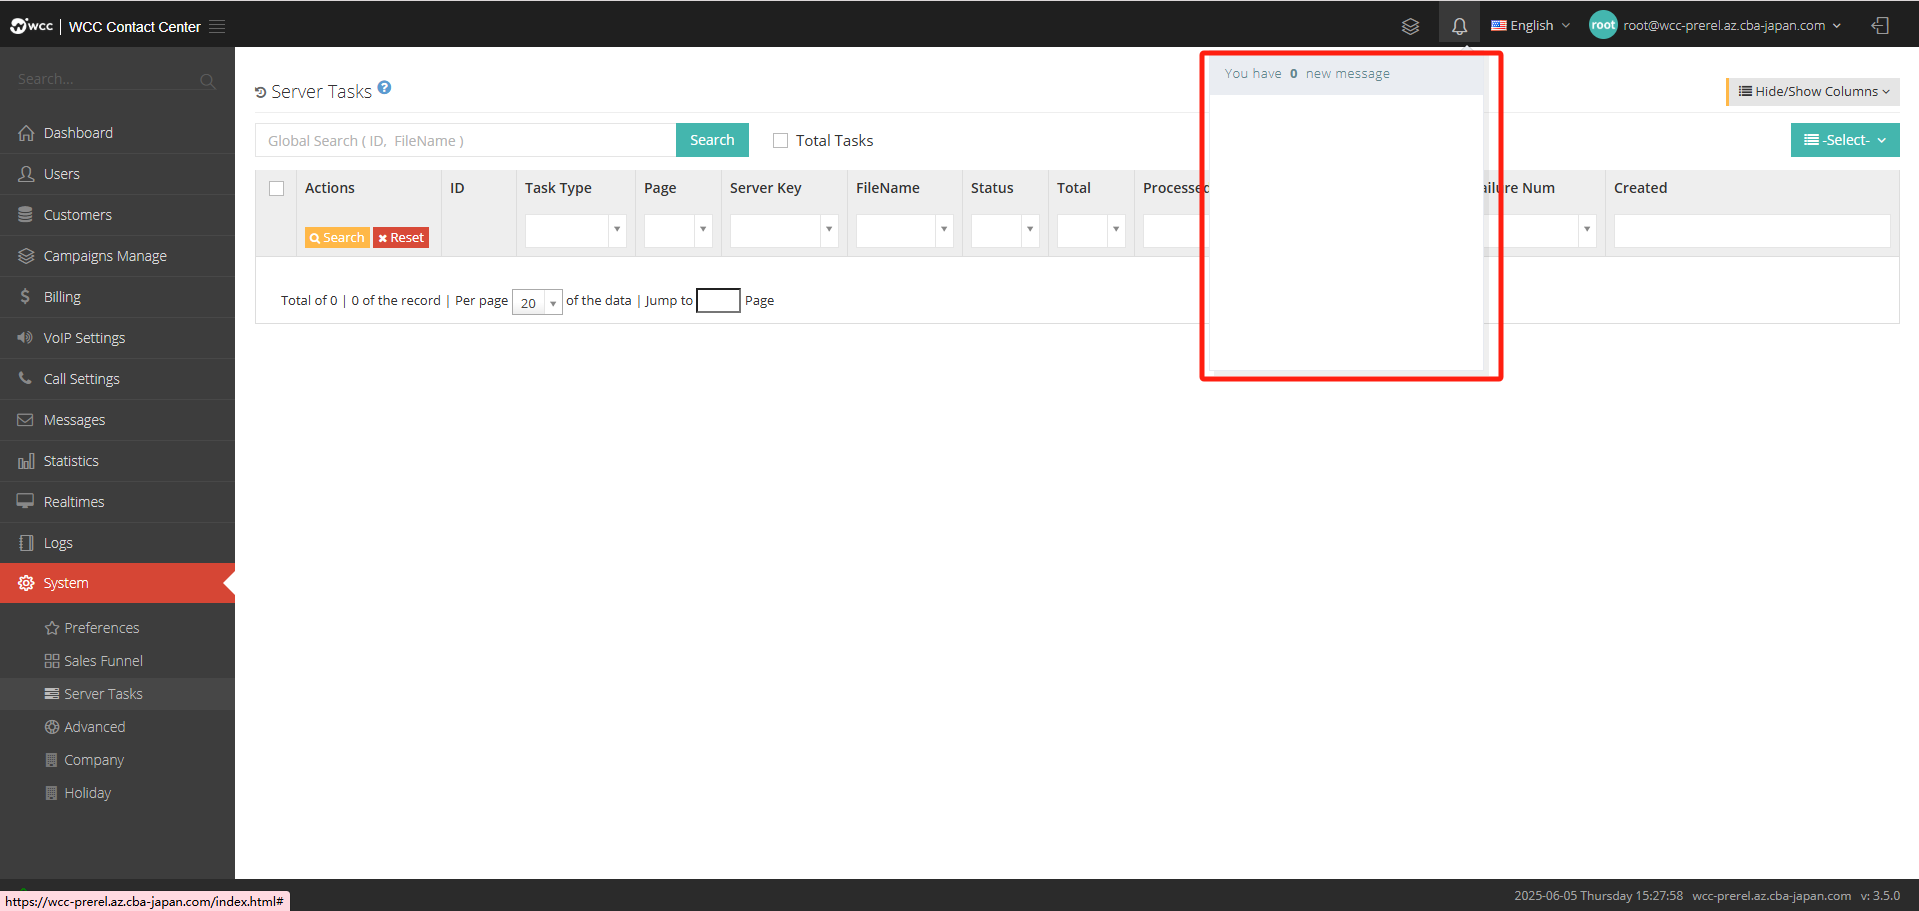
Notify: Some new messages will be displayed (as shown below).
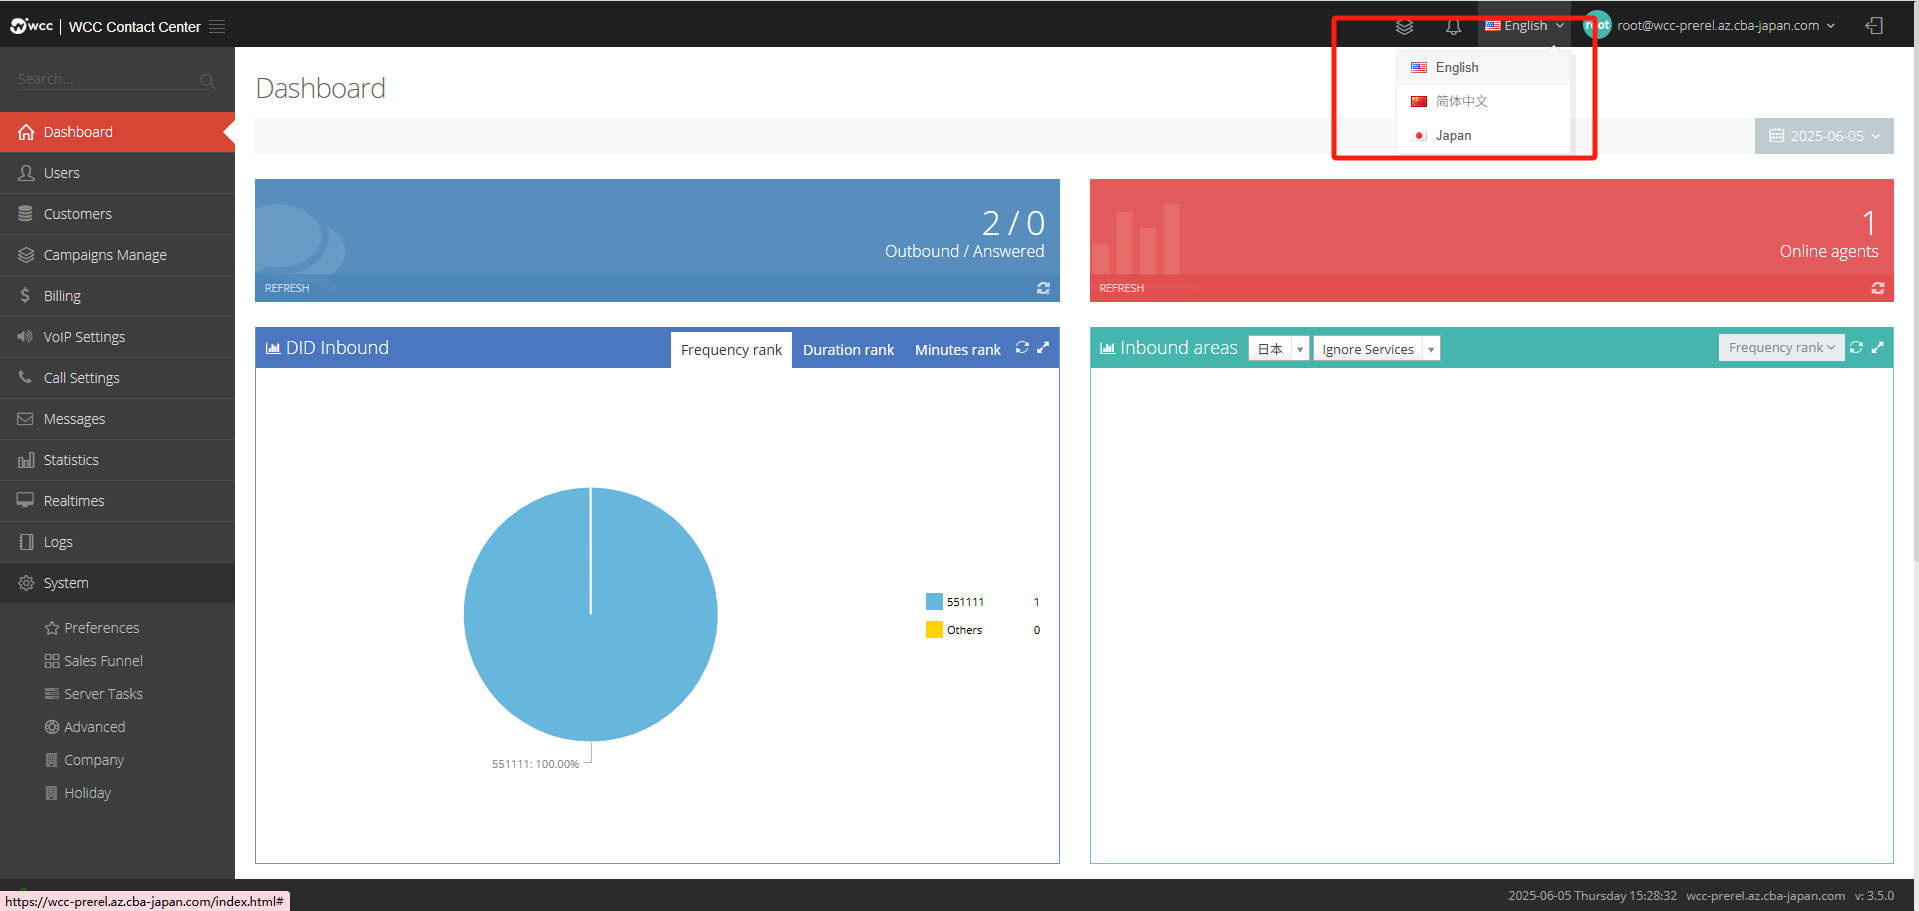
Language: Root users can select the common language type from this drop-down menu (as shown below)
My profile
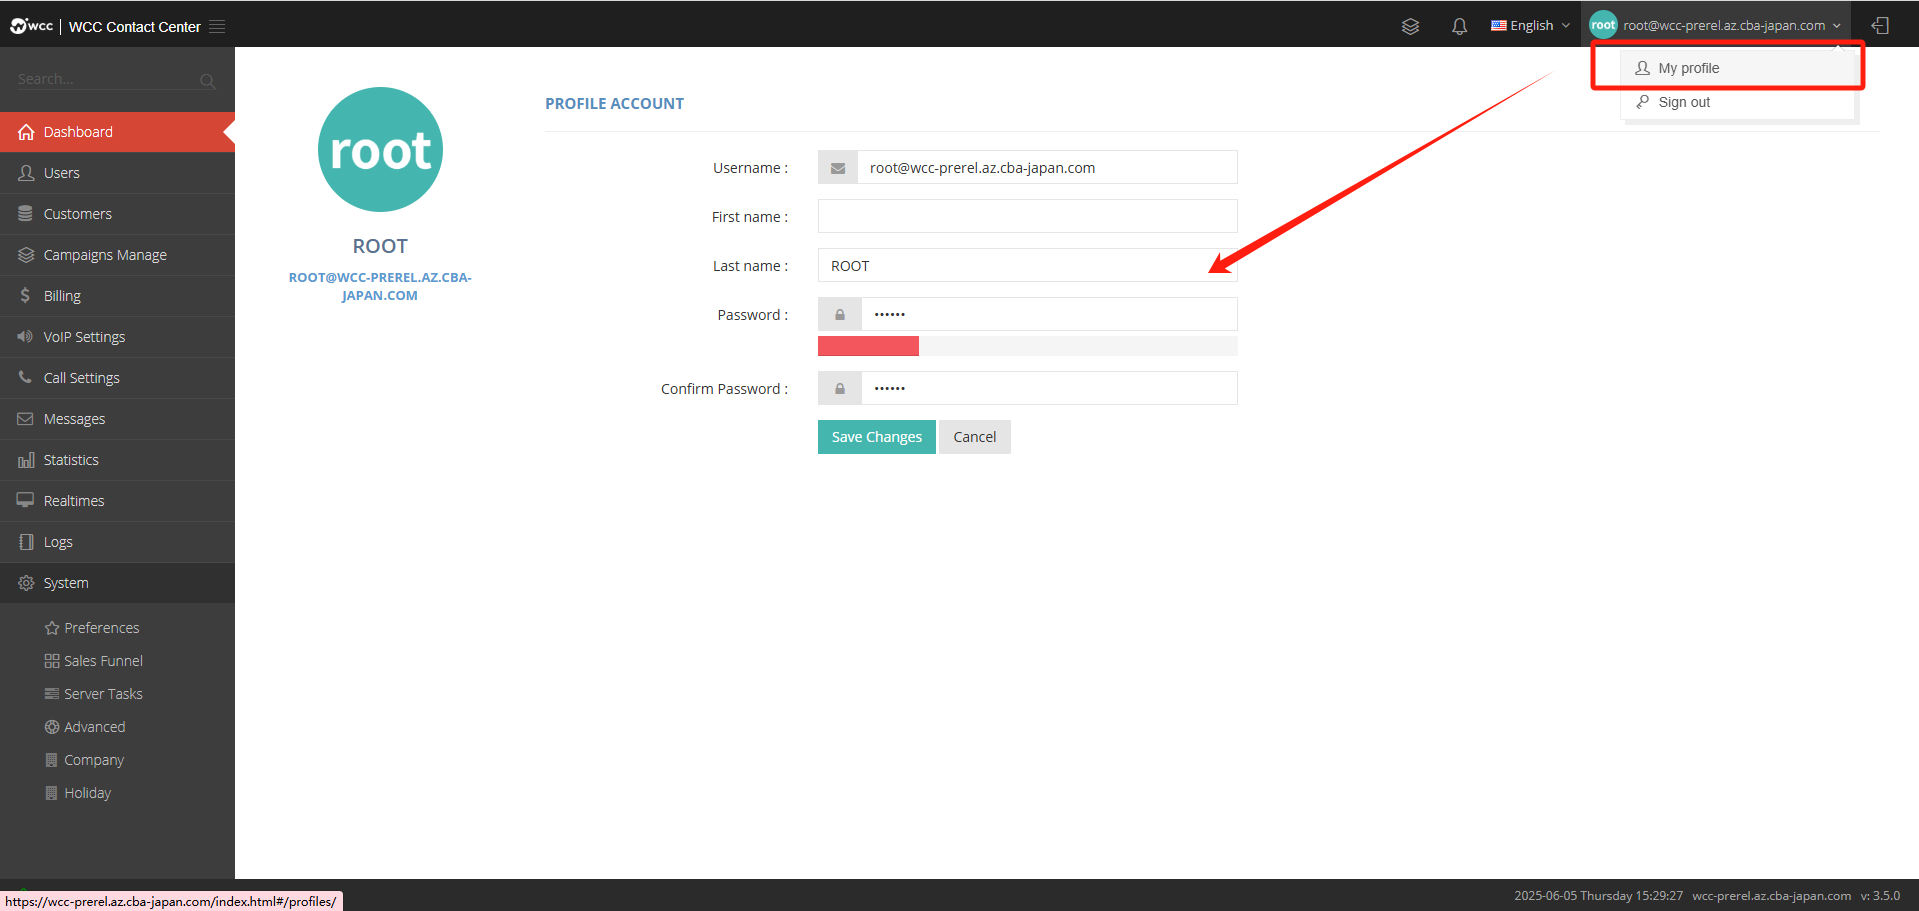
Includes “My profile” and “Logout”
[My Profile] Allows editing of root user profile
[Login]Login Exit the current login page